I've finally started piecing together some of my Tyranid models. My main focus is on my Hive Tyrant, but I'm also working on a Genestealer and a scratchbuilt spore mine.
The Hive Tyrant is a very cool kit. I have the upper body together, and it required a minimum of Liquid Greenstuff to look good. I really only used it in the little seams between the back vents. That upper shell is FIVE parts! Two vent outers, two outer arm sections, and the center core section. The mold lines are nicely placed so they don't interfere with assembly and are easily reached with a file and blade to clean them up.
The tail section is ELEVEN parts. The waist ball joint, two tail halves, the tail end, tail stinger plate, two legs, and two toes per leg. The two tail sections went together nicely, with a minimum of seams and mold lines. Since I used the long, curved, "flying" tail, I needed a clamp to hold the midtail section to the elongated tail section. Thankfully, whoever designed the kit had the forethought to place a couple of the spines on the seam line between the two sections, which helped immensely in lining up the sections for gluing. The assembled tail is now sitting on my desk with a bunch of Liquid Greenstuff along the joint lines. I'll file it smooth this evening, I hope.
I have to interject for a moment that my pot of Liquid Greenstuff is starting to dry out. I bought it the first weekend it was released, and haven't used it a ton. But, the center of the pot is becoming granular and semi-cured. I used to be able to use a nylon brush to pull a bit out and use it on a model, but now I have to get a flat toothpick or coffee stirrer and scoop the stuff out of the pot and put it on a piece of plastic. Then add water and it thins back out. Not sure I'll buy another pot when this one is gone. I've heard Privater Press or Vallejo makes an equivalent product in a dropper bottle. Might try that next. I've also heard that a slurry of Milliput also serves the same purpose and is easier to press into the seams. I used to use superglue or plastic glue drawn over the area, but those are messy and leave behind scars if you don't do it right.
As I waited for the tail to cure and set, I cleaned up the legs. The kit only allows you to use the standing legs with the standing tail, and the flying legs with the flying tail. You could do some joint pinning and sculpting to make the legs swappable, but the legs don't really look quite right on the wrong tail anyways. Because I chose the flying tail, I cleaned up the flying legs. Again, mold lines are minimal and the joint has a nice little nub in it to make it perfectly align on the tail. The tail section even has little sculpted in overlays for the joint that make the fit seamless and hide any lines.
Before I put the legs on though, I need some feedback. The flying legs are intended for use on a winged Tyrant. They have scything talons added to the end of the standard hoof-shaped foot. This makes it so a winged Tyrant is always WYSIWYG. The wings take up an arm socket, so no matter what secondary arm set you use, you always have at least one set of scything talons on the model. Because my model is not winged, and instead "leaping," I'm torn over the feet. I can either leave the feet as they are, or cut the talons off and go back to the hoof look.
This won't be a magnetized, optimized game model. It's intended as a fun, artsy project that I can enter into a painting competition (and maybe win). As a result, I'm arming him with two sets of scything talons, and posing him as if he's pouncing forward onto his prey. Picture a velociraptor, or any Wolverine attack pose, or the world's biggest Hormagaunt. Because he's ground-based, I'm thinking the foot talons need to go. He'd never be able to walk around with them, so I should remove them, right? Should I remove them, I'll likely sculpt something on the underside of the hooves. Maybe cut a little bit of thin plasticard and mimic the galaxy's weirdest horse hoof?
The Genestealer I'm working on hasn't made much in the way of progress since I pulled him off the sprue. I'm agonizing over two things: what to do with his slotta base, and if I should leap into the sculpted conversion arena right off the bat.
I have never used a slotta base in my life. On all my Marines, I've snipped off the slotta tab, flied the feet flat, and treated them like non-slotta models. I even did that to my metal models. I do this because I create my bases separately from the model. Gluing a model to a base feels like a major pain when attempting to add sand, paint, flock, etc. Marines have big, fat, chunky feet and legs. Tyranids have thin, whippy feet and legs. I think I can drill a small hole into the Genestealer's foot and lower leg to insert a pin by which to hold him during painting, but am not sure.
I have grand plans for my Genestealers as well, as I intend to hive them all tentacle faces. I've seen a bunch of examples of this done online, and really like the idea. My plan is to cut the lower jaw off of the head, sculpt the tentacles, and attach them to the upper jaw, using more GS to blend the transition so it looks natural. Essentially, they'll all look like Ymgarls from the codex art.
The question is whether I'm biting off more than I can chew. Should I start with a basic set of Stealers to start, just to get the hang of painting, or skip that and go straight to end product? My gut says start with the tentacles, as I have plenty of marine models to build and paint while waiting for tentacles to cure and glue to set.
How do you start off an unfamiliar project? Go for the desired result, or start with small test subjects first?
My spore mine is pretty rough at the moment. All I've done so far is cut a length of sprue, and chop the front off of three Gaunt spinefists. I then glued the spinefist parts to the sprue in a two-horizontal, one-vertical setup. I need to measure how tall I want the mine to be, and then insert a length of wire in the underside of the mine "head" area. I'll use GS to fill in the areas between the spinefists, making the gas sac part of the mine. Add some tentacles and a base, and done. Not at all time efficient, but it allows me to use up some junk bits and make nonstandard models.
I'll get some photos of all this work taken tonight, I hope. I've also got my first Sternguard model about 95% done as well, so you'll see him as well.
2.21.2013
Pictures of My Experiments
Here are some quick, dirty shots of the experiments I've been working on with my Carnifex plates.
This is the first thing I tried, on a plain carapace:
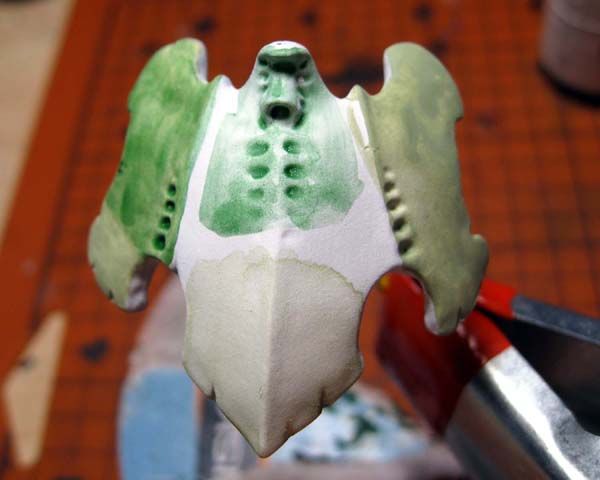
I tried five different things on this piece:
Right side is two thinned coats of RMS Pale Olive applied with my standard size 0 brush. I'm not a fan of this one, as applying it with the small brush seems to both take forever and cover poorly. You don't do big, flat areas with a tiny brush.
Top center is a straight wash of Thraka Green over the white primer. I wanted to see what it looked like. Meh.
Bottom center is a super thinned coat of Pale Olive applied with a size 2 brush. I actually liked the effect here, but don't feel it's sustainable or visually interesting. It looks a lot like watercolor.
Left bottom is another double coat of Pale Olive, again applied with the size 0 brush. I then put the Thraka Green wash over top of it on the left top. Looks like crap.
Next up:
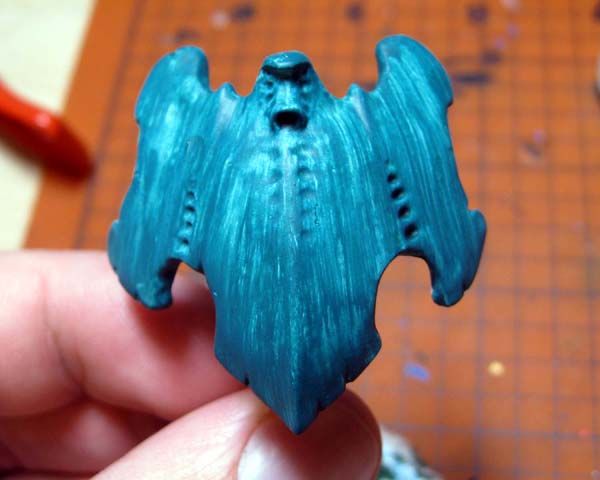
This is another smooth carapace that I painted with RMS Forest Green. I tried not thinning the paint a all, and simply applied it with a moistened (not soaked) size 2 brush. I put a quick coat on that covered poorly, and then picked up my desk a little. I went back to the carapace about 5 minutes later and tried another coat. The brush pulled off some of the prior coat and pushed it around. I used that and started pulling the paint in streaks back to the bottom points.
It's a neat effect, but it's not a skilled application of paint. I could probably use it as a base for something, but I think it would just end up looking a mess when I was done.
Finally:
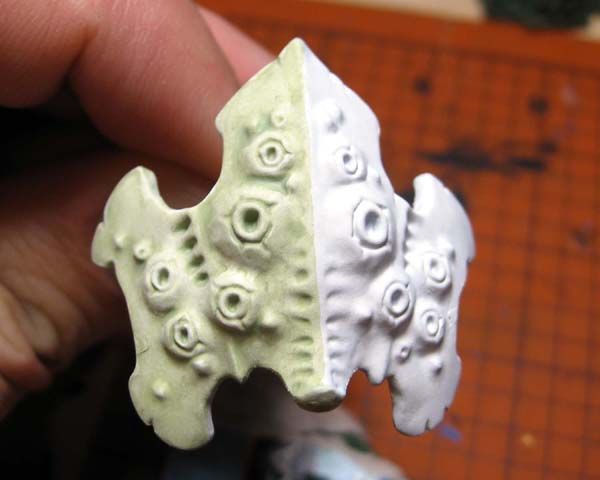
This is a slightly thinned wash of Pale Olive applied with the size 2 brush on the spore cyst carapace. I actually like this effect quite a lot. It's got nice contrast, and the pale effect I was going for. The problem again is that it just looks like watercolor, not a skilled application of paint.
I sat and thought about these samples as I tried to drum up an 1850 Nid list for the third annual Standish Standoff in November (which is hard to do).
I think the problem I'm running into is that I'm trying to achieve too much with a single color of paint and washes. Looking back at some of the Tyranid armies I've admired online, the painters don't go straight from their primer to their base color/shading. They apply a SOLID coat of the core color, then wash down, highlight back up. I was using the white primer as a shortcut to get the palest color I could, instead of mixing proper shades. The Cult of White Primer is a whole new religion for me after six years of being a Black Primer Cultist.
I also think I'm starting with the wrong bits to practice on. Big, flat plates are simple work, and don't lend themselves to any real technique. I have some thing I will ultimately try out on them, but right now I should be working on the non-plated parts of Tyranids. I think the trap I fell into was attempting to get that mottled crab look on every piece of a model. It's just not going to work for two reasons: it doesn't carry well to a painted medium, and Nids are not crabs and they do not share a complete anatomy.
If every single part of a Tyranid was plated like a crab, I could see the blends and mottling working. I could simply mimic the blends on the appropriate body parts and be done. However, Nids have some very non-crustacean features, especially their limbs. This means I have to think up a more organic paint job for them. Attempting to smoothly blend each segment of a bio weapon or scything talon would look crappy, and make me insane.
I need to refine my color scheme to something more traditionally Tyranid. I need a single palette for the body sections, another for armor plates, and a third for all the little detail parts like the exposed musculature you see on a lot of parts. There's a batch of new paint colors on its way to me from Reaper right now. I put the order in the other day. Once that arrives and I test out the new colors, I can decide on my final color palettes. Until then, I will have to get out some of the many spare arms and bio weapons I have in my new bits collection and start priming a few. I'm considering switching to a spray can primer, as I simply do not have the time to sit down and airbrush prime so many Nid parts. I'm commuting or at work from 7am to 5:30pm every day, and the boy is in bed by 6:30. No time to spray on a weeknight, ever.
Any tips, suggestions, or feedback on the above samples or my musings today?
This is the first thing I tried, on a plain carapace:
I tried five different things on this piece:
Right side is two thinned coats of RMS Pale Olive applied with my standard size 0 brush. I'm not a fan of this one, as applying it with the small brush seems to both take forever and cover poorly. You don't do big, flat areas with a tiny brush.
Top center is a straight wash of Thraka Green over the white primer. I wanted to see what it looked like. Meh.
Bottom center is a super thinned coat of Pale Olive applied with a size 2 brush. I actually liked the effect here, but don't feel it's sustainable or visually interesting. It looks a lot like watercolor.
Left bottom is another double coat of Pale Olive, again applied with the size 0 brush. I then put the Thraka Green wash over top of it on the left top. Looks like crap.
Next up:
This is another smooth carapace that I painted with RMS Forest Green. I tried not thinning the paint a all, and simply applied it with a moistened (not soaked) size 2 brush. I put a quick coat on that covered poorly, and then picked up my desk a little. I went back to the carapace about 5 minutes later and tried another coat. The brush pulled off some of the prior coat and pushed it around. I used that and started pulling the paint in streaks back to the bottom points.
It's a neat effect, but it's not a skilled application of paint. I could probably use it as a base for something, but I think it would just end up looking a mess when I was done.
Finally:
This is a slightly thinned wash of Pale Olive applied with the size 2 brush on the spore cyst carapace. I actually like this effect quite a lot. It's got nice contrast, and the pale effect I was going for. The problem again is that it just looks like watercolor, not a skilled application of paint.
I sat and thought about these samples as I tried to drum up an 1850 Nid list for the third annual Standish Standoff in November (which is hard to do).
I think the problem I'm running into is that I'm trying to achieve too much with a single color of paint and washes. Looking back at some of the Tyranid armies I've admired online, the painters don't go straight from their primer to their base color/shading. They apply a SOLID coat of the core color, then wash down, highlight back up. I was using the white primer as a shortcut to get the palest color I could, instead of mixing proper shades. The Cult of White Primer is a whole new religion for me after six years of being a Black Primer Cultist.
I also think I'm starting with the wrong bits to practice on. Big, flat plates are simple work, and don't lend themselves to any real technique. I have some thing I will ultimately try out on them, but right now I should be working on the non-plated parts of Tyranids. I think the trap I fell into was attempting to get that mottled crab look on every piece of a model. It's just not going to work for two reasons: it doesn't carry well to a painted medium, and Nids are not crabs and they do not share a complete anatomy.
If every single part of a Tyranid was plated like a crab, I could see the blends and mottling working. I could simply mimic the blends on the appropriate body parts and be done. However, Nids have some very non-crustacean features, especially their limbs. This means I have to think up a more organic paint job for them. Attempting to smoothly blend each segment of a bio weapon or scything talon would look crappy, and make me insane.
I need to refine my color scheme to something more traditionally Tyranid. I need a single palette for the body sections, another for armor plates, and a third for all the little detail parts like the exposed musculature you see on a lot of parts. There's a batch of new paint colors on its way to me from Reaper right now. I put the order in the other day. Once that arrives and I test out the new colors, I can decide on my final color palettes. Until then, I will have to get out some of the many spare arms and bio weapons I have in my new bits collection and start priming a few. I'm considering switching to a spray can primer, as I simply do not have the time to sit down and airbrush prime so many Nid parts. I'm commuting or at work from 7am to 5:30pm every day, and the boy is in bed by 6:30. No time to spray on a weeknight, ever.
Any tips, suggestions, or feedback on the above samples or my musings today?
2.18.2013
This is going to be harder than I thought...
I sat down last night before the Bruins game and had a go at trying out some of the paints I have on the primed Carnifex carapaces I have. I had picked u p my new Hive Tyrant kit on Saturday after the FLGS' team tourney (which I won't bother to write about, let's just say my dice hate me right now for some reason).
I grabbed the only green I thought might even remotely resemble the color I wanted (an olive-like green), and got to work. I thinned some paint, and started applying it. I remember why I hate white primer...it's hard as hell to get an even coat of anything on it. I kept ending up with streaks where my last brush load ended, and trying to blend in the new brush load of paint to extend the painted area was scrubbing the paint down to the primer, leaving streaks. I put two coats of olive on a third of the carapace before I quit (the game was about to start anyways).
Methinks I need to get out the bottles of drying retarder that I have somewhere in my toolkit and mix it with some flow improver and try again. Straight paint and water doesn't seem like it's going to give me the quality I'm after.
During the game I opened my Hive Tyrant kit and started messing around with dry fits. I pulled the legs and tail sections off the sprues, and started posing a little. I discovered that the new Tyrant kit only allows you to create two poses: standing, or flying. I'd really wanted to use one of the flying legs and one of the standing legs in order to make the Tyrant look like he was climbing onto a rock or ruin/rubble. Unfortunately, you can't put the flying legs on the standing tail, and vice versa. I'm going to have to sit down with the kit again tonight and see if I can't do some cutting to repose the legs.
It's important to note that you COULD get the legs onto the other tail sections (flying leg to standing tail, etc) by carving away at the attachment nubs inside the leg joint, AND taking off some of the armor outside the hip area. I may end up doing that. If I screw up the trim/cut, I can always get a spare tail section from a bit seller. Seems the tail section is cheap because you get two in every box, but only one pelvis and torso.
I'm also trying to figure out the pose for the Tyrant's scything talons. I'm going for a double set. The kit comes with one set, and I have a couple spare sets from buying a bitz box on eBay. But, I'm not sure having two identical sets on him will be the best bet. Does anyone know how the scything talons in the Mawloc/Trygon box stack up next to the Tyrant talons in regards to size? The Mawloc box comes with four sets of talons in descending size. My thought is that a large set (from the Tyrant box) and a smaller set (from the Mawloc) will look more natural and less unwieldy than two large sets. But I need to know which ones to buy! Suggestions?
On Saturday I also took possession of the IA: Aeronautica book I ordered from Forge World as part of our group order. It's pretty cool. I probably won't run any of the flyers out of it anytime soon, but the anti-air units are nice. I am thinking of bringing a pair of Whirlwind Hyperios to our next monthly. Yes, they're AV11 vehicles that only fire a single shot per turn, but that shot is twin-linked at BS4, so has a reasonable chance of hitting. S8 isn't bad either against the lighter flyers. With the way terrain works at the shop (we use plenty of it), I'm thinking that I could obscure or hide one or both of the Hyperios (Hyperii?) until turn two, then roll them out and intercept. Really only works if I have first turn (turn one, hide. turn two, move to fire lane, intercept on opponent's turn two). If I have to go second, I hide turn one, move turn two, and just fire regularly instead of intercepting. We'll see.
The Hyperios Air Defense system is also neat. I have the two gun mounts from my Aegis Defense Line/Bastion, and enough removable Whirlwind turrets to fill them. Slap turret on mount and I have impromptu anti-air turrets that are perfectly WYSIWYG. They eat a Fast Attack slot though, and since they're automated artillery, I think I have to deploy them pretty close to one another. Still, some anti-air is better than no anti-air.
As for marine paint work, I finished my fifth attack bike on Friday night. I'll get some pictures up hopefully later this week, though I didn't do anything special with it, so it looks a lot like my other ones. I'm out of Marine bike riders, so I'm going to either switch to Scout Bikers or forge ahead with my 5-man Sternguard, since I have the heads about 40% done, and one body/bolter all mounted and ready for primer.
2.13.2013
Dark First, or Light First?
I've had my Carnifex carapace bitz primed for a while now, but am stuck on how to proceed. As mentioned in the past, I'm aiming for a European Green Crab style scheme. Like this:


Yes, those are slightly different colors, but the question remains the same regardless of color combo. Do you paint the dark first, or the light first?
The top crab goes from brown-green up to blue-green with yellow-green in there as well. I'm obviously going to have to dumb down the patterning, but I'm not sure if I should start with the blue-green and feather out to the brown-green, or start with brown-green and blend up to blue-green.
As you can see from my Marines, I'm a clean, smooth painter. I work with line highlights, layering, and freehand to make my stuff look nice-yet-plain. This mottled, mixed thing is completely alien to me. I'm just not sure where to begin!
I can probably just start slapping paint on my test pieces, since that's what they're for, but I'd prefer to set myself up for success with good advice.
Anyone have any?
Or this:

Yes, those are slightly different colors, but the question remains the same regardless of color combo. Do you paint the dark first, or the light first?
The top crab goes from brown-green up to blue-green with yellow-green in there as well. I'm obviously going to have to dumb down the patterning, but I'm not sure if I should start with the blue-green and feather out to the brown-green, or start with brown-green and blend up to blue-green.
As you can see from my Marines, I'm a clean, smooth painter. I work with line highlights, layering, and freehand to make my stuff look nice-yet-plain. This mottled, mixed thing is completely alien to me. I'm just not sure where to begin!
I can probably just start slapping paint on my test pieces, since that's what they're for, but I'd prefer to set myself up for success with good advice.
Anyone have any?
2.05.2013
Carapaces Primed, Base Theme?
This weekend was a nice, three-day weekend for me. I took a day off of work on Monday for my birthday. Hooray, I'm old!
I managed to pick away at the attack bike I'm working on for a while over the weekend, and the bike itself is now done and sealed. I'll add some freehand icons to it later, when the Marines are done as well. I glued some small basing materials to the base (some skulls and rocks), and am at the blue highlight stage on the driver's backpack. The driver is primed and waiting til after the pack is done to start. I put a pin in the gunner's foot, and magnets in the guns. Everything is lined up to make sure I have the attack bike done for the FLGS's next tournament on the 16th...I hope.
Yesterday I managed to find an hour to airbrush prime the five Carnifex carapaces I have, in order to test some techniques and paint schemes. Airbrush priming white is far harder than black. Black is good to go in two coats. White took four or five.
I'm blaming that on two things: covering a darker color, and crappy pigmentation in the craft paint. I use Delta Ceramcoat for my black primer, but only one craft shop in the area carries the line anymore, so I settled for Apple Barrel at AC Moore instead of driving an extra 30 minutes. The Apple Barrel was not moving well through my airbrush. I couldn't seem to get a good thinning ratio. Eventually, I got all of the plates primed through sheer force of will and stubbornness. I just kept applying coat after coat of thin, splattery paint.
I need to either get some Delta, or experiment more with thinning the Apple Barrel stuff.
I'm planning to start with a Hive Tyrant, and will pick up the box as soon as I can get to the FLGS again. I might have to wait til the 16th.
The plan is to build him on foot, with all scything talons. I'd like to have him as dynamically posed as possible, but have to wait til I have the box in-hand, because I'm not familiar with how a Tyrant goes together. It might be a good idea for me to start fishing for spare Tyrant leg bits, just in case I screw up a reposing cut or something.
I'm also looking ahead to Genestealers. I know everyone thinks Genestealers are terrible in 6th, but I just really like the models and the aura of the unit. I'm trying to figure out two things: how to repose the legs to make them bounding or crouching, and how to build a Broodlord.
I'm trying to avoid having all of the models running forward, and instead want some leaping over rocks, skulking behind some cover, or coiling up for an attack. But the monopose legs of many of the smaller models makes that a challenge. Anyone ever reposed smaller Nid models?
The current Broodlord model is heinous. I don't want one of them in my collection, much less three or more. I have a copy of the newest Space Hulk edition, and the Broodlord model from that game. THAT is what a Broodlord should look like. I looked around, and the individual Broodlord model is upwards of $25 each. Ouch! Understandable considering its limited edition nature, but still, ouch.
So, I have to think of a way to make a new Broodlord, or three. Anyone ever made one that is larger and meaner than the regular Genestealers? I've seen the "conversions" online where folks just glue some spikes to the back of a regular Genestealer, and it doesn't do it justice.
Bases are also an important decision I need to make before I get too far into the project. My Marines are all on sandy bases painted and drybrushed various shades of brown. These days, I also try to scatter a small rock or some bitz and a tuft of static grass on the bases to break them up.
For Tyranids, a plain sanded base probably won't cut it, especially if I'm attempting to make them "high quality" models. I looked at cast resin bases from various manufacturers, but none really sparked my interest.
I'm thinking that small plants and tufts of field grass might be the best bet for the force. It'll add a small amount of color to the base, while not distracting from the models themselves. I've seen people use jungle grass and such for Nids in the past, but a lot of folks overdo it. The models end up obscured by the basing. As much as I'd love to do 3D bases, I also don't like seeing gaming models with integrated scenic bases, like standing ruins or columns. It's jarring on the table, and can cause minor in-game issues for line of sight and such. So, I'll likely create small custom plants from floral department items. You can do all sorts of neat things with floral wire and cut down cloth plants. I experimented with it briefly when working on terrain boards, but never got the practice off the ground. You can also get birch seed pods to use as leaf litter. A few leaves here and there should help add detail.
What should I use for ground cover, though? Sand and glue probably won't work, since I'm going for a loamy, forested approach. I've used Liquitex Texture Mediums in the past, namely Resin Sand. I used it as an additive to orange paint when making rusty pipes and tanks for a Mars pumping station board. It works nicely, and can easily be tinted with paint. The Resin Sand is a little too coarse for basing use. The particles are just too large. They do make a Natural Sand type, but I'm not sure how the texture would look in scale. I know GW makes those new texture paints for bases, but they're incredibly expensive for what they are, so those aren't an option.
Anyone have any suggestions?
Subscribe to:
Posts (Atom)