Showing posts with label Command Squads. Show all posts

1.08.2015

Flavius Felix, Command Squad Veteran

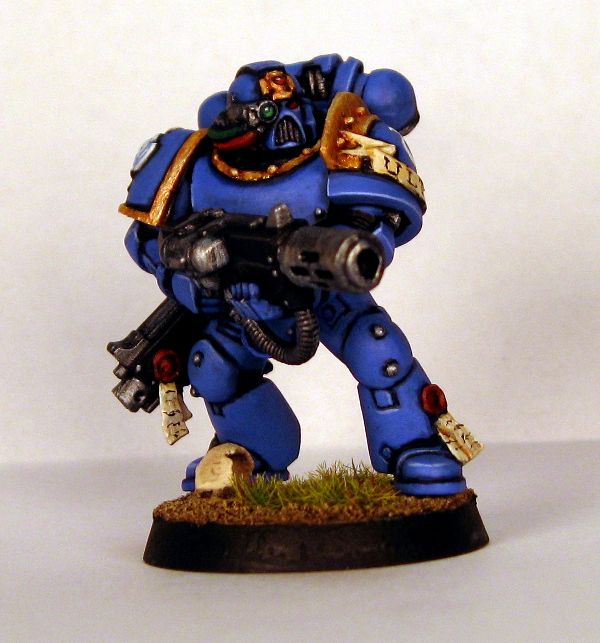
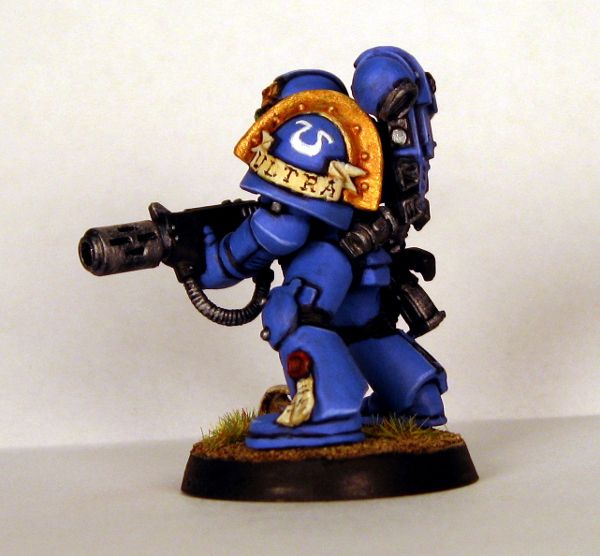
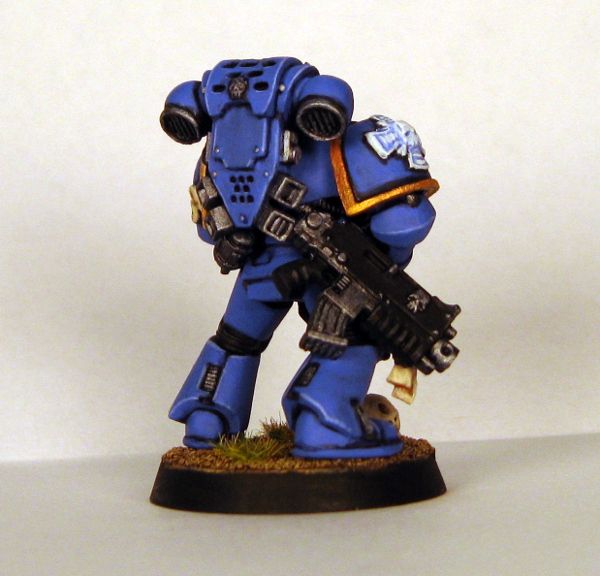
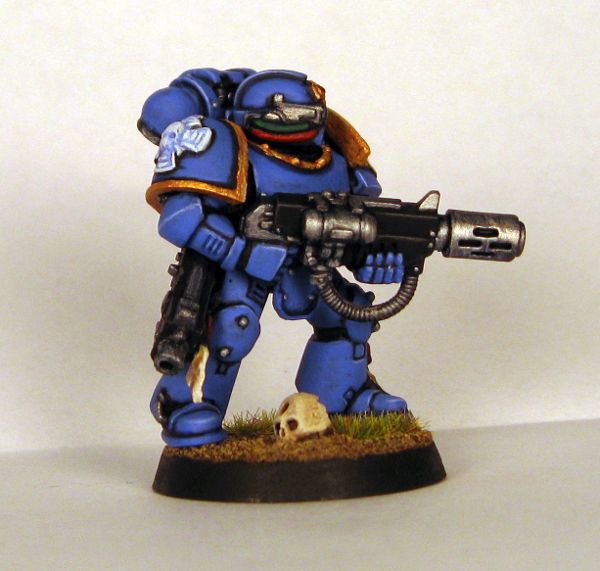
I am now the proud owner of a full Ultramarines Command Squad with Style! Here is Flavius Felix:


This is his general back story write up:
Veteran Brother Flavius Felix is the oldest member of the command squad, and is fiercely protective of Numerian Castor. He has taken more than one bullet for the Apothecary, and his extensive bionics are proof of that. Castor ensures the scarred old veteran receives the best augmetics the Chapter's Apothecarion has to offer.

Overall, I'm happy with how he turned out. I did add some static grass to his base shortly after taking the pictures to break up the brown and match the rest of the squad. Speaking of the squad...


In all their glory. It feels really good to finish such a long project like this. I know normal humans would probably have finished these guys in a week or two, but it took me six months.

Now that they are done, I can dedicate more time to completing my Vindicator. I really want to have it complete for this month's 1500 point tournament at the FLGS. I haven't run a Vindicator since the dawn of 5th Edition, when I had a second hand, metal version that I used to run unpainted and half-salvaged.

12.09.2014

Look at me, I'm bionic!

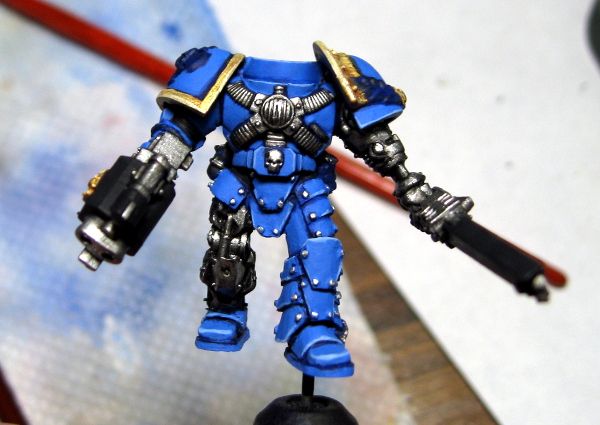
The painting bug continues gnawing on my brain, so I've been painting and painting these last several days. The result is some very solid progress on the final member of the Command Squad, the bionic bodyguard.

Here's where he's at right now:


The head is pretty much done, though I'm not so sure about that bionic eye. It's miniscule on the model, so I'm not sure there's much else I can do with it. I'm not sure if I should dot his other eye or not. I really should, but I fear I'll screw up the whole eye if I do. At arm's distance it looks ok, but in pictures the missing pupil is pretty glaring.

As for his body, he's got a Mk5 torso, bionic chainsword arm from the Commander kit, a stormbolter and arm from the Sternguard kit, one pad from the Command Squad box, and one from Sternguard, and those bionic legs. They're from Kromlech. I'll do a review of them in the future.

His pose is a little off. I'd intended it to be a walking forward type of pose with him having his arms out in a "give me your best shot!" gesture. I think I missed on it a little, and I think the reason is because I didn't roll his shoulders back. Instead of him having his shoulders back, baring his chest to the enemy, he's just walking forward with his weapons lowered. I really wish Marine torsos had ball joints on the shoulders.

I also applied a shading wash to my Vindicator but haven't cleaned it up yet. I've got the stormbolter hatch to add to it, which has been assembled and primed as long as the tank itself, I've just not touched it with paint. I also added a Razorback turret with heavy bolters to the painting queue, for use by the Command Squad and whomever they ride with.


12.01.2014

Thrax Gaios, Command Squad Veteran

I've been on a bit of a painting tear over the holiday weekend. I managed to get time in on just about every day in the four-day weekend. As a result, I finished off the tank hunting veteran for my Command Squad, put a ton of paint on my Vindicator, and started working on the final member of the Command Squad.

Here is Thrax Gaios' back story:

Veteran Brother Thrax Gaios is the squad's demolitions expert. He carries a meltagun, his bolter, and a satchel of meltabombs and grenades. He can toss a krak grenade into the vision slit of a moving tank at a hundred meters. Where the other squad members wear armor featuring ornate designs and decoration to reflect their veteran status and membership in the Command Squad, Gaios wears bulky, reinforced armor with little adornment. Because his armor is so often dented and scraped when he stands in the blast wash of exploding enemy tanks and fortifications, he has opted to forego ostentation in favor of smooth lines and heavy plating.

And here are the pictures:


As you can see, he's pretty plain. I could probably drop him into a tactical squad and he'd blend right in. I had originally planned to put a brass etch aquila on his chest, but the damned things never lay flat and gluing them down is a major pain in the ass, as you either end up gluing it to your fingers or tools, or with a spread of lumpy superglue residue around the area. I tried briefly to add one freehand, but it looked terrible and I scrubbed it off. His Ultramarine symbol is also a tad crooked, though it doesn't look quite as severe in person. I might have to go back and redo that, if it starts to irk me.

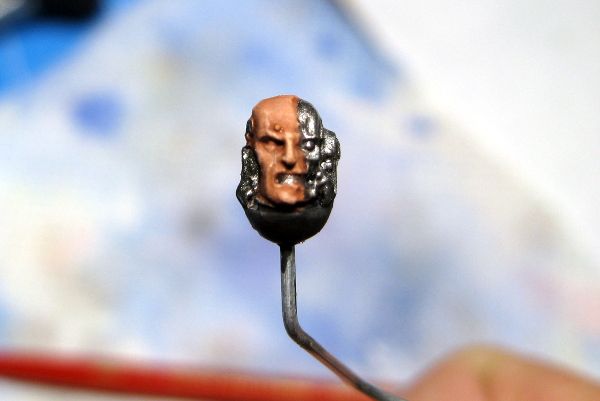
Now that he's done, I've only got one squad member left. The Apothecary's bodyguard. He's largely bionic, so I used as many bionic bits as I could on the model. I forgot to take a picture of his body, but here is his head so far:


Pretty simple bionic head. The skin is done, but the metallics are not. The rest of him is made from GW parts with Kromlech legs. I'll get a shot up in the coming days.

While waiting for Dullcote to dry, I also started plugging along on my Vindicator. Here's a quick, largely uninteresting shot:


As of this morning, the blue is about 90% done. I decided to try a different technique for painting vehicles. Instead of painstakingly applying each layer, leaving careful shade lines as I go, I decided to paint each layer quickly and thoroughly, and then apply the shading with a wash of my darkest color. If it turns out right, it'll save me a TON of time when painting tanks and pods.

There is a bit of bad news to go along with all my painting progress. Yesterday afternoon, while scrubbing mold release off my Forgeworld Raven Guard Captain Korvydae model parts, I dropped one of the fuel lines for his jump pack down the sink drain. I soak my FW resin parts in Simple Green, which is a great degreaser and perfect for cleaning resin. Unfortunately, the dissolved mold release makes the parts VERY slippery. I thought to myself "I should probably close the drain plug for this." I decided that I was almost done, so didn't bother. Fate punished me by sending that little pipe part squirting out of my fingers and right down the drain. ARGH! If anyone knows where I can get another fuel line for that kit without buying the whole thing over again, or has an example of rebuilding the line from other parts, I'd appreciate it!

In general gaming news, it looks like GW is revamping the base sizes for models. 32mm bases are up for preorders, with all of the new Blood Angel reboxings and kits having new sizes. I do like the idea of added space for posing Marines, but not the idea of buying scads of new bases at fifty cents a pop. I'm not hurting for hobby funds, I just hate spending money on simple pieces. I'll wait to see what the reasoning behind the bases is before jumping in. The timing is fortunate for me though, as I'm just about to start assembling and posing Raven Guard models. Id 32mm is standard for Marine infantry, that gives my Scouts, Assault Marines, and Jump HQs a lot of space to work with. One of the basing ideas I had for them was a desert city ruin with small tumbles of bricks and broken walls, but that is largely lost on 25mm bases. 32mm would give me room to stack bricks, sculpt pavers, and add little windswept sand piles to the debris. I'd wanted to jump right in to the RG models, but new bases put a little delay in the process. I have plenty of Ultramarine tanks to paint while waiting though.

11.17.2014

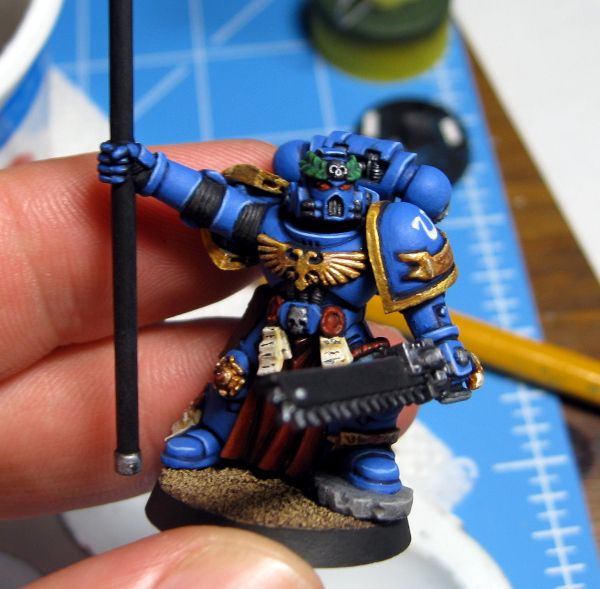
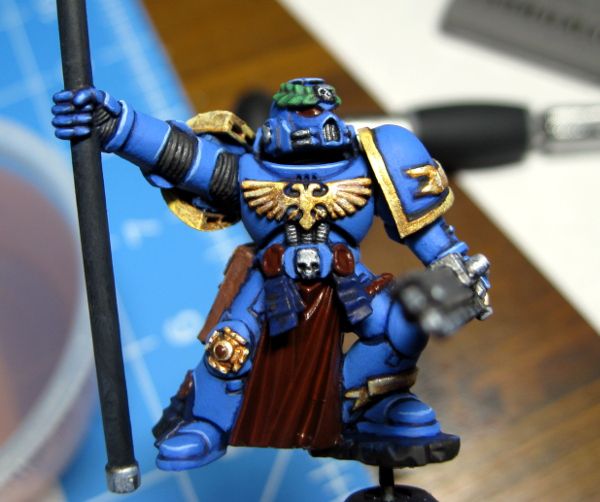
Marius Gracchus, Standard Bearer

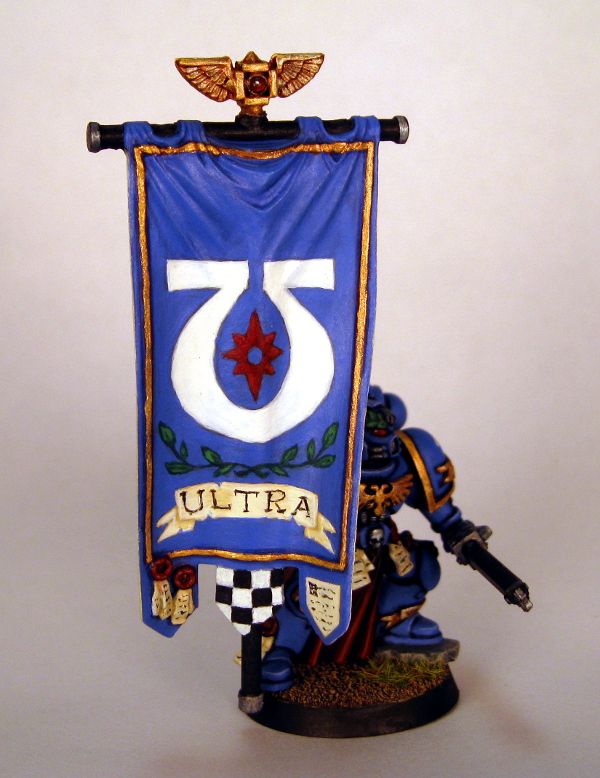
The third member of my Ultramarine Command Squad is now complete. Yes, I've finally finished off the Standard Bearer, Marius Gracchus:


Here's his backstory:
Standard Bearer Marius Gracchus, "The Youngling." Marius is one of the youngest Marines ever selected to bear a company standard. His youthful features and penchant for humor hide a warrior who is capable with a chainblade and a masterful shot with a pistol.

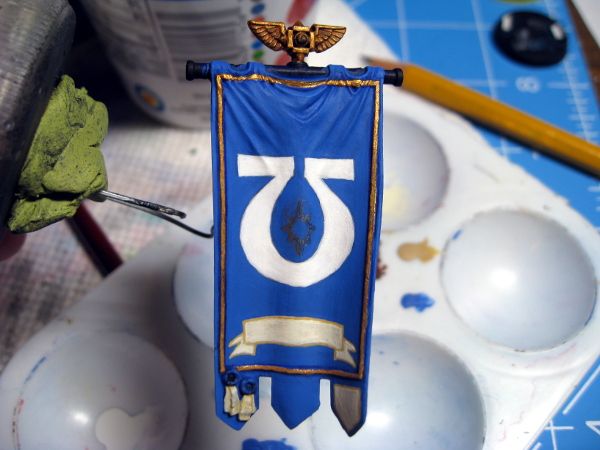
Overall I'm pretty happy with how he turned out. The only disappointment is with the banner pole and the back of the banner itself. I had drilled a paperclip into the mounting point of the pole so I could hold the banner during painting. It worked, but when I was removing it last night, I tried to file away the excess paint. That went ok, but when I finished, I blew on the area to get rid of the little grains of paint and plastic. My hand took that moment to lose strength (hooray for carpal tunnel syndrome) and I dropped the banner on the floor. The top ornament broke off, and the paint was a little scuffed near the folds of the cloth. Then, when I was trying to apply liquid plastic cement to the area and affix it to the pole, I dropped it again with glue in the channel. That picked up some dust, so I had to fiddle with it again. The cement refused to hold, so I had to settle for super glue. After I got a scare when a drop of superglue rolled out of the tube and just missed the edge of the banner (landing instead on my pant leg), I got it held in place and decided to take the rest of the night off. I know by now that when my hands get weak like that, I need to stop.

Now that Marius is complete, I can turn my attention to the Demolitionist/Tank Hunter I'd shown earlier. I've only got a quick coat of blue on him right now, so nothing special to share in that regard. He'll be a pretty simple job once I'm not bouncing back and forth between the banner and the Tank Hunter, and picking away at my Vindicator (remember that project?). I realized just a moment ago that I've been screwing around with this Command Squad since April or thereabouts. Seven months for three models thus far, with a little work on a drop pod and a Vindicator snuck in there. Yikes.

Once I get beyond these Ultramarines, I can start thinking harder about my Raven Guard. I'm still hemming and hawing over what wargear to give the Captain, or whether I want a Captain at all. Maybe a Telepathy Librarian would be more interesting. Then there are Scouts, Vanguard Vets, and Assault Marines to think about. I'm burying myself under a mountain of planning again. Add onto that the thought that maybe the Command Squad would like to have a new HQ model to lead them, and I'm swamped with ideas, but not with spare time.

I bit the bullet and ordered three new brushes, Raphael 8404s. Two size 0s and a size 2. I previously used inexpensive Loew Cornell red sable brushes from AC Moore. They were about $4 each, and held up pretty well. But neither AC Moore nor Michael's carries the line anymore. They seem to have shifted heavily towards synthetic brushes, which I just can't use anymore. With my old brush line extinct, and being on my last brush of the type, I had to get new ones. I bought them via Amazon, directly from the distributor. Delivery estimate is 4-6 weeks. OUCH. Thankfully, my last remaining brush should hold up that long. I'm hoping these new brushes are worth the money.


10.31.2014

More Progress on the Banner

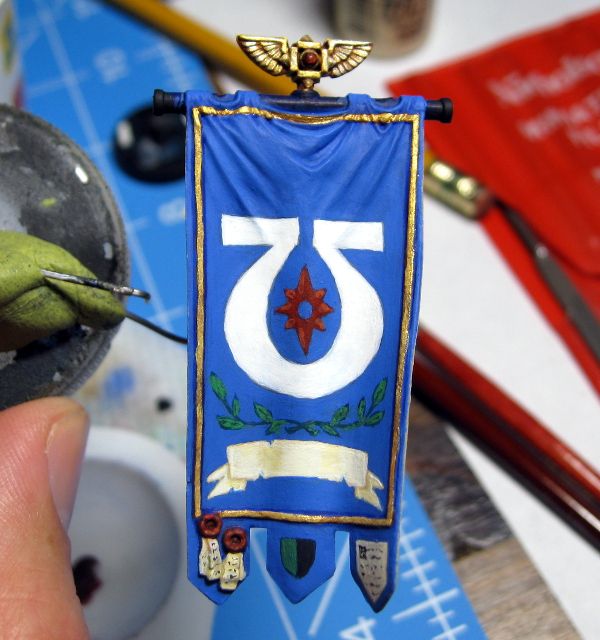
I put some more time into the banner for my Command Squad. This is what it looks like now:

I added some shading to the scroll, and knocked off all of the dark edge lines I'd had on it before. I then added the red starburst, and some small highlights on each point. However, I need to go back and clean those lighter areas up some. Some are a little blobby. I added black line text to the purity seals and the bottom right design, and put a campaign badge on the bottom center...thing. I'm not a huge fan of the badge though, and it may end up being removed. It's off center and pretty plain.
I also added the ivy/laurel branches. I started by sketching the branches out with a sharp pencil, then went over them with dark green. After that was dry, I added the leaves in the same dark green, let them dry, and then applied a thin lighter green on top. Unfortunately, by that point I was getting a little tired and slipped in some places and was messy in others. I added small lines of dark green to the leaf centers and called it a night. I need to go back and tidy up the leaves.

Once the leaves are done and I've decided on what to do with the center bottom design (it's bugging me that I don't know the term for those little things on the bottom of the standard, I'll have to Google after this), I'll finish the back in an ivory or linen color. I think it'll look nice that way and break up the sea of blue. I'm about halfway done that process, but it's pretty boring so I didn't take a picture.

I'll be happy to have this model finished, but I do have to say that I really enjoy painting the freehand on the banner. I've always been a glutton for punishment.

As soon as this is done, I can move on to the tank hunter veteran. He'll be an easy one, and then I'll get my bionic veteran up and going. Again, an easier paint job (aside from his head/face) but I'll also have a review of the Kromlech legs I ended up buying for him.

10.17.2014

Nearly Done: Standard Bearer

Here is some more progress on my Standard Bearer.


The Marine himself is pretty much done, with only some static grass needed around the edges of the rock he's standing upon. That rock was actually a major pain in the ass to base around. Normally, I put small strips of plasticard under my Marines' feet. This raises them up a tiny bit so they don't appear to be sinking into the ground. It also allows me to put sand all the way under their feet, so I don't end up with gaps around the feet when I glue the model to the base. The problem with the rock was that I wanted it to look like it was sticking up out of the sand, not sitting on top of it. I skipped putting card under it, while still putting card under the other foot. I'd hoped it would allow the rock to be sunk down while the other foot was not. All I ended up with were the gaps. It's simple enough to obscure them with static grass, but I need to be careful not to apply too much and make it look like a fuzzy ring around the rock.

Here is the current state of the banner itself:


It's pretty plain. Originally, I'd had grand plans for it, with a huge laurel wreath surrounding an Imperial aquila clutching the Ultramarines symbol in its talons, with the scroll at the bottom. I sketched it out on paper and searched Google for art I could use as a model to construct the whole thing. I was then going to print it out to scale and use the pencil-rub/carbon paper technique to transfer it to the banner. Then it would be a simple matter of painting it. Problem is, I no longer have access to Photoshop and GIMP flat out sucks for working with images other than retouching and cropping things. Every time I tried to combine my images, one would end up pixelated beyond recognition, or the scales wouldn't match, etc.

I said "screw it" and sketched a new design on the banner with a soft, sharp pencil. I had wanted to sketch my original design on there, but the curves of the piece make intricate lines tough. I ended up just going with the simple design you see above. That grey smear in the middle will be a red starburst that I need to re-draw and re-center. The red starburst is an old-school Space Marine symbol. It's supposed to be used for veteran sergeants, but I've co-opted it as a more generic symbol.
I still need to go back in and add some shading to the scroll and the symbol. Probably just a thin layer of a darker color for each one, and I should probably ding up the edges of the scroll with tears and dog ears. You don't typically see perfect, pristine scrolls on 40K artwork.

I also need to add something to the area between the Chapter symbol and the scroll, especially to the right and left edges. I'm not sure what to add though. A fancy, squiggly design? A couple crux terminatus symbols? Very small laurels?

There's no way I'm adding anything above the Chapter symbol unless I get VERY brave and ambitious. Those folds are a nightmare to draw on. If I were to add anything up there, it would likely be a row of checkered boxes, a Greek key design, or a small aquila.

We've also got the monthly tourney at the FLGS tomorrow. As of right this moment, I'm planning on going. I just have no idea what I'll bring for an army. I've not played at the FLGS in months now, so I have no real idea of what the meta is anymore. From what I've seen on Facebook and blog posts, there are plenty of Knights showing up in Imperial forces. Still a good number of power armored players, and plenty of monstrous creatures in non-Imperial armies. I guess it doesn't really matter, as honestly I've not upgraded my army to a 7th Edition style. There isn't a single grav weapon on any model in my collection yet. The last time I had plans to upgrade my bikes, it was to add Scout Bikers and a Command Squad with power lances. That should tell you how far behind the times my army is now.

10.07.2014

Command Squad Progress: the Tank Killer

In the last week or so, I've made some very solid progress on my Command Squad. Painting for the Standard Bearer is done except for his base, I've picked some parts for the bionic Veteran, and I fully built the tank-killing Veteran. Here are some shots of him:

This is the initial body construction, showing the FW torso defects I repaired and some studs I added to his knee pads.


And then his final state, with a head picked out and pads on.


The studs are micro beads, set into small drill holes and glued in place. You can see the tutorial I got the idea from over at Drowned in Plastic. While you're there, check out his Helbrecht build. It's AMAZING.
I held off on a full spread of studs, because I wasn't sure how well they'd come out. A couple added to break up the smooth lines just a bit felt like enough.

The general design behind him is that he wears plated Mk4 armor and a left-leading pad with an extended edge to protect him from the shrapnel and blast from tanks and bunkers he's destroyed with that meltagun and meltabombs (the meltabombs are behind his left hip, not visible in the images). He's got improved targeters in his helm for finding and tracking weak points in vehicle armor, including an upgraded thermal imaging suite for finding exhaust ports and venting seams in xenos and Imperial STC vehicle patterns.

I didn't elect to use another tabarded set of legs for this Marine, as I figured he'd either have no use for one as decoration or that it would be burned up pretty quickly as he stands in the blast wash from exploding tanks. It might bust up the cohesion of the squad some, but probably not a lot as the Apothecary and the bionic Veteran also do not have tabards (though the bionic one is still up in the air, with a post on him and his legs coming later this week).

It's exciting to be nearly done with the Command Squad as a whole. Once the Standard Bearer is done, I'll be over halfway finished, with only two guys left. Both are simpler paint jobs than the Standard Bearer or the Apothecary. The tank hunter will go pretty quickly, being all blue and gold and the bionic Marine will as well, since I don't forsee using any white or fancy sections on him.
Once the squad members are done I have to decide if I'll build them a custom Razorback, or just paint up a turret to put on top of one of my Rhinos. Right now, all of my Razorback turrets are assault cannons or las/plas.

Thankfully, I've finished most of my home improvement projects that were eating up my evenings and the summer heat has gone, leaving me time and motivation to paint again.

9.22.2014

Standard Bearer Progress

This weekend allowed me a few good hours of painting, which I used to work on my Standard Bearer for my Command Squad. This is what he's looking like as of today:


I still have all the red to do (eyes, purity seals, tabard) as well as the linen of the seals and the freehand on his armor and shoulder pads. After that is the standard itself. I have it primed and mounted, but haven't touched it with paint yet.

I tried a slightly different approach with the gold this time around. I started with my standard brown, then gold, then wash with Gryphonne Sepia. But instead of going back to my base gold, I skipped right to Reaper MSP New Gold, which used to be my first highlight color. I like the brightness of it, so I'll be sticking with that from now on.

The next veteran in line is the demolition specialist, who'll end up with meltabombs and a meltagun, plus a bolter. I successfully repaired his armor collar (from the FW Mk4 power weapons kit; it was miscast too thin), and added some rivets to his armor using microbeads. I'll get a picture as soon as I can (hopefully tonight). Thus far, I've only stuck the torso on the legs and let it sit to dry. I sometimes rush assembly stages, and end up knocking parts out of alignment slightly while glue dries or cures.

8.20.2014

Checking In

It's been some time since my last posting, so I figured it was time to check in with an update and some random thoughts.

I took the last week off work (hooray for paid vacation days), but didn't paint a whole lot. I had a lot of home improvement projects to do (and still do, nothing takes the time you'll think it'll take). I only found a few spare moments here and there to pick away at things. I primed the Standard Bearer, but not his banner. It's separate from the pole for painting. I also finished painting blue on the siege shield of my Vindicator (also separate from the parent model for painting). No picture, as I figure no one really needs or wants to see a siege shield painted plain blue.

I can't decide if I should finish the rest of the dozer in metallic colors before masking off the angled stripe I plan to airbrush across the front, or if I should airbrush the stripe and then finish the metals. It probably doesn't make much difference, as the stripe won't cross the metal areas.

I've selected some preliminary parts for the fourth member of the squad, who is the anti-armor and demolitions expert. I chose one of the armored torsos from the Forgeworld Mk4 Power Weapons Set, basic legs (no need for a tabard under all that plating), and haven't picked a helmet yet. FW parts are always ever so slightly smaller than GW plastics, so some heads look odd on the torso I picked. I thought about the grilled helmet from the VenDread kit, but it looks hilarious when test fitted in place.
For armament, I'm torn. I'm trying to keep every member of the squad at no more than 15 points of upgrades. Command Squad members start with a bolt pistol and a boltgun. They can buy pretty much any of the upgrade options (ranged, melee, special) and various other items. Because this guy is a demo/tank expert, he'll get meltabombs alongside his grenades. The meltabombs from the kit I linked above are about half the size of regular GW plastic bombs, so they can be fitted to a Marine's belt, pack, or thigh plates.
The sticky part are his guns. All Marine Veterans get two base attacks in their profile. You can bump them to three if you trade the bolter for a melee weapon while retaining the pistol. But this Marine isn't a melee fighter, so he won't get a melee upgrade. My decision comes down to: meltagun and bolter, or combimelta and bolt pistol? Both the combimelta and the meltagun are the same points cost.
If I take a pistol and combi, I'll get only one shot with the melta but also have the bolter to fire the rest of the time, as well as a pistol shot before a charge. It's simple to model and a pretty standard choice. However, if I take the meltagun and bolter I can fire as many melta shots as I like, and still have the bolter when other things are out of range or are less than ideal targets (you don't shoot melta at Gaunts and Orks). I won' tneed the pistol before a charge, because a meltagun is Assault 1. Modeling the bolter and the meltagun in a somewhat realistic way will be tougher. I will have to sling one or the other weapon over his back or under his backpack, or try to clamp the bolter to his leg. Unfortunately, there are no smaller bolters in any kit, and slinging weapons has always been a modeling challenge.

The fifth member of the squad is one I've not assembled parts for, though I did pickup some parts I might use. I got a handful of what I'm told are old upgrade torsos for Fabius Bile enhanced Marines. They look suitably bionic/augmetic for my purposes of building a squad member who's almost entirely rebuilt with bionics because he takes a lot of bullets for the Apothecary. The general plan is to use the half-bionic sergeant head from one of the older Marine kits, one of those Bile torsos, and then either buy or build bionic arms and legs. GW makes the Iron hands upgrade kit (though its in Finecast now), and Kromlech also makes some interesting bionic legs but no arms. I haven't picked armament for him yet, but I'm leaning towards something cheap like a stormbolter and a chainsword, because he'll be taking Look Out Sir rolls for the Apothecary a lot.

After all of that, I'm still working and planning some Allied units. Raven Guard are still in the works, but I'm also looking sidelong at Grey Knights. I own a 5-man unit of the old metal Terminators, and a Captain Stern model who can be just about any of the HQ models in TDA. I'd originally wanted to add them to add some Sanctic and anti-Daemon ability into my force, but the new codex looks really interesting. Not over the top like its prior incarnation, and much more streamlined.
There's also the upcoming Officio Assassinorum dataslate to think about. The one thing I hated about prior incarnations of Assassins was that you had to spend points on an HQ and Troops to get access to one. I'm definitely going to look at the dataslate when it's available, as I've always wanted to put an Eversor or a Culexis on the table.


8.06.2014

Numerian Castor, Apothecary

My new Apothecary is completed! Meet Numerian Castor...


There are some small details I'm not a huge fan of, like the vials and the white dot on his main helmet optic. For the vials, I solved the color issue by simply drybrushing some white back over the colored 'fluid' in order to make it look like there was glass in front of it. Not perfect, but good enough. I messed up the location of the white dot in the main optic, and placed it a little too low and center. I might have to go back and touch that again with some red to shift it up and left where it's supposed to be.
 
I also noticed that I have a small grey dot on the back of his left foot, and that I forgot to clean up the painted-on sole texture. I also forgot to add the static grass to the base that will make the rock he's kneeling on look less like it's hovering over the sand.

Other than that, I think he came out well enough for a first try at all-white armor. As I'd mentioned before, I went about painting white in the most backwards way possible, with black primer, grey basecoat, and working upward. Should I ever do this again, it'll be white primer, grey wash, white touchups. I think I was afraid his blue, gold, and silver wouldn't match the rest of my army if I'd primed white. If I'm still afraid of that in the future I'll just paint the pad separate or touch the areas with black before painting them.

Here is Castor's bio from my initial writeup of the Command Squad:

Apothecary Numerian Castor is a patient, deliberate Marine. While not a coward by any means, he takes very few risks. He knows his mission is to safeguard the Marines with whom he serves, and when necessary, their geneseed.
I have already assembled the next model in the squad, the Standard Bearer.

 
Pretty standard fare (pun partially intended). There's not a ton you can do with the banner arm, other than rotate the location of the banner itself around the top of the banner pole. I thought about using a super fancy chain sword from the Sternguard or Vanguard kits, but decided to let him use a basic version. His armor is fancy enough to put him in Command Squad territory. Too much decoration and fancy weaponry puts him closer to Honor Guard territory.

I'm not sure how I'll paint that banner. I recently saw a neat tutorial on using custom transfers for banners over at B&C, but that seems like a LOT of setup and materials for one banner. I'll probably leave the banner itself for last, in order to give myself more brainstorming time.


6.19.2014

Pertinus Aemilius, Company Champion

I finally took passable photos of my new Company Champion last night. I'd taken a set on Monday, but they didn't look quite right. I did a little more work on the paint on his face, and retook the shots. Here we go:


For the life of me, I could not get a good front-on shot of his face. As I mentioned before, I didn't paint eyes or teeth, because the model doesn't HAVE discernible eyeballs once he's primed, and attempts to paint his teeth kept resulting in what looked like an add for whitening strips. In the end, I decided to quit screwing around with the face and call it done. You have to know when to stop.

This is his bio, from the post in which I lined up all the backgrounds for my Command Squad:
Pertinus Aemilius, Company Champion, known behind his back as The Bull. Brave and self-sacrificing, to a fault. He was censured twice as a Scout for engaging enemy sentries in protracted melee, instead of silently dispatching them with his combat blade. The second such action resulted in the death of a fellow Scout when Pertinus' duel with an Ork sentry alerted an entire camp. He served five years penance for that failure. Shortly afterward, he was placed with an Assault Squad, skipping the traditional placement with a Devastator Squad. Selected as Company Champion after fifty years as an Assault Squad member, based purely on his skill with a blade. Pertinus Aemilius is not the smartest or most tactically gifted Ultramarine. He is stubborn and thick-headed, but unflinchingly loyal to his commander.
Next in the pipe is the Apothecary:

Pretty simple. Kneeling legs (which I swore I'd never use for an Apothecary, but did anyways), basic torso (I'd planned on putting his geneseed canisters on his left hip, but they didn't look right), Ravenwing narthecium and apothecarion shoulder pad, and the head from the Marine command squad box. I'd actually ordered a full set of the Ravenwing apothecary parts, but realized once I was assembling this guy that the bitz seller sent me a basic Ravenwing beakie head, not the one with the apothecarion symbol.
That makes twice I've been boned by a bitz shop sending wrong or incomplete parts and not noticing until a month later when I go to use the parts (the previous incident was a seller not including the shrine section of a Ravenwing bike that I'd pegged for a Chaplain's bike; I didn't notice until five weeks later, too late for a complaint). From now on, I'll check every order piece-by-piece. I stashed the regular helmet away for use on Raven Guard, and was lucky that I had a spare basic Apothecary head in my bitz box.

I'm going with a white-armored scheme for this guy. My other two apothecaries used the blue armor and white pad scheme, and they just don't stand out enough from the rest of the Marines on the table. I can paint white relatively well, but have only tried on small areas like helmets so far. This will be a new experience. The one thing I need to decide on is whether to have him shaded in a regular grey, or use the very thin Ultramarine blue that I used for Terminators and Sternguard. My gut says grey, as he won't have the blue armor to tie into. My Terminators and Sternguard all have regular blue armor, and it was important to tie the white to the blue. I don't know if that's needed here.

5.29.2014

Painting Progress: Company Champion

I've been making some solid progress on my Company Champion over the last several days. At this point, he's about 80% done.

Here's his head:

The hair is shiny because I've not sealed it with Dullcote yet. I used a paint from the Reaper master Series line called Brown Liner. It's a nearly black brown color, and the liner paints tend to come out glossy. I then did some rough lines in a dark grey across the top to break up the surface some (but you can't see them in the pic, and I couldn't photograph it because of the glare off the shine).
You can see that I missed some spots near the hairline, so I'll have to go back and touch that up. I've repainted the face a couple times due to stray dots of Brown Liner. I do still have to go in and touch the teeth with an ivory or something, but I don't plan to paint eyes. The model doesn't seem to have actual eyeballs in there, and if it does, the squint obscures them.

Then there's the rest of him:


As I said, only about 80% done. I have to hit all his soft armor joints, the purity seal, gems, laurel, and tabard. He's wearing a laurel shoulder pad on his sword arm as well. I'm going to go with green for the laurels, but can't decide whether I should go ivory/linen or red for the tabard. My old Captain model wears red, but I'm not sure if I want to keep with that trend. Here's that old Captain:


Since I'm retiring some old models (my old Apothecary, especially) when I finish this Command Squad, maybe I'll retire this Captain as well. Hilariously, I can't remember if I've updated this guy yet to my new gold recipe and power sword technique.

As a quick note, while I was digging through my Photobucket for the pics of the Captain, I stumbled across this image:

It's my army for a monthly tournament at the FLGS, back in September of 2009. All of those non-Ultramarine bikes were eventually stripped and rebuilt into my current bike force, but it's neat to see the models I used to put on the board.


4.04.2014

More Glamour Shots

I snipped some of the bare heads from the new Sternguard kit, and did some test fits for my Champion. As a reminder, here are the two finalists from the previous batch of heads:


And here are the candidates from the Sternguard box:


Not a huge fan of the bald/bionic one or the mohawk one. The mohawk head looks a lot like a guy I was in the marines with, who always cut his hair in a "horseshoe" cut and was a general jackass. lol. The bald head is too mature for the persona I've given this model. I really like the final head, as it displays a fierceness without resorting to the "show me your war face" route. What do you folks think?

I also took a quick shot of the fin assembly of my drop pod, to see how it looked on screen.

I discovered that I am NOT  a fan of painting large, flat areas of metallic colors. It's damned near impossible to avoid brush strokes and pooling. There's two coats of my darkest silver color, a wash of Badab Black around the edges, another coat of the darkest silver, and then two coats of my mid-tone silver. And you can still see streaks and lines! The Dullcote helped a little, but I really need to find a way to paint big, flat silver surfaces. Any tips?

4.02.2014

Names, Stories, and a Plan

I've started this post at least two other times, each one slowly evolved into a very long and rambling post about nothing. Hopefully, the third time is a charm.

Firstly, I've not made any progress on my Champion or snipped test heads from the Sternguard sprue yet. I got distracted painting pieces of my drop pod. That bugger is so close to done I can almost taste it.

However, I did sit down and think up some names for my Command Squad members. I wanted each Command Squad member to have a first and last name, and for each name to be pseudo-Roman/Latin to match the Ultramarine naming conventions. In the past, I've named my various sergeant models and they all got single names. These Command Squad members will get two to differentiate them just a tiny bit more. All my future HQ models will also get two names.
Here's what I came up with:

Company Champion: Pertinus Aemilius.
Apothecary: Numerian Castor.
Standard Bearer: Marius Gracchus.
Veteran: Thrax Gaios.
Veteran: Flavius Felix.

I mostly grabbed names I thought sounded interesting. Flavius Felix was an actual Roman Senator, which I discovered via Google after selecting the name. No big deal. I also drafted up some very general backstory/personality traits for each member:

Pertinus Aemilius, Company Champion, known behind his back as The Bull. Brave and self-sacrificing, to a fault. He was censured twice as a Scout for engaging enemy sentries in protracted melee, instead of silently dispatching them with his combat blade. The second such action resulted in the death of a fellow Scout when Pertinus' duel with an Ork sentry alerted an entire camp. He served five years penance for that failure. Shortly afterward, he was placed with an Assault Squad, skipping the traditional placement with a Devastator Squad. Selected as Company Champion after fifty years as an Assault Squad member, based purely on his skill with a blade. Pertinus Aemilius is not the smartest or most tactically gifted Ultramarine. He is stubborn and thick-headed, but unflinchingly loyal to his commander.

Apothecary Numerian Castor is a patient, deliberate Marine. While not a coward by any means, he takes very few risks. He knows his mission is to safeguard the Marines with whom he serves, and when necessary, their geneseed.

Standard Bearer Marius Gracchus, "The Youngling." Marius is one of the youngest Marines ever selected to bear a company standard. His youthful features and penchant for humor hide a warrior who is capable with a chainblade and a masterful shot with a pistol.

Veteran Brother Thrax Gaios is the squad's demolitions expert. He carries a combimelta and a satchel of meltabombs. He can toss a krak grenade into the vision slit of a moving tank at a hundred meters.

Veteran Brother Flavius Felix is the oldest member of the command squad, and is fiercely protective of Numerian Castor. He has taken more than one bullet for the Apothecary, and his extensive bionics are proof of that. Castor ensures the scarred old veteran receives the best augmetics the Chapter's Apothecarion has to offer.

And there you go. These guys are designed to be a fixed unit that can be led by any HQ (captain, chaplain, or librarian). They're not optimally armed, but are designed more for looks and flavor. It's a direction I'm leaning for most units going forward, though a squad like this lends itself to that very easily. The only armament I'm not set on is that of Flavius Felix. I'm trying not to spend more than 15 points per model on upgrades. I'm leaning towards a chainsword and grav pistol, but am not sure. The model will have as many bionics as I can lay hands on though.

In addition to planning this squad, I'm also planning out small non-Ultramarine painting projects. I realized from my failure with Tyranids that it's ok to paint single models from time to time, as long as I'm not under massive pressure to get them on the table as a force. Nids were a poor choice in that regard, as I was facing the prospect of spending months painting models, only to wait months more to ever use them. I've decided that one-at-a-time is a good way to branch into Allies. My first non-Ultramarine model will probably be a Raven Guard Shadow Captain. It'll be good practice painting black and white without any blue, as well as the chance to possibly try out a non-Caucasian skin tone. No pressure to get a playable unit on the table here, just a fun one that COULD be used alongside my existing army someday.

3.25.2014

He Is the Champion, My Friends

I'm lining up additional projects beyond my drop pod, and one of those is to build a Command Squad on foot. I'm modeling the Champion right now, and here are a couple in progress shots:


Yes, that appears to be a cat hair across the lens in the first shot. Damn cat. He's supposed to be in a shield guard stance, with his blade waiting for the opportune thrust or stab. It looks awkward from the side, but I like the look from the front. I ended up using a pair of Rhino gunner arms for this model. The shield arm has the gunner hand cut off at the wrist, a bolt pistol added, and then the shield pinned to the pistol and arm. The sword arm is the gunner arm, hand removed at the wrist and replaced with a power sword from the Assault Marine box, and then drastically rotated. I then had to pin the shoulder joint at an extreme outward angle and will fill the soft armor joint with Greenstuff. I triple checked to make sure the shoulder pad will fit on that side, and still leave room for the backpack. I ran into that issue with my Honor Guard models, and so I'm learning from those mistakes.

The big decision I have to make is regarding his head. I want the model to have character, and look stern and menacing. Sort of a "give me your best shot" look. I wasn't sure if a helmeted head would convey that properly. I grabbed a bit of poster tack and did a lineup of possible heads:


I skipped any heads that had rebreathers, as I felt those really didn't convey anything at all. I do actually like the helmeted head I selected, as well as the head in the fourth shot. The first Blood Angel head (fifth picture) is growing on me, but I'm not sure if a screaming head really conveys the vibe I'm after. The final picture is subtly different in the expression than the fifth, beyond the bionic eye. It looks more like a "Nooooo!" face than a "Raaaar!" face.

What do you folks think? Any heads you like or hate? Do you think the helmeted head will convey a feeling from the model? I do have to crack open my Sternguard box again and check those bare heads, but I'll use another post for that. I plain forgot.

Also, point of trivia: the heads from the old kits have much larger ball joints at the neck. For the first three bare heads, I'd have to trim that area down to make it look right. Not a big deal, just interesting changes to model kits over time.