I downloaded the Tyrannic War Veterans dataslate last night, as I'm a sucker for anything Ultramarine. This unit used to exist in the 4th Edition codex, and it was one of the main reasons I started playing Ultramarines. Combined with an old article on the GW website about converting TWV models using Tyranid parts, it was the coolest theme I'd ever seen for Marines.
Sadly, the creation of TWVs faded out of my mind when the 4th Edition codex died. I moved on to other things. With the release of this dataslate, I might go back! I have all four of the TWV models in metal, just waiting for paint.
The dataslate consists of three parts: the background material, a new unit entry, and a formation.
The backstory is good stuff. While it contains a pretty standard writeup of the FirstTyrannic War and the Battle for Macragge, it also introduces some small additional details. I won't spoil those for you, as they're a fun read.
The new unit entry is an Elites choice in a Codex: Space Marines army: Tyrannic War Veterans. They are essentially Sternguard with only Hellfire rounds, Preferred Enemy (Tyranids), and a special rule that gives them Zealot (Hatred+Fearless) when facing Tyranids. The unit also starts at 4 models (to coincide with the number of TWV models GW produces), instead of 5, but can still go up to 10 strong. They can select a Drop Pod or a Land Raider (any type) as a dedicated transport, and the only wargear option is to give the sergeant meltabombs.
Nothing earth-shattering, but flavorful and interesting. The ability to run four models as a unit is definitely an incentive to get mine painted up.
The formation is a non-slot detachment, like all other formations. it consists of Chaplain Cassius, 1+ TWV squads, and 0-6 Stormtalons. Yes, you are reading that right, up to SIX Stormtalons. The TWVs are prohibited from taking Drop Pods. However, the formation does have some special rules. I forget the exact name of the first rule, but it states that any enemy unit hit by a Stormtalon in a given Shooting phase to be shot at by TWV squads using the Ignores Cover USR. This isn't limited to Tyranids, either. The second rule gives the Stormtalons Infiltrate and the ability to start on the board in Hover mode.
Overall, I felt the background and TWV unit entry are worth the $7 I spent. I was/am not a fan of formations in any way, shape, or form. I hate the fact that formations don't take any FOC slots or Allied detachment slots. Hate.
One nice thing for those that DO like the formation rules and plan to use them, is that the dataslate contains the complete rules for Cassius, TWVs, and Stormtalon Gunships right in the file. You don't need to run out and buy Codex: Space Marines to add the formation to your army. It even contains all the supporting rules like Chapter Tactics (though only CT: Ultramarines).
On the painting front, I have gotten a tiny bit of work in, and do have pictures to share in my next post. I've been spending all my free time working on building my son's birthday present (a four-unit play kitchen with fridge, stove, sink, and cabinets) so 40Kpainting has taken a backseat until that's done. It's a crazy ambitious project for me, since before this project I wasn't exactly what you'd call a carpenter. I'm doing the bulk of the work on a table saw, alongside my hand tools, power drill, sander, and a jigsaw. The most ambitious part is the lighting. I'm planning to put orange and red LEDs under the stove/over the oven that turn on to make the burners light up and the oven to illuminate. I also have plans to put in a fridge light that turns on when you open the door, and possibly a small fan in the freezer that blows air when you open that door. Things should return to normal in the next week and a half.
Showing posts with label Sternguard. Show all posts
Showing posts with label Sternguard. Show all posts

7.19.2013
Picture Friday: July 19th Edition
In an effort to keep true to my promise of pictures at least every Friday, I sat down last night and worked on my Hive Tyrant.
I added the shading wash to his armor, and then the first blending coat. It's not much to look at right now:

You can see how uneven my base coats are when I start on these armor parts. This is due to white primer, large flat areas, and green paint from the flesh. By the time I'm done, you never even see those splotches any more. Any that you do see are semi-intentional, as they give the carapace a somewhat natural mottled look in small areas.
I'd forgotten how long a process painting the brown is. I think I use a total of 8 or 9 different color transitions from dark to light, including the streaking colors. I could probably get away with fewer, but oh well. If it's not broken, don't fix it.
Since I'm halfway through the third color in the process, only six more to go after this! Muahahah!
I've also got a quick shot of the next Sternguard model in the line:

It's just a basic grenade throwing pose. I wanted to have at least one guy who wasn't just standing there aiming a bolter. Plus, I have a ton of those damned grenade arms. I could probably start chopping the hands off and replacing with pistols and such. I'd have to save the removed hands, because I'm silly like that.
Looks to be a busy weekend in non-hobby life, so I'll see you when I see you!
7.01.2013
Sternguard! Jumping Bug!
I found the time this weekend to take some semi-good photos of the Sternguard model I just finished, and the current status of my Hive Tyrant.
Here's the Sternguard:


The tiniest two sizes also have minute detail on the feathers that is obliterated when you prime them. I know some folks use etched brass pieces without painting them, but it just looks odd to me when you have unpainted parts on a painted model.
I've already begun working on the fourth squad member. I've got him base coated in Ultramarine Shadow and a base picked out.
Then, there's the Hive Tyrant:


Here's the Sternguard:


Simple and clean, as is my current trend with Marines. This is the last Sternguard model to use a Mk8 armor torso. As much as I like the look, it's just too much of a pain in the ass to get the painted heads in there without damaging the paint.
This guy also has a Forge World etched brass Aquila added to his shin. I bought a whole sheet of those, having seen them used to great effect on other peoples' models online. They are a major bitch to work with, however. The smallest two sizes are so tiny that it's nearly impossible to bend them neatly, and I ruined two of the smallest sizes working on this model. That's ok, as the sheet comes with tons of them. I'd originally planned to put an Aquila across his brow, or on the backs of his hands, but failed in the bending of the pieces and settled for the shin. The tiniest two sizes also have minute detail on the feathers that is obliterated when you prime them. I know some folks use etched brass pieces without painting them, but it just looks odd to me when you have unpainted parts on a painted model.
I've already begun working on the fourth squad member. I've got him base coated in Ultramarine Shadow and a base picked out.
Then, there's the Hive Tyrant:


There's not a ton to see here. I've got three and a half color coats on him, with another quick coat of Olive Green needed before I continue up the spectrum. The flesh will match the rest of the model...eventually.
The 40mm base is there just to have something to hold on to while I paint, though I'm finding myself holding on to the top carapace as well due to the top heaviness of the model. When I'm don painting, I'll pop the model off the 40mm and put it on its proper 60mm.
I have 4 of 5 Genestealers mounted on wires and corks, and still have to build my cork holder. I also have to do some experiments on basing the Tyranids using grey-brown paint and resin sand, then adding static grass and small plants. Maybe a mulch-as-rock piece on the larger bases.
It's nice to be moving forward!
6.03.2013
Stunned!
Remember the story event/tourney at my FLGS that I was originally not going to, then going to, then not, and then finally, actually attending? It was this past Saturday. I did indeed go, and brought a stripped down version of my old Bikes and Bombs list:
Captain on bike with artificer armor, power sword, storm shield
5-man bike squad with two meltaguns, combimelta, meltabombs
6-man bike squad with two plasmaguns, plasma pistol
6-man bike squad with two flamers, combiflamer
Squadron of two Landspeeder Typhoons
Squadron of three multimelta attack bikes
10-man Assault Squad with two plasma pistols, sergeant with dual plasma pistols
Two Whirlwinds
I didn't get a chance to write the short story that supported the list, like I normally do for large events. In short, it was designed as a rapid strike force (bikes, duh) supported by artillery assets. The Whirlwinds pound the enemy while the bikes close in for the kill. The artillery stops right before the bikes hit enemy lines, but if things go awry, they keep firing and the Marines weather the storm while in amongst the bad guys.
As I said, the event was not a traditional tournament. The players were divided into two teams: Imperials and Chaos/Destruction. Some armies started out Neutral, but were sorted into either side as needed to fill gaps. I do not believe this was done arbitrarily, either. For example, we had Tau supporting Chaos, but also had Necron players on both sides. My guess is that the Crons were split evenly between sides so that everyone had a little bit of everything.
The missions were simple in their design, but there were table-based "call outs." These were terrain-based objectives that when held, provided a small bonus to the entire team. For example, capturing the Medicae Facility on Table Z granted a single unit in your teams' armies a 6+ Feel No Pain roll. If you grabbed that facility, you immediately shouted out that your team had it. If you lost it, you'd shout that as well (and listen to the cries of "Noooooo!" from your team). I wasn't lucky enough to play on any of those boards, but it was still great fun hoping and waiting for them to be taken by my teammates.
My first game was a simple capture of table quarters mission. I faced a Tau army, and it was the first time I'd seen new Tau. It was a pretty standard Tau list. Lots of Fire Warriors, an Ethereal, suits, suit HQ guy, Hammerhead with Ion and the named tank commander guy, Skyray, and a pair of Forgeworld Sensor Towers. Those let a single unit within 6" become twin-linked for a turn. So, two units per turn because of two towers.
I took the table corner with better cover and LOS-blockers, and lined up for a cavalry charge. The Whirlwinds were parked firmly out of LOS, and I used a mission special rule to swap the melta bikers out as a scoring unit, and swapped in the Assault Marines. I combat squadded those and left 5 basic guys out of LOS in my deployment corner to claim it.
I hauled ass forward, knowing that the key against Tau was to hit their lines and weather as much fire as possible. I lost my attack bikes early, and several bikers as well, but I managed to get in close. However, I used the Whirlwinds to murder the Ethereal first turn by barrage sniping him. With his death, a lot of the bite was taken out of the grunts.
I was very wary of the Supporting Fire rule, but eventually charged in anyways with my Captain. His 2+ armor save from the artificer armor and 3++ from the storm shield made him tough to kill. He ran two entire Fire Warrior squads off the board by himself.
I ended up winning 3-1, and leaned that Supporting Fire sounds scary, but is largely a puppy if the Tau do not have the ability to boost their shooting reliably on Overwatch. Markerlights fired in overwatch help, but aren't reliable. It's probably scarier with lots of Crisis Suits nearby, who pack harder-hitting weaponry. Pulse rifles just didn't bother bikes much, especially not when most of the wounds were soaked onto a 3-wound HQ with a 2+/3++.
Second game was objectives, but with a twist. In order to grab objectives, you had to defuse them with a d6 roll. The Imperium was the attacking force in this one due to our performance in round one. The defenders got to place all three objectives, but they had to be in the no man's land between deployment zones in a Dawn of War setup. Ours were spaced evenly in the middle, but close to the defending zone. I was facing Orks: Forgeworld Biker Boss guy, generic Warboss on Bike, max size Nob Bikerz with all powerklaws and invulnerable saves and a Painboy, max size Ork Bikers, and a Dakkajet.
This one was a 1-1 tie. I made a few tactical errors as a result of bloodlust and desperation. Twin-linked dakkaguns are stupid good (S5, Assault 3 is like every bike in your army having a heavy bolter). Dakkajet is ok, but not all that threatening to power armored armies.
The final game was pure kill points with some small mechanics that could boost or degrade your KP total. I faced a MSU Venom Dark Eldar force. All Warriors and Trueborn in Venoms backed up by Ravagers, led by the Duke. I was a little frosty when I started this game, as I was concentrating really hard on how I'd approach it. I probably came off as a little stand-offish. In the end, I just resolved to go all-out into the enemy in a cavalry charge. It worked, and I rolled through 13-5.
At the end of the day, I took home Best Imperial Overall (and had the points or best overall of the whole field, after tiebreakers). I was stunned. I've never won overall in anything before. Neat!
I didn't enter anything into the painting competition, as I hadn't painted anything specifically for it, and I just don't like my Marines anymore from a painting stand point.
On Sunday night, I glued the Hive Tyrant's body section to a 40mm base. I used a small amount of glue under the tail mounting point in order to make it so I could remove the 40mm base after he was all done, and then mount him on his proper 60mm base. I just needed something to hold him by while painting, and paperclip mounts just weren't going to cut it. I have a couple small gaps to fill tonight, and then it's primer time!
I also picked away at a Sternguard model, finishing the blue parts. I also selected the parts for another and bagged them for when I finish the current one.
3.04.2013
New Marine, New Tyranids!
I've spent the last couple weeks or so picking away at this Sternguard model, and now he's complete:

He needs a little bit of static grass behind that rock, but you get the point. This guy uses one of the white helmets I painted as an airbrush experiment several months ago. It looks nice on the model, alongside the white pad rims and gold aquila. He's clean and smooth, and I took some extra time to clean up lines and seams.
The only thing I don't like about him was the assembly of his head to the body. I painted the head separate from the body, pack, and bolter. I trimmed the neck before painting, and had done a test fit of the helmet into the Mk8 torso. Unfortunately, once all the parts were painted, they were a hair thicker in all dimensions. So when I tried to glue the head into the torso, there was some contact made between the helmet and the collar. It scraped the paint on all the contact points, and I about threw it across the room. I was able to repair the chips and scrapes, but the back of his helmet has some very small lumps and bumps from the repair work.
I'm now very leery of using the Mk8 torsos for the rest of the squad. I already have the second member of the squad assembled and primed, so I'll give it one more go, knowing that I have to be careful. But if I mess that one up, I may switch to non-Mk8 torsos and be happy with that.
I also continued working on my Hive Tyrant. I decided to lop off the talons from his feet. I then started resculpting texture on the bottom of his hooves.
The first step was resculpting the ball joint at the bottom of what I assume is his Achilles tendon


The hole in the first foot is actually an air bubble in the cast that I uncovered when I sliced off the talons. I'm going to use Brown Stuff to sculpt a pad under each hoof, similar to a horse shoe, and then more Green Stuff to give the area inside the "shoe" a fleshy texture. I stopped at the Achilles repair, because I wanted the GS to fully cure before moving on, as I didn't want to inadvertently touch the GS while working on the rest and ruin it. Patience!
While I waited for that to cure, I cleaned and assembled my very first Genestealer:

I have to say, assembling and working with Tyranids is half again as much fun as assembling and working with Marines. The swappable talons (this guy has Hormagaunt talons as his back arms), posing, etc is all so much fun. I still love my Marines, but assembling a Sternguard Marine is exactly the same as assembling a Tactical Marine or Assault Marine, just with different bitz attached.
This Genestealer needs a little gap filling around his neck and leg, but looks pretty neat overall.
I'd agonized over whether to jump right into sculpting Ymgarls or not, but decided to build at least five models with the basic Genestealer heads first. I need basic models to work with so I can hammer down my final color scheme, and waiting to sculpt fancy heads will add too much to the queue and further stall the project. Plus, I'll need basic Stealers as Troops far sooner than I'll need Ymgarls as Elites.
On Saturday I picked up some Liquitex artist ink, in a green-blue shade. My plan forward is to prime a few Genestealers white, airbrush my selected shade of green onto the fleshy parts, and then test out the effects of the ink on those areas. I'm pretty excited about the possibilities here!

He needs a little bit of static grass behind that rock, but you get the point. This guy uses one of the white helmets I painted as an airbrush experiment several months ago. It looks nice on the model, alongside the white pad rims and gold aquila. He's clean and smooth, and I took some extra time to clean up lines and seams.
The only thing I don't like about him was the assembly of his head to the body. I painted the head separate from the body, pack, and bolter. I trimmed the neck before painting, and had done a test fit of the helmet into the Mk8 torso. Unfortunately, once all the parts were painted, they were a hair thicker in all dimensions. So when I tried to glue the head into the torso, there was some contact made between the helmet and the collar. It scraped the paint on all the contact points, and I about threw it across the room. I was able to repair the chips and scrapes, but the back of his helmet has some very small lumps and bumps from the repair work.
I'm now very leery of using the Mk8 torsos for the rest of the squad. I already have the second member of the squad assembled and primed, so I'll give it one more go, knowing that I have to be careful. But if I mess that one up, I may switch to non-Mk8 torsos and be happy with that.
I also continued working on my Hive Tyrant. I decided to lop off the talons from his feet. I then started resculpting texture on the bottom of his hooves.
The first step was resculpting the ball joint at the bottom of what I assume is his Achilles tendon

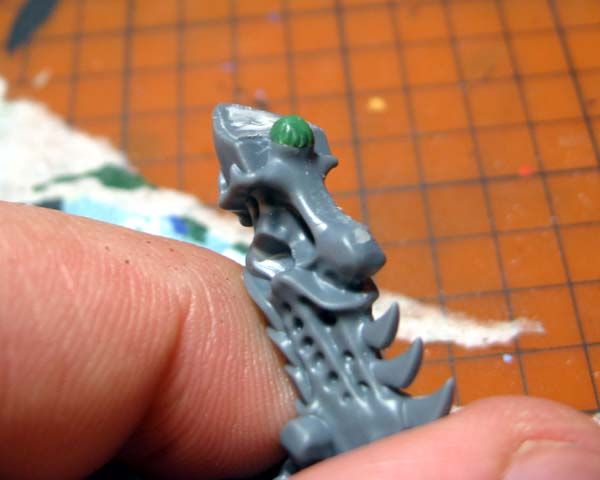
The hole in the first foot is actually an air bubble in the cast that I uncovered when I sliced off the talons. I'm going to use Brown Stuff to sculpt a pad under each hoof, similar to a horse shoe, and then more Green Stuff to give the area inside the "shoe" a fleshy texture. I stopped at the Achilles repair, because I wanted the GS to fully cure before moving on, as I didn't want to inadvertently touch the GS while working on the rest and ruin it. Patience!
While I waited for that to cure, I cleaned and assembled my very first Genestealer:

I have to say, assembling and working with Tyranids is half again as much fun as assembling and working with Marines. The swappable talons (this guy has Hormagaunt talons as his back arms), posing, etc is all so much fun. I still love my Marines, but assembling a Sternguard Marine is exactly the same as assembling a Tactical Marine or Assault Marine, just with different bitz attached.
This Genestealer needs a little gap filling around his neck and leg, but looks pretty neat overall.
I'd agonized over whether to jump right into sculpting Ymgarls or not, but decided to build at least five models with the basic Genestealer heads first. I need basic models to work with so I can hammer down my final color scheme, and waiting to sculpt fancy heads will add too much to the queue and further stall the project. Plus, I'll need basic Stealers as Troops far sooner than I'll need Ymgarls as Elites.
On Saturday I picked up some Liquitex artist ink, in a green-blue shade. My plan forward is to prime a few Genestealers white, airbrush my selected shade of green onto the fleshy parts, and then test out the effects of the ink on those areas. I'm pretty excited about the possibilities here!
2.28.2013
Tyranids are so much fun to build!
I've finally started piecing together some of my Tyranid models. My main focus is on my Hive Tyrant, but I'm also working on a Genestealer and a scratchbuilt spore mine.
The Hive Tyrant is a very cool kit. I have the upper body together, and it required a minimum of Liquid Greenstuff to look good. I really only used it in the little seams between the back vents. That upper shell is FIVE parts! Two vent outers, two outer arm sections, and the center core section. The mold lines are nicely placed so they don't interfere with assembly and are easily reached with a file and blade to clean them up.
The tail section is ELEVEN parts. The waist ball joint, two tail halves, the tail end, tail stinger plate, two legs, and two toes per leg. The two tail sections went together nicely, with a minimum of seams and mold lines. Since I used the long, curved, "flying" tail, I needed a clamp to hold the midtail section to the elongated tail section. Thankfully, whoever designed the kit had the forethought to place a couple of the spines on the seam line between the two sections, which helped immensely in lining up the sections for gluing. The assembled tail is now sitting on my desk with a bunch of Liquid Greenstuff along the joint lines. I'll file it smooth this evening, I hope.
I have to interject for a moment that my pot of Liquid Greenstuff is starting to dry out. I bought it the first weekend it was released, and haven't used it a ton. But, the center of the pot is becoming granular and semi-cured. I used to be able to use a nylon brush to pull a bit out and use it on a model, but now I have to get a flat toothpick or coffee stirrer and scoop the stuff out of the pot and put it on a piece of plastic. Then add water and it thins back out. Not sure I'll buy another pot when this one is gone. I've heard Privater Press or Vallejo makes an equivalent product in a dropper bottle. Might try that next. I've also heard that a slurry of Milliput also serves the same purpose and is easier to press into the seams. I used to use superglue or plastic glue drawn over the area, but those are messy and leave behind scars if you don't do it right.
As I waited for the tail to cure and set, I cleaned up the legs. The kit only allows you to use the standing legs with the standing tail, and the flying legs with the flying tail. You could do some joint pinning and sculpting to make the legs swappable, but the legs don't really look quite right on the wrong tail anyways. Because I chose the flying tail, I cleaned up the flying legs. Again, mold lines are minimal and the joint has a nice little nub in it to make it perfectly align on the tail. The tail section even has little sculpted in overlays for the joint that make the fit seamless and hide any lines.
Before I put the legs on though, I need some feedback. The flying legs are intended for use on a winged Tyrant. They have scything talons added to the end of the standard hoof-shaped foot. This makes it so a winged Tyrant is always WYSIWYG. The wings take up an arm socket, so no matter what secondary arm set you use, you always have at least one set of scything talons on the model. Because my model is not winged, and instead "leaping," I'm torn over the feet. I can either leave the feet as they are, or cut the talons off and go back to the hoof look.
This won't be a magnetized, optimized game model. It's intended as a fun, artsy project that I can enter into a painting competition (and maybe win). As a result, I'm arming him with two sets of scything talons, and posing him as if he's pouncing forward onto his prey. Picture a velociraptor, or any Wolverine attack pose, or the world's biggest Hormagaunt. Because he's ground-based, I'm thinking the foot talons need to go. He'd never be able to walk around with them, so I should remove them, right? Should I remove them, I'll likely sculpt something on the underside of the hooves. Maybe cut a little bit of thin plasticard and mimic the galaxy's weirdest horse hoof?
The Genestealer I'm working on hasn't made much in the way of progress since I pulled him off the sprue. I'm agonizing over two things: what to do with his slotta base, and if I should leap into the sculpted conversion arena right off the bat.
I have never used a slotta base in my life. On all my Marines, I've snipped off the slotta tab, flied the feet flat, and treated them like non-slotta models. I even did that to my metal models. I do this because I create my bases separately from the model. Gluing a model to a base feels like a major pain when attempting to add sand, paint, flock, etc. Marines have big, fat, chunky feet and legs. Tyranids have thin, whippy feet and legs. I think I can drill a small hole into the Genestealer's foot and lower leg to insert a pin by which to hold him during painting, but am not sure.
I have grand plans for my Genestealers as well, as I intend to hive them all tentacle faces. I've seen a bunch of examples of this done online, and really like the idea. My plan is to cut the lower jaw off of the head, sculpt the tentacles, and attach them to the upper jaw, using more GS to blend the transition so it looks natural. Essentially, they'll all look like Ymgarls from the codex art.
The question is whether I'm biting off more than I can chew. Should I start with a basic set of Stealers to start, just to get the hang of painting, or skip that and go straight to end product? My gut says start with the tentacles, as I have plenty of marine models to build and paint while waiting for tentacles to cure and glue to set.
How do you start off an unfamiliar project? Go for the desired result, or start with small test subjects first?
My spore mine is pretty rough at the moment. All I've done so far is cut a length of sprue, and chop the front off of three Gaunt spinefists. I then glued the spinefist parts to the sprue in a two-horizontal, one-vertical setup. I need to measure how tall I want the mine to be, and then insert a length of wire in the underside of the mine "head" area. I'll use GS to fill in the areas between the spinefists, making the gas sac part of the mine. Add some tentacles and a base, and done. Not at all time efficient, but it allows me to use up some junk bits and make nonstandard models.
I'll get some photos of all this work taken tonight, I hope. I've also got my first Sternguard model about 95% done as well, so you'll see him as well.
12.14.2012
New White Helmet Technique
I found the time earlier in the week to sit down and work on my white helmet technique. As I mentioned in a prior post, I'm looking at ways to use my airbrush more often, but the initial experiments didn't work all that well with white. The helmets I tested my theories on lacked definition and contrast.
One of my potential solutions was to finish them by hand, instead of zenithal work with the airbrush.
Here's the result of the hand painting over the airbrushed helmet:


One of my potential solutions was to finish them by hand, instead of zenithal work with the airbrush.
Here's the result of the hand painting over the airbrushed helmet:
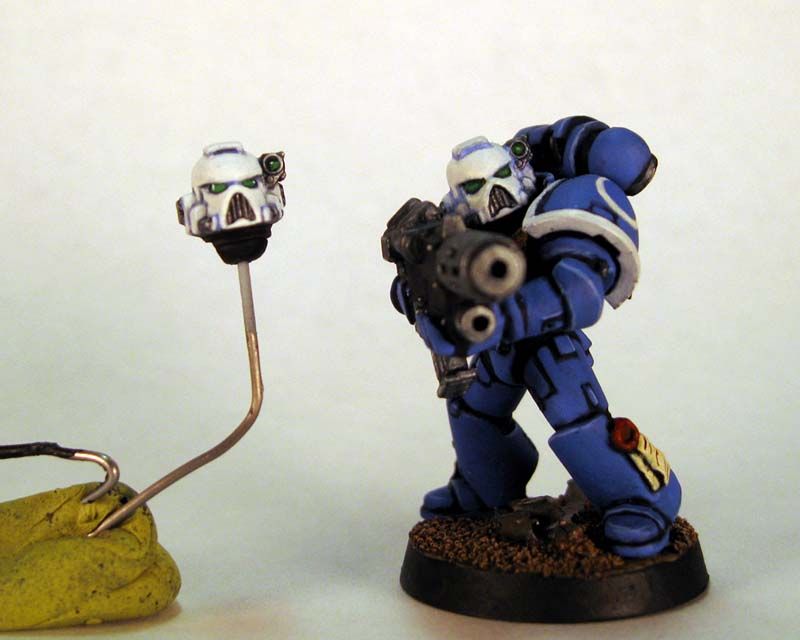
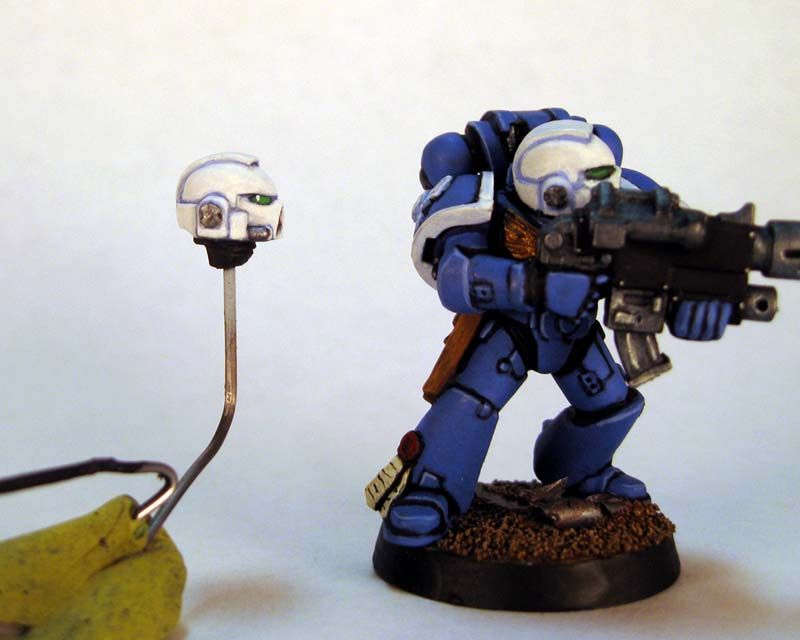
I'm thrilled with it, honestly. There's contrast, but it's not cartoony. Details are crisper, and the white is smoother and more vibrant.
How did I get this effect?
I first applied a wash of very thin Reaper Master Series 'Ultramarine Highlight'. However, I simply couldn't get the wash to stay in the seams of the helmet. I was using water to thin, and it just wasn't working. Then I dug out my unused bottle of Winsor and Newton Flow Improver. I've had this stuff for years and never used it.
I loaded a spare brush with some of the liquid, and made a small pool of it on my palette. I then loaded my brush with the medium, and thinned a small section of the Ultramarine Highlight paint. I picked that up in the brush and used it as my wash.
It immediately clung to the seams in the helmet, as you can see above. The process was messy, so all of the other surfaces had a tint of blue as well. I gave it two or three goings-over before allowing it to dry.
I went back over the helmet with more thinned white after the wash had dried, cutting the color back to the thin lines you see above. I then hit the metallic areas using MSP Shadowed Steel, Badab Black wash, more Shadowed Steel, then Hones Steel, and finally Polished Silver.
I also reworked my eye lens colors. I used to use MSP Pine Green, Leaf Green, and Pale Green from the Warm Greens Triad. Instead, I used MSP Forest Green, Grass Green, and Jade Green from the Cool Greens Triad, plus a white dot for a lens effect. I applied the same to the targeter.
All in all, I'd say it's a definite improvement and a total success. I'm thinking that maybe all airbrush, all the time just isn't going to work for me. I think I'm going to end up doing my majority of colors using the airbrush, but going back with washes to fill details and contrast and then cutting back the washes with my main color.
I also took a few minutes to put together the Marine's eventual bolter:
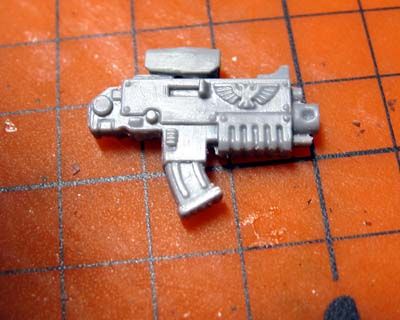
It's a targeter from the IG Heavy Weapons sprue on a regular bolter. It took a lot of fiddling to put on, as the underside of that tiny targeter bit is sloped some and makes it want to point downward. It's supposed to look like an ACOG sight. I think I need to file off the iron sight at the front of the bolter, though. What do you think?
I'm also considering cutting off the sickle magazine and replacing it with a box magazine from a Black Reach Terminator's storm bolter arm. I have enough to choke a horse, so sacrificing a few for Sternguard isn't a huge deal. Good idea, or leave it as-is?
Subscribe to:
Posts (Atom)