10.31.2014

More Progress on the Banner

I put some more time into the banner for my Command Squad. This is what it looks like now:

I added some shading to the scroll, and knocked off all of the dark edge lines I'd had on it before. I then added the red starburst, and some small highlights on each point. However, I need to go back and clean those lighter areas up some. Some are a little blobby. I added black line text to the purity seals and the bottom right design, and put a campaign badge on the bottom center...thing. I'm not a huge fan of the badge though, and it may end up being removed. It's off center and pretty plain.
I also added the ivy/laurel branches. I started by sketching the branches out with a sharp pencil, then went over them with dark green. After that was dry, I added the leaves in the same dark green, let them dry, and then applied a thin lighter green on top. Unfortunately, by that point I was getting a little tired and slipped in some places and was messy in others. I added small lines of dark green to the leaf centers and called it a night. I need to go back and tidy up the leaves.

Once the leaves are done and I've decided on what to do with the center bottom design (it's bugging me that I don't know the term for those little things on the bottom of the standard, I'll have to Google after this), I'll finish the back in an ivory or linen color. I think it'll look nice that way and break up the sea of blue. I'm about halfway done that process, but it's pretty boring so I didn't take a picture.

I'll be happy to have this model finished, but I do have to say that I really enjoy painting the freehand on the banner. I've always been a glutton for punishment.

As soon as this is done, I can move on to the tank hunter veteran. He'll be an easy one, and then I'll get my bionic veteran up and going. Again, an easier paint job (aside from his head/face) but I'll also have a review of the Kromlech legs I ended up buying for him.

10.17.2014

Nearly Done: Standard Bearer

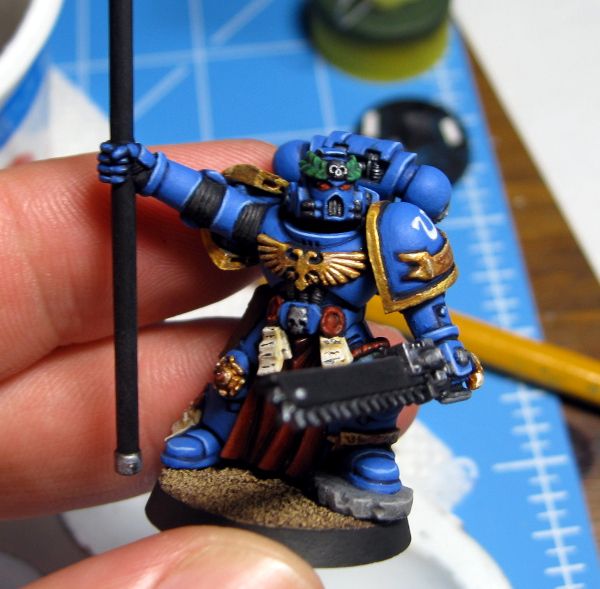
Here is some more progress on my Standard Bearer.


The Marine himself is pretty much done, with only some static grass needed around the edges of the rock he's standing upon. That rock was actually a major pain in the ass to base around. Normally, I put small strips of plasticard under my Marines' feet. This raises them up a tiny bit so they don't appear to be sinking into the ground. It also allows me to put sand all the way under their feet, so I don't end up with gaps around the feet when I glue the model to the base. The problem with the rock was that I wanted it to look like it was sticking up out of the sand, not sitting on top of it. I skipped putting card under it, while still putting card under the other foot. I'd hoped it would allow the rock to be sunk down while the other foot was not. All I ended up with were the gaps. It's simple enough to obscure them with static grass, but I need to be careful not to apply too much and make it look like a fuzzy ring around the rock.

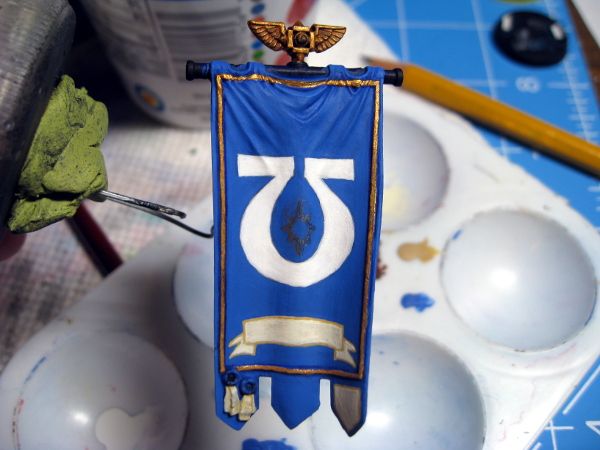
Here is the current state of the banner itself:


It's pretty plain. Originally, I'd had grand plans for it, with a huge laurel wreath surrounding an Imperial aquila clutching the Ultramarines symbol in its talons, with the scroll at the bottom. I sketched it out on paper and searched Google for art I could use as a model to construct the whole thing. I was then going to print it out to scale and use the pencil-rub/carbon paper technique to transfer it to the banner. Then it would be a simple matter of painting it. Problem is, I no longer have access to Photoshop and GIMP flat out sucks for working with images other than retouching and cropping things. Every time I tried to combine my images, one would end up pixelated beyond recognition, or the scales wouldn't match, etc.

I said "screw it" and sketched a new design on the banner with a soft, sharp pencil. I had wanted to sketch my original design on there, but the curves of the piece make intricate lines tough. I ended up just going with the simple design you see above. That grey smear in the middle will be a red starburst that I need to re-draw and re-center. The red starburst is an old-school Space Marine symbol. It's supposed to be used for veteran sergeants, but I've co-opted it as a more generic symbol.
I still need to go back in and add some shading to the scroll and the symbol. Probably just a thin layer of a darker color for each one, and I should probably ding up the edges of the scroll with tears and dog ears. You don't typically see perfect, pristine scrolls on 40K artwork.

I also need to add something to the area between the Chapter symbol and the scroll, especially to the right and left edges. I'm not sure what to add though. A fancy, squiggly design? A couple crux terminatus symbols? Very small laurels?

There's no way I'm adding anything above the Chapter symbol unless I get VERY brave and ambitious. Those folds are a nightmare to draw on. If I were to add anything up there, it would likely be a row of checkered boxes, a Greek key design, or a small aquila.

We've also got the monthly tourney at the FLGS tomorrow. As of right this moment, I'm planning on going. I just have no idea what I'll bring for an army. I've not played at the FLGS in months now, so I have no real idea of what the meta is anymore. From what I've seen on Facebook and blog posts, there are plenty of Knights showing up in Imperial forces. Still a good number of power armored players, and plenty of monstrous creatures in non-Imperial armies. I guess it doesn't really matter, as honestly I've not upgraded my army to a 7th Edition style. There isn't a single grav weapon on any model in my collection yet. The last time I had plans to upgrade my bikes, it was to add Scout Bikers and a Command Squad with power lances. That should tell you how far behind the times my army is now.

10.07.2014

Command Squad Progress: the Tank Killer

In the last week or so, I've made some very solid progress on my Command Squad. Painting for the Standard Bearer is done except for his base, I've picked some parts for the bionic Veteran, and I fully built the tank-killing Veteran. Here are some shots of him:

This is the initial body construction, showing the FW torso defects I repaired and some studs I added to his knee pads.


And then his final state, with a head picked out and pads on.


The studs are micro beads, set into small drill holes and glued in place. You can see the tutorial I got the idea from over at Drowned in Plastic. While you're there, check out his Helbrecht build. It's AMAZING.
I held off on a full spread of studs, because I wasn't sure how well they'd come out. A couple added to break up the smooth lines just a bit felt like enough.

The general design behind him is that he wears plated Mk4 armor and a left-leading pad with an extended edge to protect him from the shrapnel and blast from tanks and bunkers he's destroyed with that meltagun and meltabombs (the meltabombs are behind his left hip, not visible in the images). He's got improved targeters in his helm for finding and tracking weak points in vehicle armor, including an upgraded thermal imaging suite for finding exhaust ports and venting seams in xenos and Imperial STC vehicle patterns.

I didn't elect to use another tabarded set of legs for this Marine, as I figured he'd either have no use for one as decoration or that it would be burned up pretty quickly as he stands in the blast wash from exploding tanks. It might bust up the cohesion of the squad some, but probably not a lot as the Apothecary and the bionic Veteran also do not have tabards (though the bionic one is still up in the air, with a post on him and his legs coming later this week).

It's exciting to be nearly done with the Command Squad as a whole. Once the Standard Bearer is done, I'll be over halfway finished, with only two guys left. Both are simpler paint jobs than the Standard Bearer or the Apothecary. The tank hunter will go pretty quickly, being all blue and gold and the bionic Marine will as well, since I don't forsee using any white or fancy sections on him.
Once the squad members are done I have to decide if I'll build them a custom Razorback, or just paint up a turret to put on top of one of my Rhinos. Right now, all of my Razorback turrets are assault cannons or las/plas.

Thankfully, I've finished most of my home improvement projects that were eating up my evenings and the summer heat has gone, leaving me time and motivation to paint again.