10.28.2016

Dreadtober Update #4: Work Complete!

This is my final Dreadtober update, because I successfully finished the model!

Raven Guard Venerable Dreadnought

Raven Guard Venerable Dreadnought

Raven Guard Venerable Dreadnought

Raven Guard Venerable Dreadnought
 
 
Firstly, I fixed the sepia tone of my images. I covered the table with white paper to prevent the brown color from reflecting up onto the model. I also discovered that the shrouds I put over my front lights actually had small burns on them from the lightbulb heat. I changed those and it may have helped. Of course, fixing the white balance in GIMP also helps.
 
I replaced the model's right shin plate with one from the Ravenwing upgrade sprue. Many thanks to Berman from A Painted Life for the new plate. I like the bit of asymmetry it creates against the left plate. I really like the brass ribbed pipes. They break up the silver nicely. I didn't go with colored cables like I did on my Leviathan, mostly because the one power cable I'd apply color to is hard to reach on the lascannon. It crosses over that brass cable awkwardly.
 
The decals on the sarcophagus came out nicely. The XIX numerals came from an IG vehicle sprue, while the icons came from the Forgeworld Raven Guard sheet. I went with a grey-white for this model, and did edge highlights in pure white. You can't really see it in the pictures, but you can in person. I like the effect a lot, and it should stand out even better on infantry models that have more edges.
 
I played three games with this model last weekend before he was 100% complete. He's pretty ineffective with this armament. He just doesn't have the rate of fire needed to be a true anti-tank threat. After the Standish Standoff, I'll probably give him a new set of arms. Maybe multimelta and Dreadnought close combat weapon.
 
Next up is my 5-man Tactical squad packing plasma weaponry. I've already base coated the black and am at the edge highlight stage.

10.20.2016

Dreadtober Progress Reports #2 and 3: Basic Colors and The Base

This week I have two Dreadtober updates to share in one post. I was out of town last week, so I missed the update on blocking in colors on the model.

Here's the current painting progress on the Raven Guard Venerable Dreadnought:
Raven Guard Venerable Dreadnought

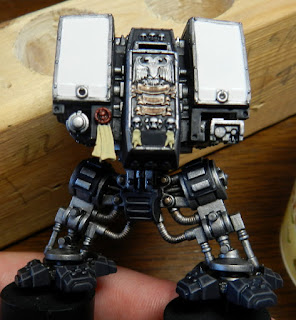
He's nearly done. You can see that I left his shins off for painting. You can also spot a small dot of silver on his left thigh area that needs cleaned up. I used Runelord Brass on small details like bolt heads and ribbed cables, washed it with Devlan Mud, and then touched it again with Ironbreaker because it looked too flat. It breaks up the monotony of silver nicely.

I'm supposed to use this model in a is weekend, so I'll probably concentrate on decals and final details like lenses and targeters next week.

In order to get him table-ready, I also started work on his base. I use a flagstone style base scheme for my Raven Guard, and I covered the process I used to make the first bases HERE.

The first step for the Dreadnought base was to slather the whole thing in plastic glue and start slapping down carved squares and scraps.
40K Flagstone Basing

The scraps are left over from building my original 32mm bases and the base for my Leviathan Siege Dreadnought. All the overhangs are very intentional in order to get a more random placement of the center flagstone on the base. The overhangs go away when I turn the base over a couple days later and use an Xacto knife to trace around the top edge. This scores the plastic and allows me to snap the overhanging parts off. Those scraps go in a bag for later use. The result is here:
 40K Flagstone Basing
After snapping the overhangs off, you angle your knife and carve the flagstone texture into the edges. You can see some of the little curls of plastic produced by this process in the picture above.
 40K Flagstone Basing
The final step is to add bits, rocks, and sand. I have a bin full of random offcuts from which I pulled that skull-arch thing (I believe it came from a 40K scenery scrap), and obscured by the glare in the upper left are two resin skulls from Secret Weapon's "Sack 'O Skulls". Those are top-notch quality, and I highly recommend them.
 
The bits get stuck on with superglue, and then I use PVA glue top make little puddles where I want rocks and sand. I randomly drop small rocks into the puddles, and then cover the remainder in sand. Both materials came from the springtime washdown at the end of my driveway. That's the little piles of sand and dirt left in the drive by the melting snow.
 
I try to focus on wonky areas of the base for rocks and sand, like the corners of the center flagstone. I got lazy and didn't carve it up enough, and so it looked too sharp and geometric. The rubble obscures that and solves the problem.
 
The base is now sitting in my garage, waiting for the primer to dry. I'll paint it tonight during the Bruins game.


10.07.2016

Dreadtober Progress Report #1: The Build

As I mentioned last time, I signed up for Dreadtober this year. It's my first time taking part in a blogosphere challenge, though I had made painting vows at the Bolter and Chainsword 5+ years ago.

I challenged myself to build and paint a magnetized Raven Guard Venerable Dreadnought by the end of the month. I love Dreads in general (also, Terminators), and the VenDread kit is dirt cheap on ebay because of all the folks splitting up Death Masque box sets.

I wanted to fully magnetize the arms on the model, as I did the first time I built the kit for my Ultramarines. However, I specifically wanted to avoid using any of the parts I used last time to make it more interesting to paint.

Here's the build as it stood yesterday morning:

Raven Guard Venerable Dreadnought

I selected the lascannon arm from the kit, and added a spare missile launcher from my bits box. I sank 1/4 inch magnets into the arms and the shoulders. I'll build and paint the rest of the possible armaments some other time.

The Body

Raven Guard Venerable Dreadnought Sarcophagus
 
For this Raven Guard Dreadnought, I decided to select the bare glacis plates and sarcophagus. I wanted some nice, uninterrupted area to add decals and paint white. The majority of the model will be black and metals, so I wanted some white that would stand out no matter what arms I gave him on a given day. After test fitting the blank sarcophagus, I changed my mind and went with a more detailed version you see above. Making the whole front of the model plain felt like a waste of the Venerable kit and looked pretty uninteresting as a whole.
 
The left glacis plate will get an XIX (Raven Guard are the nineteenth Legion) decal and either a black skull or crux terminates design, over which will be placed a large purity seal for visual interest. The right plate will get the Chapter symbol. I've already added another couple purity seals on the body since taking this shot.
 

The Legs

 Raven Guard Venerable Dreadnought Leg Plates
 

These are the purity seals and leg plates I selected. The light seals are from the Forgeworld Captain Korvydae kit I used as the basis for Corben Beck, while the larger one is from the Land Raider Crusader accessory frame.

Honestly, I'm not a huge fan of the leg plates provided in the Venerable Dread kit. There is an alternative set than those pictured, but they're pointed at the top and look odd. I don't mind the right plate above, but the left one really irks me. It has molded-in text (Arx, Calth, Talassar, and Lost Hope). These are planets with which the Raven Guard have no affiliation. Why would a Raven Guard Dreadnought have the names of these planets carved into his armor plating? I can explain it away as a salvaged plate or some sort of Deathwatch service remnant, but I'd prefer not to. There is a nice, semi-fancy plate in the old Ravenwing Upgrade frame I could use, or I can just grab a plain one from the standard Dread kit. I've not glued these on yet, so there's still time to change my mind. Anyone have any suggestions for explaining away the pictured plate?
only left side option has script on it: Arx, Calth, Talassar, and Lost Hope. The Raven Guard weren't present at any of those planets during their destruction, so I have no idea how I'll explain it away. It bugs the hell out of me, but I didn't have any other options. Thankfully, I've not glued them on yet so if I manage to find a replacement before the end of the month, I can use that.
Anyone have any other suggestions for explaining why the above plate might appear on a Raven Guard Venerable Dreadnought?

The next step is to build the base to match the rest of my models. It'll involve cutting squares of plasticard, carving them, and then gluing them on the 60mm base to make flagstones. I very briefly thought about casting the result for reuse, but I don't think I'll use many more 60mm bases in my army.