10.26.2012

What's Missing?

From time to time, I get stuck on what unit I should add to my army/collection next. I have a pretty diverse collection already, as can be seen in my inaugural post pic. I focus heavily on bikers and tactical Marines, with a lot of different supporting units.
Currently, I'm slaving away on a pair of additional attack bikes and an Assault Marine sergeant for use in the upcoming Standish Standoff. The Standoff is my FLGS's annual "big show" for 40K. 32 player slots, painting competition, and a $30 buy-in. I TO'd last year's event, and it was a great event.
Our community has refined the event over the last year, so this one should be just as good, if not better.

Anyhow, back to my army selection overall...

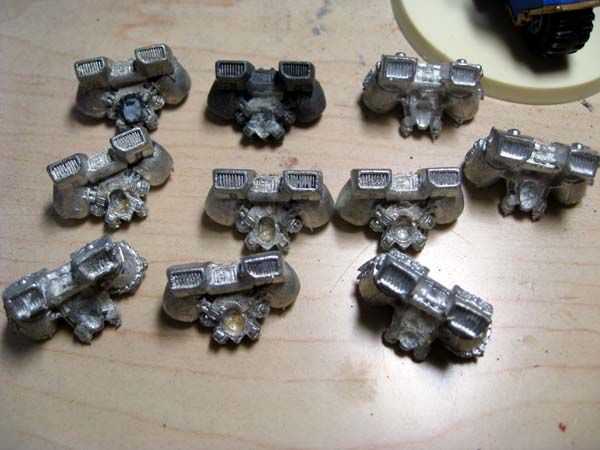
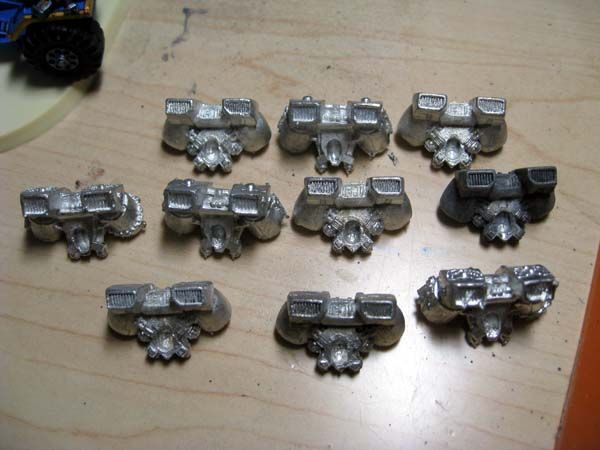
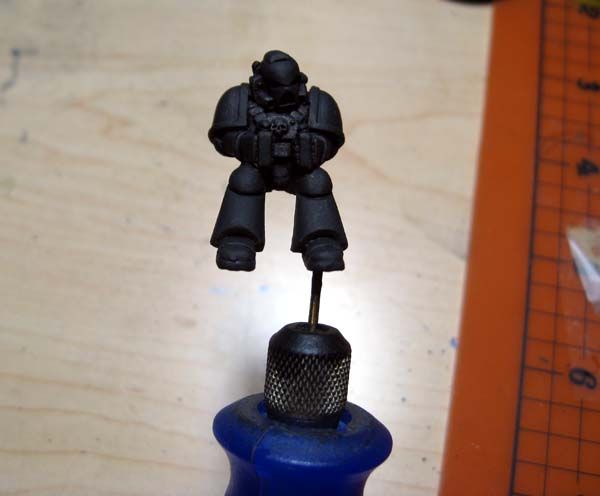
Right now I'm focusing heavily on bikes, as that is sort of my area of expertise. I've been running bike lists for a few years now, and am the local "expert" on their use. I'm trying to nail down their usage in 6th Edition, and can only do that by actually fielding them. I've got enough bikes to field three significant Troops slots, a Command Squad, and a Captain. The two additional Attack Bikes I'll be capping off soon will bring my total to four.
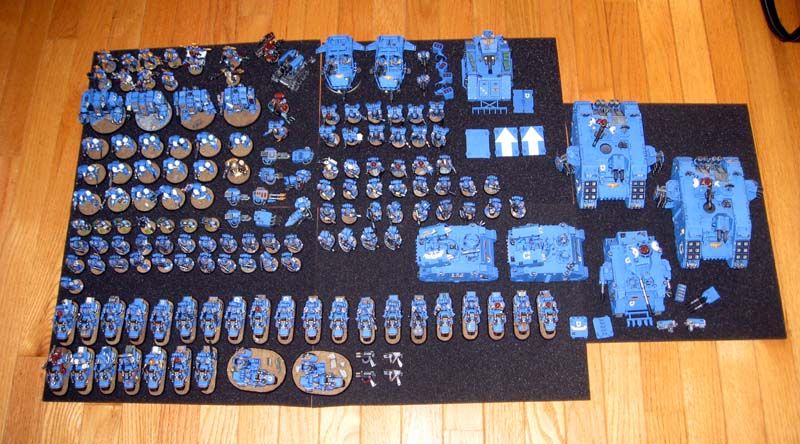
Alongside the bikes, I like to shuffle through my supporting units, though I strongly prefer my Fast Attack slots: Landspeeders, Attack Bikes, Assault Marines. I'll either take a Predator in my heavy slot, or load up on templates via Whirlwinds and a Thunderfire Cannon. I've got a jump pack Librarian who will sometimes make an appearance alongside the Assault Marines, but not often. I don't think I've used him in 6th Edition yet.
Bikes are largely a small arms and special weapons force that operates at the 12-24" range band. You can get plenty of melta/plasma/flamers into a bike list, but you'll have a tough time loading up on long-range weaponry, melee capability, and small arms wounds that "stick." Yes, thinned boltguns are accurate as hell, but they lose half their hits when rolling to wound.

With those things in mind, I'm leaning toward one of these options, which are based on models and parts I already have in my to-build/paint collection:
  • A new landspeeder. I magnetize all my vehicle models, so this would be fully swappable to various armaments. Problem is, it would either have to eat a Fast slot, or boost my existing two-strong Landspeeder Squadron. Landspeeders are even more fragile in 6th than they were in 5th, and it's not a problem for a unit to blast all three out of the sky in a single go. 
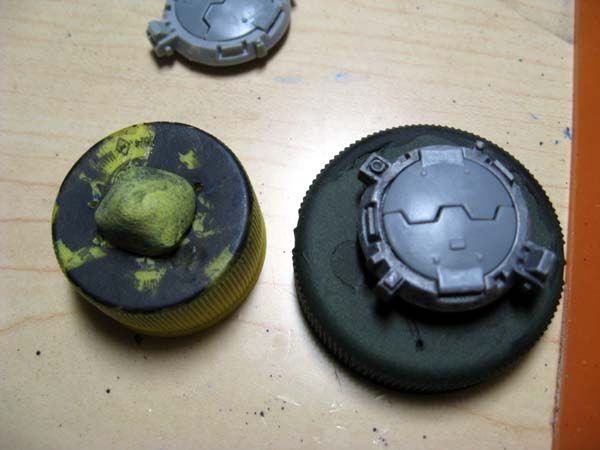
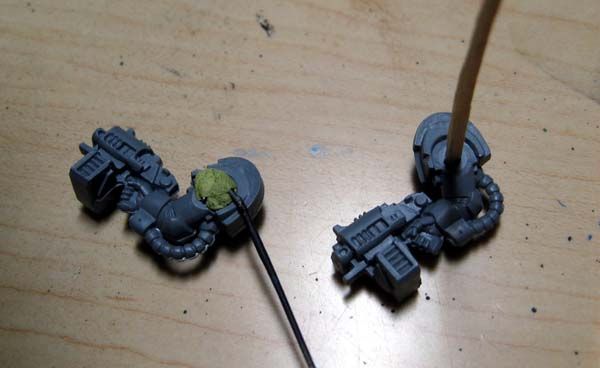
  • Redo my Jump Librarian. I built my current Jump Librarian from a mish-mash of parts, and scratchbuilt his staff.
    (WIP photo, Photobucket ate my finished one)

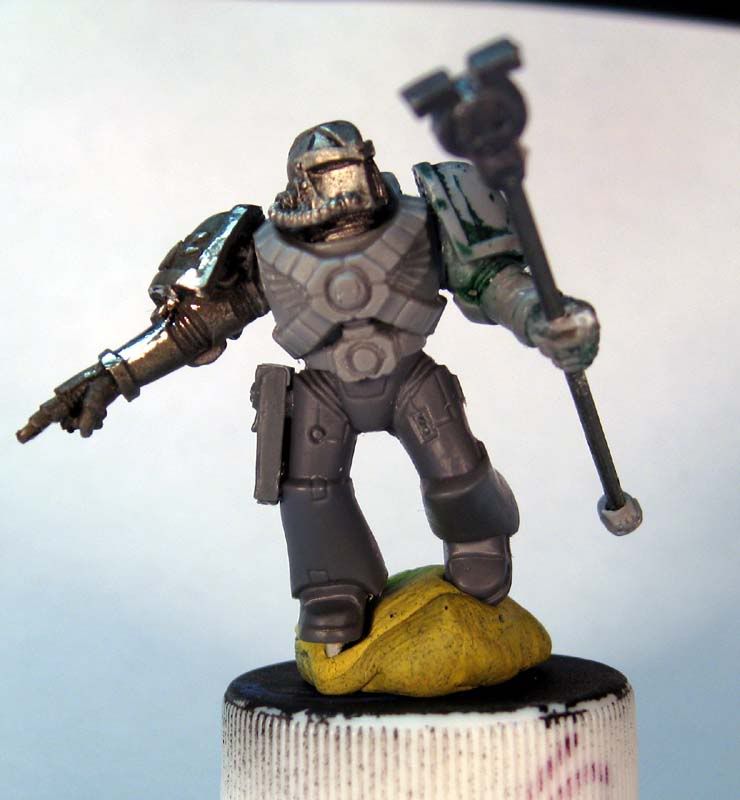
    His pose is a tad wonky, and his armament is sub-optimal these days. I'd like to remake him using more modern parts, a better pose, and maybe a sword instead of a staff.
  • Scout Bikers. Another Fast slot, but one that goes with the rest of my army. I have the parts to make about seven or so of these guys, though only three are the new all-plastic kit. Four or so are the old, metal kit. These guys might bring another dimension to mt biker army, as they can Scout and Outflank and whatnot.
  • Sternguard. This breaks from the biker/fast mold, and goes toward something I'm desperate for: reliable wounds. Hellfire rounds are HUGE now, as everyone and their brother is piling on Biomancy psykers with Iron Arm, Nurgle units, and what have you. Twin-linked bolters just don't cut it in those areas. I'd likely start with a small, 5-man unit to test the waters. Of course, a unit that small will likely end up as fodder. I'm also torn on what models to use for these. I have a ton of metal Veteran Marines of various sorts that would fit the bill, but my initial vision for Sternguard involves every member being in Mk8 armor with a targeter helmet, box-magazine bolter, and loads of gear and grenades.
  • Biker Chaplain or Librarian. These would be force multipliers for my Command Squad, most likely. Very low on the priority list, honestly.
What do you folks think?

10.22.2012

How I Base Models

Every model in my army is based nearly identically. They all stand on a display board that is also based in the same manner. Here's how I base my models, as well as a brief review of the resin base I used.

The base was purchased from Iron Halo. It is their Generic Round Pill 65x90mm. They're reasonably priced, and fit attack bikes perfectly. I've found that other companies attack bike bases are either too large or too small. These fit beautifully and leave some room for basing decoration.
Iron Halo is a small family operation in New Zealand.

The bases come pretty standard from the shop.

Very smooth, and a minimum of air bubbles. The air bubbles that were present were pinprick small, and can be safely painted or glued over.
As always with resin, be sure to wash the bases in cool, soapy water before attempting to use them. I didn't notice any mold release agent on the bases, but better to clean them up just in case.
After the bases are clean and dry, I set an attack bike on the blank base and sketch carefully around the tires with a colored pencil. You can use a regular pencil, marker, or whatever you prefer. You're just getting the general location of the tires down.
I then cut small squares of plasticard and glue them to the center of each tire area on the base. This makes sure the bike doesn't look like it's sinking into the sand. A valuable tip from From the Warp (in the blogroll, to the right).
I also draw around the perimeter of the open spaces available for basing. This ensures i don't glue rocks or bitz under the body of the bike, which is both pointless and can prevent the bike from being glued to the base.

The next step is to grab a bottle of white glue, a cheap brush, and your base.

Pour out a good amount of white glue onto a smooth, disposable surface. I like to use the inside of a blister pack. Load the brush with a bit of water, and thin the glue ever so slightly. Then start slathering it onto the base, being sure not to drown nay of your detail bitz.


You then want sand. I have a pound of craft sand that I got for a dollar at the craft store several years ago. It's a lifetime supply. One pound will last forever. I then filled a plastic squeeze bottle with sand. It's a cheap bottle from the candy making section.


Pour the sand liberally over the base, making sure to cover every bit of glue.


Let this sit overnight. Doing so ensures the glue is completely dried before you start working with paint. After your overnight wait, you can pick the base up and knock off all the loose sand. Tap the underside with your fingers for a while to get any loose grains off the base. Pour the sand back into your bottle.


You'll invariably have some grains of sand glued to detail pieces and the lip of the base. Gently pick them away using the tip of a hobby knife, a toothpick, or other pointed object. For the base lip, just use your thumbnail to peel away any bonded sand. Be careful not to get too close to the base top, or you'll have small gaps at the edge. If you have good eyes, you can spot such a spot at the leftmost edge of the base above.
Now to start painting.
I first apply a very liberal coat of Reaper Master Series Muddy Brown.


I do mean liberal. You need to cover every grain of sand to make sure it tints to the correct color and hides the base from showing through. While you're at it, go ahead and cover the detail bits as well. it makes them easier to paint in the following steps.
Let this dry for a few hours. Do not attempt any further steps until this coat is 100% dry, otherwise the glue will not have reset (the thinned paint softens it temporarily) and it will pull off when you drybrush.
Once the paint is dry and the glue recured, I apply a heavy drybrushing of RMS Leather Brown.

Follow that up with a lighter drybrush of RMS Amber Gold. (Autolevels altered the following photo a tad too much).

Paint your detail bits. I used RMS Shadowed Stone, Stone Grey, Weathered Stone, and Leather White for my rocks; Stained Ivory, Yellowed Bone, and Creamy Ivory for the skull. The chainsword was done with black and silver and GW washes.
Paint the base rim your desired color (I always use black craft paint), and seal the base. After sealing, apply any static grass.
The result:

A nice, neat base.

10.18.2012

Quick Tip: Acetone

I just wanted to share a quick tip for refurbishing old models: acetone.
When I first started in the hobby, I was a poor waiter struggling to pay my phone bill, let alone buy models. As a result, I was turned on to eBay and secondhand models. I quickly learned how to remove paint and recover abused models, all for a fraction of the cost of new stuff. I no longer buy used models (I only buy bitz online, and all my new kits from the FLGS), but I haven't lost those salvage skills.
One trick I learned was the use of acetone. Any hardware store employee will tell you that acetone is a solvent and used for thinning paint or removing adhesives and glues. Any Poison Control Center employee will tell you it's perfect for removing superglue from one's fingers.

I have a love affair with metal models, and hoarded a ton of metal jump packs, seen here:

I stripped the paint off of most of these using a process involving Simple Green followed by overn cleaner. I'll cover that process in a later post. The problem with those two methods, though, is that they don't remove glue, enamels, or varnishes.
As you can see in the photo, some of these packs have significant amounts of old superglue, plastic, and general crud built up in the seams. The pack in the far upper left actually has part of a plastic torso stuck to it from when I ripped it off the unsalvageable Assault Marine. There's a ring of Testor's enamel paint around it, and a whole lot of superglue.
Enter the acetone!

Get yourself a small glass jar and a can of pure acetone. Don't waste your time with nail polish remover. It's actually cheaper by volume to go to the hardware store and get a small can of pure acetone.

Also, save yourself a disaster and do not use plastic jars, cups, or containers for this. Acetone eats most plastics almost on contact.
Fill the jar with your models and bitz, and pour in enough acetone to cover them all. Put the lid on tight and set the jar someplace no one will disturb it overnight.

Come back in the morning and open the jar. Pull out the pieces and rinse them off under warm water. All of the superglue and paint should have dissolved away, leaving you with fresh metal parts.


The jump packs are all now squeaky clean and ready for use by my Marines!
I wanted to show you what happened to the plug of plastic on the previously highlighted pack but as I was pulling it out of the jar, I dropped it down the sink. Oops! Acetone essentially reduces polystyrene (the plastic our models are made of) to the consistency of Silly Putty.
Never, EVER attempt to remove paint from plastic or resin models with acetone of any sort!

10.16.2012

How I Mount Models for Painting

Everyone has a different method to their painting process. Some folks like to paint on the sprue, paint bitz before assembly, after assembly, partial assembly, etc etc. I've developed a process of my own, and I'll be sharing the bulk of it with you over the next couple weeks' worth of posts.

The first step I take is assembling models. I tend to assemble as much of the model as I can before priming and painting. For basic line troopers and such, I'll assemble everything but the backpack, and leave some of the obscured areas basic primer or shade coat colors. You can't see behind the bolter held tightly to the chest, so leaving chest armor in your primer or base coat colors typically won't sink your quality of painting.

After assembly, I mount my models for ease of handling. For this example, I'm working with a couple tank hatches and a pair of Black Reach Terminator storm bolter arms:

The hatches are fiddly to handle while painting, unless you have long fingernails or something. Normally, I would assemble the storm bolter arms to bodies before painting, but these will be used in an upcoming segment or two, so I don't want them glued to a body.

I typically mount flat objects like tank hatches onto a bottle top using poster tack. The example in the link is blue, but mine is yellow. The stuff is great, as it's almost infinitely reusable. One package will last you a lifetime of modelling. Even when you get primer and paint on it, just knead it back into a ball, and the flecks of paint are broken up and mixed into the putty.


For the arms, you can simply jam toothpicks into the socket, or if the arm has no socket, use more poster tack and a bent paperclip to create a thin handle by which you can hold the arm or bit. I do this every time with backpacks.

For infantry, I drill a shallow hole in a foot and insert a short length of paperclip with a tiny dab of superglue. (The pictured model is a refurbished plasma cannoneer I'll get to painting some day.)


You then grip the length of paperclip in a Dremel tool or pin vise, or even a power drill. I use an old, burned out, battery-powered Dremel I use to use for modelling, but that no longer holds a charge. (The model here is a primed attack bike gunner for my next attack bike, you'll see shots of this in the near future).

Once you've completed painting, remove the pin from the vice or holding tool, and grab a pair of needle nose pliers. Gently hold the model in one hand, and use the pliers to twist the pin out of the hole. So long as you didn't use a ton of superglue or a really deep pin hole, it will loosen up and pull right out. You can even save that length of paperclip and use it to mount the next model.

What do you think? Do you use a similar method, or something completely different?
The next how-to session will focus on my primer creation and application methods.

10.13.2012

Book Review: Xenos (No Spoilers)

I'm a pretty avid reader of Black Library fiction, being a fan of the 40K universe in addition to the game. I get a lot of my Black Library books from paperbackswap.com. That's where I got this copy of Dan Abnett's 'Xenos'.
The series was highly recommended by gamers at the FLGS, and I was running low on my backstock of novels. I decided to start reading the series, despite my love-hate feelings toward Inquisitors in general.

The story starts out in a gumshoe detective fashion, which I found to be quite good. I'd not really thought of Inquisitors as detectives, but more as warrior-psykers or covert spies. As the book goes on, you learn that the detetive vibe is because of Eisenhorn's personal style. There are several Inquisitor characters, each with their own methods and attitudes. You get to see some interesting play between the Inquisitors of the different schools, from extreme radical to fanatical puritan.

The book's pace is good, though there are a few points where it slows down for exposition and introspection. Thankfully, the pace stays brisk overall, whether there is an action scene or not.

The large majority of events in the book are believable within the fram of the 40K universe. Eisenhorn isn't a one-man army. It's important to note that the background details are of the older GW canon. Example: Deathwatch Marines are referred to as a Chapter, not an organization. There's no reference to the Marines being from individual Chapters at all, which is fine. It may even be possible that Abnett glossed over those details, or misrepresented them, because Eisenhorn simply doesn't know them. The book is written in first-person perspective, after all.
There is also a believable passage of time, versus character development. For example, the characters make a 30-week journey through the Warp on a ship. They spend their time constructively, and layman/amateur characters manage to evolve into capable skill users. Those are small details that make the story work.

My only gripe abut the book is the ending. The final climax is ended by a bit of a deus ex machina. I'm aware the book is the first part of a trilogy, but the heroes get off way too easy, with the Big Bad simply running off at the end though no actions of the main character. It's my one pet peeve in fiction writing. Solve your characters' problems through their own actions, authors! You don't end a story with a minor character saving the hero with a small act.

All in all, I'd give the book a solid A grade. The only thing keeping it from an A+ is the ending, and the fact that said ending is a lead-in to the sequel.
The entire trilogy is available from the Black Library as an omnibus now, as opposed to the three book format in which I acquired it.

10.11.2012

Inaugural Post!

Ahhhh, the inaugural post of Thin Your Paint! Feels nice.
The first post of any blog should introduce the author, so here we go.

I'm known at my FLGS (Crossroad Games in Standish, ME) as Todd the Goalie, but online I go by TheRhino (or at Bolter and Chainsword as ShinyRhino). The history of the Rhino handle goes far back into the mists of time, before I started playing Warhammer 40K. It actually goes all the way back to Quake 2. I'm old, man. Old.

I'm a Space Marine player, through and through. You'll often see me pining to start a new army in my posts, but it may never happen. I started painting Ultramarines in...2008? Myabe 2007. Since then, I've amassed this:


That, Dear Reader, is four years of work. It's mighty tough to move on from four years of work comprising hundreds of man-hours. I'm still going strong on my Ultras, and the main content of this blog will be works in progress and projects involving my army.
I've won a couple painting awards in my time. Two "Best in Show" style awards in small GT-style events, and a couple individual model awards. Honestly, I'm still amazed I've won anything at all.

I'm not much of a competitive gamer. I've always played the units I like, in the lists I enjoy. That being said, the only time I really get to play the game is at the FLGS's monthly tournaments. You won't find a ton of army list ideas or power builds here on the blog. I'll opine about this option or that, and make some suggestions or such here and there.

One thing I'm semi-known for in my area is my love of Space Marine bikers. You probably spotted the large number of them in the picture above. I've loved the speed and style of Marine bikes since the first time I fielded them. I'm a fan of the "fast" army build, and take bikes and Assault Marines whenever I can (and when I'm not bored with them). I wrote a tactica article on Marine biker armies over at the Bolter and Chainsword that is referenced from time to time by posters there, but it's in dire need of an update for 6th Edition. You'll be seeing bits and pieces of that here on the blog, as well.

I should note that this blog is a result of moving my existing blog from the Bolter and Chainsword site. It was a good place to start, but I'd like to expand my readership and project base beyond the confines of the B&C. If you're curious about the content of that blog, you can find it here: BLOG.

I think that's a pretty good inaugural post, so I'll stop the rambling for the day. Expect an update on the attack bike project I've been working on in the next couple days!