2.26.2015

Raven Guard Skin WIP #1

Another small update. I've primed the Scout models, considering the modeling done. I was debating holding off until I decided upon a base theme, because normally I attach models to bases after they're painted using small strips of plasticard to mark foot position and then gluing sand and objects around those strips. That typically involves tracing around feet with a colored pencil, etc. But for my Raven Guard, I decided to try a different basing method. I'll be doing a ruined city base style, with very large, slab-style pavers and tumbled debris. I don't need to deal with strips of card and pregluing for that.

Anyhow, I have started on the skin for these guys. As many of you may know, Raven Guard have pale, paper-white skin. They don't go full-on alabaster until some time after geneseed implantation. It's perfectly normal for Scouts to have pinkish skin. So, I decided all of mine would be "rookie" Scouts with pinkish skin. This not only provides me the chance to work different skin techniques into the army, but also delays the need to figure out how to paint the more mature Marines' skin.
To start, I applied a bunch of thin layers of Reaper Master Series Fair Shadow. This is the darkest color in the Fair Skin triad (Reaper sells their Master Series paints in three-color sets, for those not in-the-know). It took anywhere from 3-5 coats per model. You can see here what only a few coats looks like, leaving a bit of grey tone on the flatter areas of the face.

Once that was dry, I applied a very thin wash of Ogryn Flesh to the whole face. I put a bunch of Ogryn Flesh on my palette, and then thinned it out with Winsor and Newton Acrylic Flow Improver. This gives a pinkish hue in the recesses. If you don't dilute the wash, it just stains the light skin color a reddish color. You can do that, and just come back up to the Fair Shadow color, but it's a bit of a waste of time and effort, and you can end up with very stark pink lines around the edges and in the facial creases.

At this point I stopped for the night to let the washes dry thoroughly. If you keep poking at them you end up softening and removing the paint underneath, and repairing the holes can be a pain depending on how many layers you damaged. The next step will be to touch up any overly pink areas with more Fair Shadow, and then move on to the next color, MSP Fair Skin, and then highlights of Fair Highlight, which is nearly white.

I have no idea how I'm going to paint these guys' eyes. The eyeballs are so poorly defined on the models once you've primed and painted them, that it's really tough to paint them so they don't look wide-eyed and fearful, or cross eyed. I know HOW to paint eyes, just not on Marine faces.

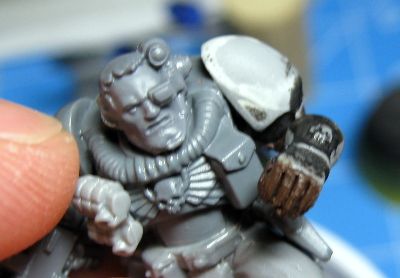
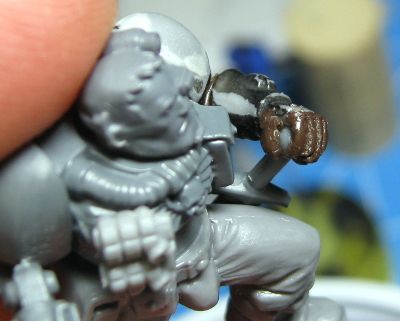
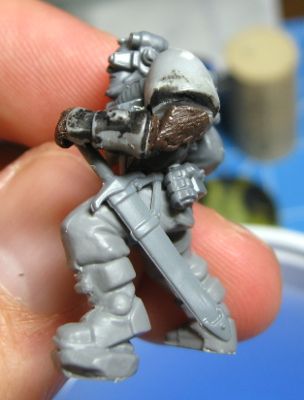
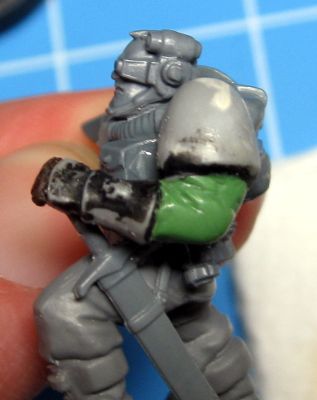
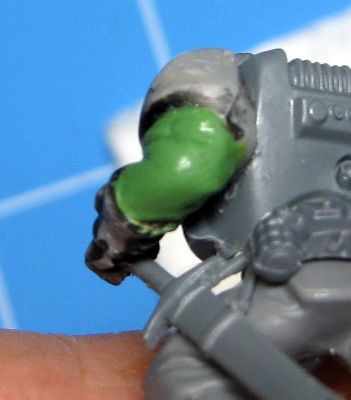
I have also been poking away at other projects and models. Here are a couple WIP shots of my Ultramarine Librarian. I tried using darker blue for his armor, to make him stand out from the other Ultramarines. The shoulder pad shot is intended to show the tone difference. I did miss the brown basecoat on the shoulder pad rim, and yes, that is a magnet sunk into his back. I'm taking the backpack magnet plunge so I can use him with a jump pack or on foot!


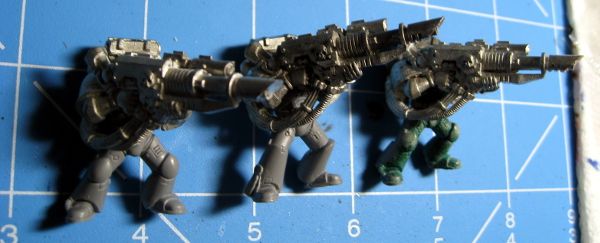
I also got bored and assembled some lascannon Marines usable as part of a Devastator or Tactical Squad. Missile launchers just don't cut it in the modern "AV13 and 2+ armor everywhere" world of 40K. I'm using old, metal lascannons and salvage-quality bodies/legs/heads. The metal cannons aren't all that hard to assemble if you do so in the correct order and with the correct glue. I use Loctite Ultra Gel Control super glue. Assemble the backpack to the body, then the gun to the torso by applying glue to both the stump of the power feed on the pack and the arm joint. Press the power cables of the cannon against the stump on the backpack, and then the shoulder to the torso joint. Hold it in place for several minutes, and then attach the support arm by applying glue in the wrist socket and the left shoulder joint. Press the wrist into the socket on the cannon, and then the shoulder to the torso. Hold, and you're done! I also recommend leaving the head off the model until after the lascannon is fully assembled, to make sure it's not at an angle or pose that would prevent the cannon from seating properly against the shoulder joint. The models are wobbly and tippy, but putting them as far back on a base as you can helps mitigate it a little. 32mm bases would help a LOT.


2.20.2015

Raven Guard Sergeant Progress

Just a smallish update today. I spent a little time working on the Sergeant, roughing out the shapes of his hand and arm.
First I got the fingers laid out, and a small wad of Brown Stuff pushed into place for the general structure of his arm/elbow. I like this better than a wire skeleton, as I know I can just rip it out of there if I really hate it.


As you can see, really rough work, but I got the general shapes and dimensions in there. Then I started work on the arm/sleeve/elbow/whatever with Green Stuff, as it flows better than Brown Stuff. Brown Stuff is spectacular stuff, but it gets a little grainy when worked too much, and it's intended for sharp lines and sandable edges, instead of folds and curves.


This is where the Sergeant sits as of now. I need to go back in and file his fingers smooth and then patch any low areas with GS. The one thing that's really bugging me is the side-on view of the arm. In the picture immediately above this text, the elbow and bicep area look fine. But in the side-on shot, you can see that the arm looks a little...puffy. There's an unnatural angle to the area right behind the forearm cuff of the gauntlet.

Can anyone suggest a fix for this? It sort of looks like I need to point the gauntlet upward more or something. I can't quite figure out what the problem is, and how to fix it.

Oh, and because Khorne Inquisitor asked about on his blog, here's a picture of my blotting/wiping towel, though this one is relatively fresh.


2.11.2015

Revised Raven Guard Scouts

I have updated Raven Guard Scout models to share! After ripping some of the previous incarnations apart and reassembling, here's what I have:

The first model is the shotgunner, who is unchanged from last time. I just took a slightly better picture.

Second model now has a swapped combat blade and is throwing a grenade. The blade arm is a reclaimed bit. Stripped of a previous owner's sloppy Templars paint job.
 
 
The third Scout is unchanged, but here's a better picture.


Scout number four is the only model I left with the Scout Hug Syndrome, as it actually works in this pose. Pistol extended for a shot, with the swapped combat blade ready for a followup stab.


The Sergeant is unfinished, but he is the most ambitious model in the squad. I removed his powerfist entirely, replacing it with a pistol. I then gave him a WHFB scabbarded sword to serve as either a combat blade or a power sword as I see fit in my lists.


I'd thought about bitz-buying the hands from the Sniper box, intended to graft the hand holding a scope onto a spare arm. But I decided to be more daring and pose him with his hand resting on the sword's pommel. I grabbed another reclaimed arm from the same lot of models, and started cutting. I sliced off the forearm at the end of the armor section, and separated the shoulder pad from the bulk of the bicep. I then carved away the fingers from the hand, and bored a slight depression in the palm area. Using plastic glue, I attached the shoulder to the torso and the palm to the pommel and got this:


The next step is to build the core section of the arm/elbow with Brown Stuff. I just need a rigid center on which to add Green Stuff for the final cloth details. After that is done and set, I'll tackle the fingers.

2.04.2015

Old Projects, New Projects

As promised, here are some images and descriptions of my current projects.

First up is the most boring part, the painted Razorback heavy bolter turret for the Command Squad's transport. it needs a coat of Dullcote, then a quick Ultramarine symbol on the top and it'll be done. I'm not doing a dedicated hull for it. Instead, it'll ride on top of one of my existing Rhinos.

I'm also working on the stock, plastic GW Librarian with staff to lead the squad for now. No alterations on conversions, just a quick bang-out job to have a real Libby in my collection instead of subbing in Honor Guard or Captain models in games. He's just in primer right now, but I'm hoping to get started on his face/head tonight during period breaks in the Bruins/Rangers game.

I finished my Vindicator's top hatch with a storm bolter and gunner, and stuck it in the mounting hole. Didn't glue it in, as I want to be able to remove it if one of the open hatch doors breaks or something, or I need it for another vehicle in a pinch. I've decided to set the Vindicator aside for now, since I can't think of anything to paint on the siege shield front. I do random Google image searches from time to time to look for inspiration. Nothing yet.

The most exciting news is that I have finally started working on Raven Guard. I decided to start with a small Scout Squad to break into the one Troop requirement for Allied Detachments. I have a total of ten Scout models available, half in bitz and half from one of the first box sets I ever bought from my FLGS (if not THE first). I wanted my Raven Guard models to be radically posed, with lots of movement and different stances. Then I ran into the reality of the Scout kits. They're pretty terrible! The torsos barely fit on the legs due to the pistol holsters sticking up too far, and the legs are almost all posed in the same manner. Unfortunately, I am not good enough with Green Stuff sculpting to be able to cut and repose these legs. Instead, I decided my Scouts would rely on their arms to convey action. I do have to note that these images illustrate the models as they were when I took them. After I'd uploaded them to Photobucket, I decided I hated some of them with a passion, and went to my desk and tore some of them apart and swapped things around. That being said, here's how the models started out:

For this first guy, I chose the grenade-throwing arm from the Scout Bike kit and swapped in an old, Third Edition Space Marine combat blade for the chainsword that originally came on this arm. I tore this guy apart, because I didn't like having both arms spread wide like that. It looked like he was trying to kill you with hugs.

The second Scout was intended to serve as the squad's Sergeant with a powerfist and shotgun. I figured that because you can't get bonus attacks for a pistol with a powerfist, the shotgun would be an ideal pre-charge weapon for him. The shotgun is from the Scout Bike kit, and the powerfist is from the Cadian Command Squad, grafted onto the pistol arm from the Scout Bike (I am cannibalizing all the arms from my Scout Bike kits because they come with two handlebar-holding arms, and none of the weapon arms add anything to the model). I'd originally wanted to put a regular bare Marine head on all my Scout Sergeants, but discovered that it was really hard to do. Many of the bare heads are out of proportion with the Scout heads, meaning you have a big potato head on there even after cutting down the neck. So I compromised and put the fancy optic-wearing head on there. The more I looked at this model, the more I hated the posing of the powerfist. He suffers from Scout Hug Syndrome, just like the prior model. I ripped both this guy's arms off and haven't replaced them yet.

These next two are stock models with basic assembly. The shotgunner uses a pair of legs from the Speeder Storm kit, which is a treasure trove of torso and arm options, but shit for legs. I've seen people use the passengers from the kit on bases in a variety of crazy poses, and they all make me laugh. I got these parts from a bits lot I purchased, I sold my Speeder Storm a while back in my pre-Tyranid kit purge. No regrets though. I ripped the knife arm off the pistol/blade Scout, as I don't like the massive combat blades on Scouts. They're just absurd for anyone but Templars. Other Chapters' Scouts are sneaky bastards who infiltrate behind enemy lines and sabotage, assassinate, or relay intel. How are you supposed to slit a sentry's throat with a two-foot-long blade? You couldn't even drawn a blade that big in close confines!

I solved the blade problem with this next Scout, who is my favorite. I sliced off his overlarge combat blade and saved it in my bitz box. I have plans for all the blades I remove. Then I got out a regular Space Marine combat blade and grafted it in place. I think it looks far more proportional. In addition, I grabbed a Catachan knife/canteen belt gear bit and removed the canteen. I then sliced the hilt off the scabbard and hollowed it out a bit. You can just barely see it on his left hip, just above the knife blade. Those Catachan knives are perfectly sized for Marines. It looks like the blade he's wielding would actually fit in the scabbard! This Scout and the shotgunner were the only two to survive the arm-ripping, and the shotgunner only survived because it was too hard to get the shotgun arms off.

I'm very excited by this project, despite the pitfalls of the Scout kits. Honestly, I initially rushed some of the models I eventually disassembled, and had tried to use as many loose bitz as I could before cracking into my intact Scout Squad box. It's a mistake I'm remedying. Despite the horrible leg poses, you can actually do quite a bit with the Scout kits by swapping out blades, mixing arms, and cutting and rotating wrists.

2.03.2015

Are Terminators a Thing of the Past?

I have several project progress pictures to share...tomorrow. I was a little too busy to take them last night. Clearing snow and doing home improvements eats up time!
Today I wanted to talk about Terminators. Terminators, and characters in Terminator Armor, have long been one of my favorite models in the Space Marine ranges. Big, brutal guys who are immune to all but the heaviest weapons in the lore, but who crumple on the table to massed lasgun fire.

I've always wanted to run a very Terminator-heavy army. At various points in my hobby history I've thought about painting Deathwing, or running an army using their rules and my Ultramarine models. I've never done so, because Deathwing are always very points-intensive and lack really good support options. When the previous Grey Knights codex was released, I (along with everyone else) considered a GKT/Paladin army, but could never justify spending all that money. The current GK codex is very points-friendly, and I have money to spend so it would be an option if I hadn't already messing around with Raven Guard.

The biggest obstacle to running a lot of Terminators is that my FLGS runs Maelstrom missions exclusively. Terminators are incredibly slow, being infantry units with very limited transport options. For Space Marines, you've got Land Raiders and Stormraven Gunships. Both are upwards of 200 points, and with upgrades and weapon options can creep up into the 300 point range.

That combination of expensive units and expensive transports means you're short on models and units to claim and contest objectives in Maelstrom missions, on top of that very limited mobility issue.

So, does this mean Terminator-heavy armies are dead in this edition of the game? I cannot think of a viable way to run pure Deathwing, pure GKT, or another all-Terminator force anymore.

When you add in the massive amounts of AP2 weaponry in the game now, TDA feels like its pretty damned pointless. You've got Eldar disc-shooter guns with de facto Rending, plasma, melta cannons, monstrous creatures, and a million other things that can simply bypass Terminator armor. A model that can take a krak missile to the head and keep ticking is felled by little bits of metal spit out by an Eldar gun.

Does anyone actually still run Terminators in their armies? How do you reconcile the inability to react quickly to Maelstrom missions or the wide variety of AP2 fire with the units' ability on the table?