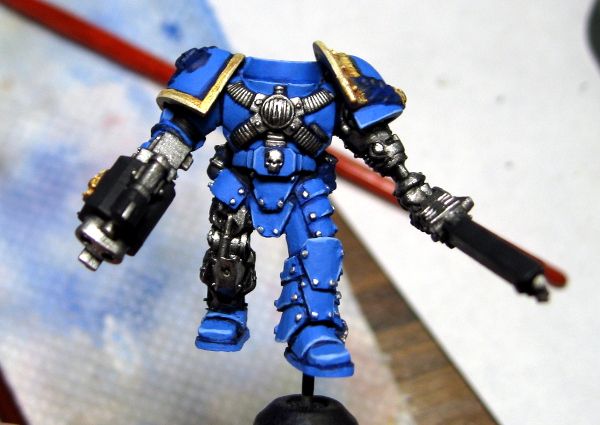
The painting bug continues gnawing on my brain, so I've been painting and painting these last several days. The result is some very solid progress on the final member of the Command Squad, the bionic bodyguard.
Here's where he's at right now:
The head is pretty much done, though I'm not so sure about that bionic eye. It's miniscule on the model, so I'm not sure there's much else I can do with it. I'm not sure if I should dot his other eye or not. I really should, but I fear I'll screw up the whole eye if I do. At arm's distance it looks ok, but in pictures the missing pupil is pretty glaring.
As for his body, he's got a Mk5 torso, bionic chainsword arm from the Commander kit, a stormbolter and arm from the Sternguard kit, one pad from the Command Squad box, and one from Sternguard, and those bionic legs. They're from Kromlech. I'll do a review of them in the future.
His pose is a little off. I'd intended it to be a walking forward type of pose with him having his arms out in a "give me your best shot!" gesture. I think I missed on it a little, and I think the reason is because I didn't roll his shoulders back. Instead of him having his shoulders back, baring his chest to the enemy, he's just walking forward with his weapons lowered. I really wish Marine torsos had ball joints on the shoulders.
I also applied a shading wash to my Vindicator but haven't cleaned it up yet. I've got the stormbolter hatch to add to it, which has been assembled and primed as long as the tank itself, I've just not touched it with paint. I also added a Razorback turret with heavy bolters to the painting queue, for use by the Command Squad and whomever they ride with.


Nice job. I think the head has come out great. The skin tone is nice and smooth. What colors do you use for the skin? I always struggle with realistic skin tones.
ReplyDeleteThe arms can be annoying to pose but it doesn't take much to rotate them either. I've done it a few times and just a little something between the arm and torso changes everything. Then a little greenstuff for the soft armor webbing and done.
Still, I think once you get the head on there and the backpack that it will pull together. The head already says, "Come get some," and I think it will translate to the pose.
Thanks.
DeleteThe skin is Reaper's Rosy Skin triad. It's an approximate match to GW Ratskin Flesh, with highlights that go upward toward Cadian or Bestigor Flesh. The trick is in the Ogryn Flesh wash I use. I basecoat in Rosy Skin, and then mix 1:1 or so of Ogryn Flesh with my Acrylic Flow Improver. I think Lahmian Medium would work as well. Then I dab it on and it pools in the creases and recesses without staining the skin too badly. When I tried the flesh wash without using the medium, it would just stain the flesh. Once that's thoroughly dry, I lightly bring the edges back up to a highlight.
I actually got the idea for using the Medium from one of the GW YouTube painting videos. The one for Putrid Blightkings:
https://www.youtube.com/watch?v=Xy7AoKAywHk&index=4&list=PLEaPE4sLDA7s-26V0v6SepDFiznb3y6hx
They don't cover advanced techniques or anything, but they show you how they intended different paints to work with one another.
I've angled arms for various models in the past, but didn't realize what the issue was with this model until it was too late. I'd normally just insert pins into the torso, and then drill into the arms at the correct angle. I just think ball joints would make the process easier, though probably more fiddly for less experienced modelers.