Originally, I'd chronicled the process over at Bolter and Chainsword on the blog I used to run there. When B&C crashed and decided to not revive the blogs, the whole process was lost to the Warp.
This is my "from memory" attempt to describe the process again...
The first thing I did was select all the parts I wanted to use:

Pictured are a Black Templars scabbarded sword (I wanted the option to give him a power weapon, but didn't want it blatantly visible and therefore a must-take), a set of used legs (this was back in my "too poor to buy new stuff" phase, where I was buying cheap lots on eBay and stripping them for parts and to refurbish), a damaged metal multimelta backpack (the previous owner had lopped off the cable feeds and put some sort of pin in the top), a metal Iron Warriors upgrade torso, bolter arms, the Techmarine head from the Ravenwing box set, a Mechanicus pad from the Marine vehicle upgrade sprue, an a Chaos Marine Terminator Reaper Autocannon.
The first thing I'd wanted to do was repose those legs and give him some bionics. I cut a piece of round sprue from a model jeep kit and replaced the thigh with it. I'd intended to add additional cables and coils around it. This shot shows how laughable the attempt was:
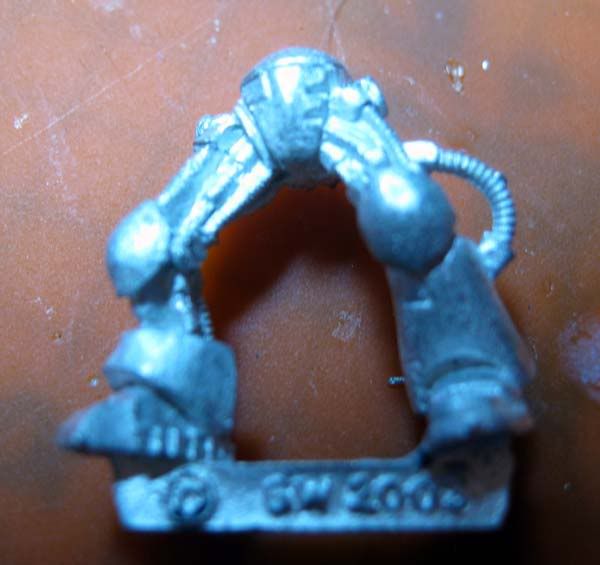
I then decided to get rid of the Dark Angels iconography on the Techmarine head. I didn't have any Greenstuff at the time, so I filled the area with plastic glue. I waited for it to dry, and then filed it down smooth. Again, pretty sloppy and laughable looking back:

I then started working on the beamer. I began by lopping the barrels off the autocannon, because I wanted those recoil compensators to be energy coils. After some misadventures, I ended up drilling three lengths of paper clip into the front, and slipping tubing from Q-Tips over the top and bottom ones. I then found some random flat oval bit, drilled matching holes, and used it as a brace or end cap. I think my intent was to use this assembly as an energy collection point, with the tubing painted like it contained an energy beam inside each one.

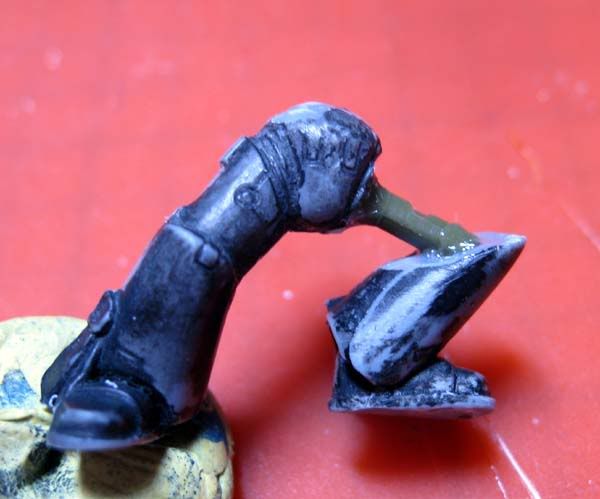
The amount of glue used to make all this stick was appalling, and it really ruined the finish on the parts. Plus, it looked a little too thin to be a big, scary weapon. I decided to wrap the whole thing in wire to remake the coils. Also, I'd replaced the Terminator arm section with the equivalent piece from a regular bolter arm:

I'd used 40-gauge floral wire to wrap the coils, and it was a bitch towards the end to keep together. This resulted in gaps. However, I needed some sort of support structure for the coils anyways, so I covered most of the gaps with pieces of bent 1mm plasticard (actually a 'for sale' sign I'd bought for that purpose). These are superglued to the coils and then plastic glue was used on the backside to blend the joint by the melt-then-sand method I used for the helmet.

I needed a little more structure, so I added a random piece from the jeep model underneath the assembly, and then added focusing/discharge coils in the form of the shock springs from the same jeep kit.

I then added a final focuser to the front in the form of the upright from a radar dish off of the Marine vehicle sprue. But the gun was now massive, and would require two hands to hold and fire. I added a handle by chopping up some bit from a Baneblade sprue.

Because of the positioning of the handle, a regular bolter support arm wouldn't fit. So, I grbbed a spare biker arm, sliced off the hand (the grip was too small), and attached the hand from the bolter support arm.

By this time, I'd scrapped the idea of making my own bionic legs, and began searching for alternatives. One option was to slice the legs off of one of these old Devastator models:

But I somehow landed a set of bionic legs from the Iron Hands kit instead:
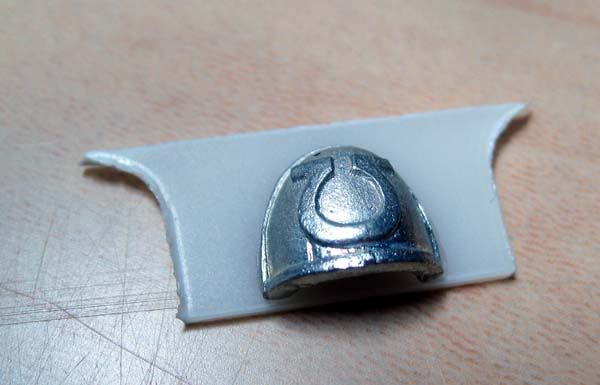
I wanted him to have a fancy shoulder pad with a deflector on it, so I glued plasticard to the back of a metal Ultramarine pad, and then trimmed away the excess. This is what bitz poor people do in place of expensive bitz!
Some posing and assembly of his body:

And then assembly of his gun, arms, and pack, plus the addition of his fuel delivery lines. These are actually wires from a phone cable I tore out of my house while redoing rooms.


Some WIP paint pics:


And finally some completed shots:
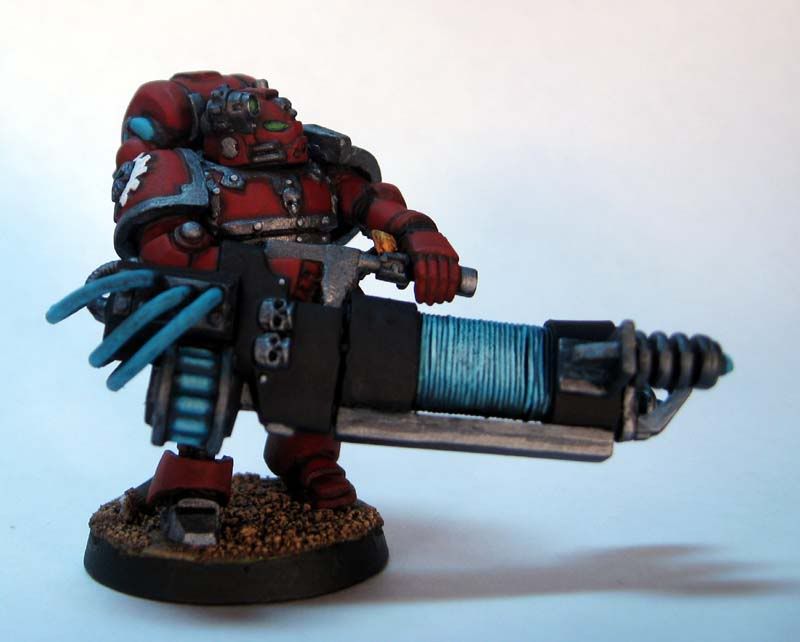


And there you have it! I was pretty proud of this model when I finished it. Lately, he's been showing his age. Funnily enough, while my painting skills have improved overall, I no longer make creative, scratch built models like this. Somewhere in the progression, I lost that bit of creativity and boldness that would push me to make a model like this. I've actually been thinking of replacing him with a new version that uses the Forgeworld Valthex model as a base. I don't' think I ever will, though, as this guy has seen the table less than ten times, ever.
It's a shame he hasn't seen more play time. He is such an awesome model and conversion.
ReplyDelete-Hippie
Yeah. The problem has always been that he has to stand still to fire the thing unless you put him on a bike. He also has never had the chance to take a complimentary squad. Unless you take a 5-man naked Tac Squad or Scout Squad to babysit him, you're wasting shots that could go elsewhere when you try to get that max range S10, AP1 Blast.
DeleteMy Decimator has 'Firing Calibration' which means he has to stay still to fire his as well. Doesn't work out great but it is a neat concept and certainly sounds nasty to the opponent.
ReplyDelete