11.17.2014

Marius Gracchus, Standard Bearer

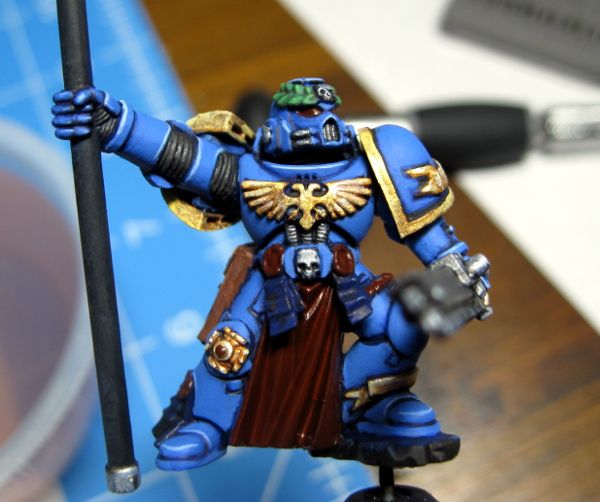
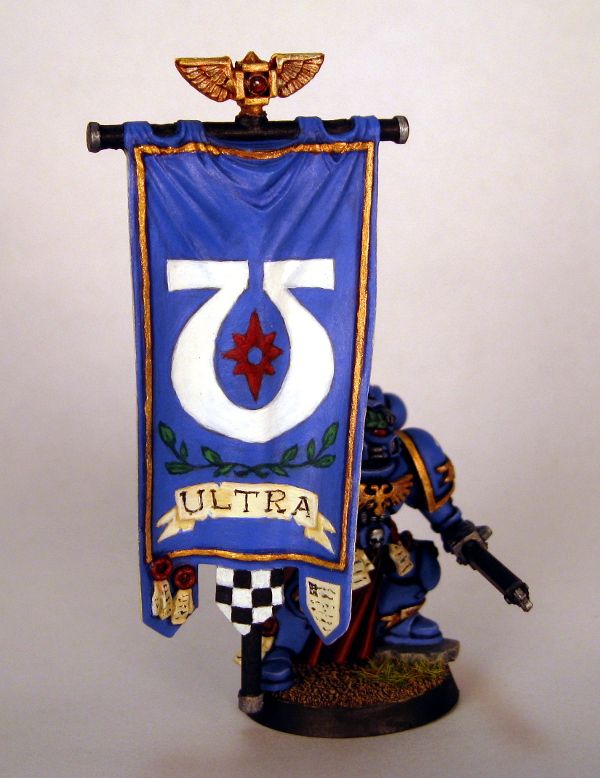
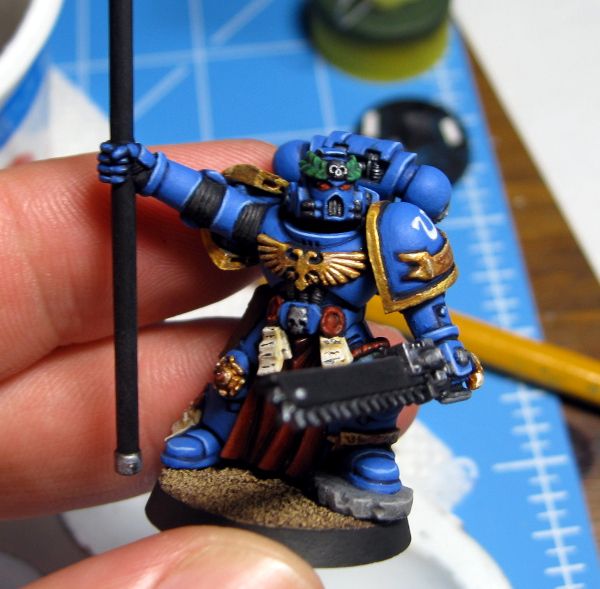
The third member of my Ultramarine Command Squad is now complete. Yes, I've finally finished off the Standard Bearer, Marius Gracchus:


Here's his backstory:
Standard Bearer Marius Gracchus, "The Youngling." Marius is one of the youngest Marines ever selected to bear a company standard. His youthful features and penchant for humor hide a warrior who is capable with a chainblade and a masterful shot with a pistol.

Overall I'm pretty happy with how he turned out. The only disappointment is with the banner pole and the back of the banner itself. I had drilled a paperclip into the mounting point of the pole so I could hold the banner during painting. It worked, but when I was removing it last night, I tried to file away the excess paint. That went ok, but when I finished, I blew on the area to get rid of the little grains of paint and plastic. My hand took that moment to lose strength (hooray for carpal tunnel syndrome) and I dropped the banner on the floor. The top ornament broke off, and the paint was a little scuffed near the folds of the cloth. Then, when I was trying to apply liquid plastic cement to the area and affix it to the pole, I dropped it again with glue in the channel. That picked up some dust, so I had to fiddle with it again. The cement refused to hold, so I had to settle for super glue. After I got a scare when a drop of superglue rolled out of the tube and just missed the edge of the banner (landing instead on my pant leg), I got it held in place and decided to take the rest of the night off. I know by now that when my hands get weak like that, I need to stop.

Now that Marius is complete, I can turn my attention to the Demolitionist/Tank Hunter I'd shown earlier. I've only got a quick coat of blue on him right now, so nothing special to share in that regard. He'll be a pretty simple job once I'm not bouncing back and forth between the banner and the Tank Hunter, and picking away at my Vindicator (remember that project?). I realized just a moment ago that I've been screwing around with this Command Squad since April or thereabouts. Seven months for three models thus far, with a little work on a drop pod and a Vindicator snuck in there. Yikes.

Once I get beyond these Ultramarines, I can start thinking harder about my Raven Guard. I'm still hemming and hawing over what wargear to give the Captain, or whether I want a Captain at all. Maybe a Telepathy Librarian would be more interesting. Then there are Scouts, Vanguard Vets, and Assault Marines to think about. I'm burying myself under a mountain of planning again. Add onto that the thought that maybe the Command Squad would like to have a new HQ model to lead them, and I'm swamped with ideas, but not with spare time.

I bit the bullet and ordered three new brushes, Raphael 8404s. Two size 0s and a size 2. I previously used inexpensive Loew Cornell red sable brushes from AC Moore. They were about $4 each, and held up pretty well. But neither AC Moore nor Michael's carries the line anymore. They seem to have shifted heavily towards synthetic brushes, which I just can't use anymore. With my old brush line extinct, and being on my last brush of the type, I had to get new ones. I bought them via Amazon, directly from the distributor. Delivery estimate is 4-6 weeks. OUCH. Thankfully, my last remaining brush should hold up that long. I'm hoping these new brushes are worth the money.

10.31.2014

More Progress on the Banner

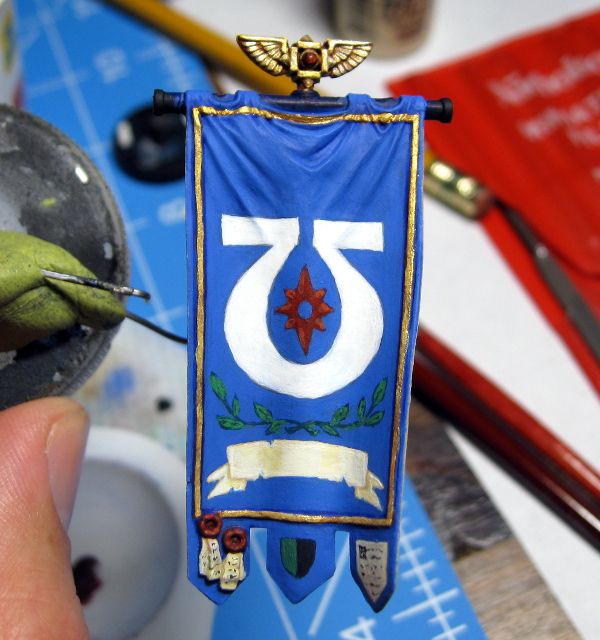
I put some more time into the banner for my Command Squad. This is what it looks like now:

I added some shading to the scroll, and knocked off all of the dark edge lines I'd had on it before. I then added the red starburst, and some small highlights on each point. However, I need to go back and clean those lighter areas up some. Some are a little blobby. I added black line text to the purity seals and the bottom right design, and put a campaign badge on the bottom center...thing. I'm not a huge fan of the badge though, and it may end up being removed. It's off center and pretty plain.
I also added the ivy/laurel branches. I started by sketching the branches out with a sharp pencil, then went over them with dark green. After that was dry, I added the leaves in the same dark green, let them dry, and then applied a thin lighter green on top. Unfortunately, by that point I was getting a little tired and slipped in some places and was messy in others. I added small lines of dark green to the leaf centers and called it a night. I need to go back and tidy up the leaves.

Once the leaves are done and I've decided on what to do with the center bottom design (it's bugging me that I don't know the term for those little things on the bottom of the standard, I'll have to Google after this), I'll finish the back in an ivory or linen color. I think it'll look nice that way and break up the sea of blue. I'm about halfway done that process, but it's pretty boring so I didn't take a picture.

I'll be happy to have this model finished, but I do have to say that I really enjoy painting the freehand on the banner. I've always been a glutton for punishment.

As soon as this is done, I can move on to the tank hunter veteran. He'll be an easy one, and then I'll get my bionic veteran up and going. Again, an easier paint job (aside from his head/face) but I'll also have a review of the Kromlech legs I ended up buying for him.

10.17.2014

Nearly Done: Standard Bearer

Here is some more progress on my Standard Bearer.


The Marine himself is pretty much done, with only some static grass needed around the edges of the rock he's standing upon. That rock was actually a major pain in the ass to base around. Normally, I put small strips of plasticard under my Marines' feet. This raises them up a tiny bit so they don't appear to be sinking into the ground. It also allows me to put sand all the way under their feet, so I don't end up with gaps around the feet when I glue the model to the base. The problem with the rock was that I wanted it to look like it was sticking up out of the sand, not sitting on top of it. I skipped putting card under it, while still putting card under the other foot. I'd hoped it would allow the rock to be sunk down while the other foot was not. All I ended up with were the gaps. It's simple enough to obscure them with static grass, but I need to be careful not to apply too much and make it look like a fuzzy ring around the rock.

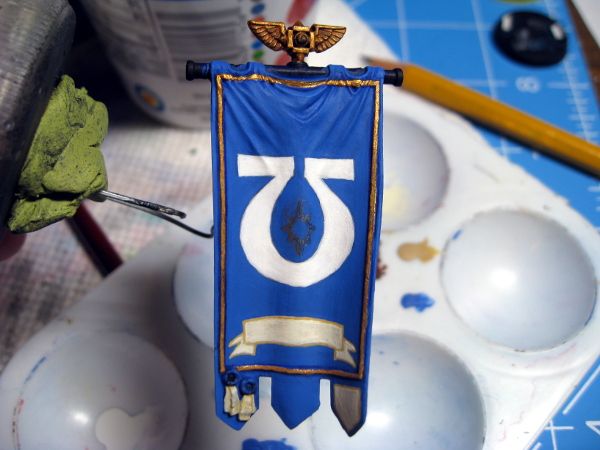
Here is the current state of the banner itself:


It's pretty plain. Originally, I'd had grand plans for it, with a huge laurel wreath surrounding an Imperial aquila clutching the Ultramarines symbol in its talons, with the scroll at the bottom. I sketched it out on paper and searched Google for art I could use as a model to construct the whole thing. I was then going to print it out to scale and use the pencil-rub/carbon paper technique to transfer it to the banner. Then it would be a simple matter of painting it. Problem is, I no longer have access to Photoshop and GIMP flat out sucks for working with images other than retouching and cropping things. Every time I tried to combine my images, one would end up pixelated beyond recognition, or the scales wouldn't match, etc.

I said "screw it" and sketched a new design on the banner with a soft, sharp pencil. I had wanted to sketch my original design on there, but the curves of the piece make intricate lines tough. I ended up just going with the simple design you see above. That grey smear in the middle will be a red starburst that I need to re-draw and re-center. The red starburst is an old-school Space Marine symbol. It's supposed to be used for veteran sergeants, but I've co-opted it as a more generic symbol.
I still need to go back in and add some shading to the scroll and the symbol. Probably just a thin layer of a darker color for each one, and I should probably ding up the edges of the scroll with tears and dog ears. You don't typically see perfect, pristine scrolls on 40K artwork.

I also need to add something to the area between the Chapter symbol and the scroll, especially to the right and left edges. I'm not sure what to add though. A fancy, squiggly design? A couple crux terminatus symbols? Very small laurels?

There's no way I'm adding anything above the Chapter symbol unless I get VERY brave and ambitious. Those folds are a nightmare to draw on. If I were to add anything up there, it would likely be a row of checkered boxes, a Greek key design, or a small aquila.

We've also got the monthly tourney at the FLGS tomorrow. As of right this moment, I'm planning on going. I just have no idea what I'll bring for an army. I've not played at the FLGS in months now, so I have no real idea of what the meta is anymore. From what I've seen on Facebook and blog posts, there are plenty of Knights showing up in Imperial forces. Still a good number of power armored players, and plenty of monstrous creatures in non-Imperial armies. I guess it doesn't really matter, as honestly I've not upgraded my army to a 7th Edition style. There isn't a single grav weapon on any model in my collection yet. The last time I had plans to upgrade my bikes, it was to add Scout Bikers and a Command Squad with power lances. That should tell you how far behind the times my army is now.

10.07.2014

Command Squad Progress: the Tank Killer

In the last week or so, I've made some very solid progress on my Command Squad. Painting for the Standard Bearer is done except for his base, I've picked some parts for the bionic Veteran, and I fully built the tank-killing Veteran. Here are some shots of him:

This is the initial body construction, showing the FW torso defects I repaired and some studs I added to his knee pads.


And then his final state, with a head picked out and pads on.


The studs are micro beads, set into small drill holes and glued in place. You can see the tutorial I got the idea from over at Drowned in Plastic. While you're there, check out his Helbrecht build. It's AMAZING.
I held off on a full spread of studs, because I wasn't sure how well they'd come out. A couple added to break up the smooth lines just a bit felt like enough.

The general design behind him is that he wears plated Mk4 armor and a left-leading pad with an extended edge to protect him from the shrapnel and blast from tanks and bunkers he's destroyed with that meltagun and meltabombs (the meltabombs are behind his left hip, not visible in the images). He's got improved targeters in his helm for finding and tracking weak points in vehicle armor, including an upgraded thermal imaging suite for finding exhaust ports and venting seams in xenos and Imperial STC vehicle patterns.

I didn't elect to use another tabarded set of legs for this Marine, as I figured he'd either have no use for one as decoration or that it would be burned up pretty quickly as he stands in the blast wash from exploding tanks. It might bust up the cohesion of the squad some, but probably not a lot as the Apothecary and the bionic Veteran also do not have tabards (though the bionic one is still up in the air, with a post on him and his legs coming later this week).

It's exciting to be nearly done with the Command Squad as a whole. Once the Standard Bearer is done, I'll be over halfway finished, with only two guys left. Both are simpler paint jobs than the Standard Bearer or the Apothecary. The tank hunter will go pretty quickly, being all blue and gold and the bionic Marine will as well, since I don't forsee using any white or fancy sections on him.
Once the squad members are done I have to decide if I'll build them a custom Razorback, or just paint up a turret to put on top of one of my Rhinos. Right now, all of my Razorback turrets are assault cannons or las/plas.

Thankfully, I've finished most of my home improvement projects that were eating up my evenings and the summer heat has gone, leaving me time and motivation to paint again.

9.24.2014

Thinking About Black Armor

As I inch closer to completion of my Ultramarines Command Squad, I'm turning my mind towards a plan for painting Raven Guard.

I have been thinking about the paints I'll use for their black armor. There are a lot of tutorials and how-to's online about how to paint black, each uses a different variation on the theme. Some rely purely on a black paint with grey or blue highlights. Some use grey shaded with black, and some even attempt an NMM (non-metallic metals for those who don't know) effect.

I've only painted black armor twice before, both times for Ultramarines Chaplains. For those models, I used a deep, dark grey from Reaper call "Grey Liner." Basically, it's a paint designed for darklining fantasy miniatures. Darklining is where you paint a thin line of a darker shade between two separate pieces of a model, like a flesh-colored arm and a tunic sleeve, or an armor plate and a leather strap or belt. I think this is an outdated technique that most folks don't use anymore, having been supplanted by washes, but I could be wrong.

Anyhow, this paint is a very dark grey. For my Chaplains, I primed black, applied Grey Liner to all the armor, and then edge highlighted with lighter greys. Here is what it looked like on my counts-as Chaplain Cassius (try to ignore the horrible posing of the model):
 
 
Here's another shot with less colors, so you can compare it to the basic black of primer:

 
One thing to note is that I painted this Chaplain back before I started using Badab Black as a wash. In those times, I used thinned black paint to wash my metals and such. I can't remember if I added a black wash to his armor, but I doubt it.

I think this paint scheme will work for Raven Guard. However, my Raven Guard will be very plain in the armor department. I'm planning to select a lot of models and parts that don't have a ton of dangly decorations and fancy parts. I just don't see Raven Guard, the sneakiest of sneaky, carrying around all that junk on their armor. The clink of a decorative chain can give you away, and too much carved decoration on armor makes it harder to slip through small areas. The issue facing plainer armor using my Grey Liner method is that the models might be too plain on the table, looking like unpainted, primer-only models. My hope is that the edge highlights, small metal or colored details, and deeper black of a Badab Black/Nuln Oil wash in the recesses will help them stand out enough to look properly painted.

One additional idea I'm thinking about is switching over to GW paints for Raven Guard. The only problem is, I have no idea if they have an appropriately dark grey to replace the Grey Liner. I know I'll be using Leadbelcher and Ironbreaker for metal parts, plus Nuln Oil as a wash. While I do want the models to be muted and dark, I don't want them to be boring. The solution to boring black armored models is to add small splashes of color here and there. Grenades, pouches, and especially bolter casings. The bolter casings for my Ultramarines are black. Black casings over black armor will be too monochrome, so I'm thinking of using a very dark tone washed with Nuln Oil for the casings instead. I had my eye on Incubi Darkness for a greenish blue undertone, but I have no idea what the paint looks like in person. The other option is Caliban Green. Does anyone use these colors and able to tell me how they'd look slathered in Nuln Oil?


9.22.2014

Standard Bearer Progress

This weekend allowed me a few good hours of painting, which I used to work on my Standard Bearer for my Command Squad. This is what he's looking like as of today:


I still have all the red to do (eyes, purity seals, tabard) as well as the linen of the seals and the freehand on his armor and shoulder pads. After that is the standard itself. I have it primed and mounted, but haven't touched it with paint yet.

I tried a slightly different approach with the gold this time around. I started with my standard brown, then gold, then wash with Gryphonne Sepia. But instead of going back to my base gold, I skipped right to Reaper MSP New Gold, which used to be my first highlight color. I like the brightness of it, so I'll be sticking with that from now on.

The next veteran in line is the demolition specialist, who'll end up with meltabombs and a meltagun, plus a bolter. I successfully repaired his armor collar (from the FW Mk4 power weapons kit; it was miscast too thin), and added some rivets to his armor using microbeads. I'll get a picture as soon as I can (hopefully tonight). Thus far, I've only stuck the torso on the legs and let it sit to dry. I sometimes rush assembly stages, and end up knocking parts out of alignment slightly while glue dries or cures.

9.09.2014

Metals and Music


I found the time to do a little painting last night. I got the midtone coat finished on my Standard Bearer, but decided not to press on to the top coat as it was getting late. Instead, I brought out the dozer blade for my Forgeworld Vindicator. I've got all the blue done on that already, but needed to start on the metallics.
I was too lazy to take a rather boring shot of a blank dozer blade, but essentially I'm painting the bottom teeth of the blade and the surrounding plate, as well as the side plates silver metallic, while the blade face is my standard Ultramarine blue.
Back when I was working on my drop pod, I'd had a really tough time on the metallic sections of the model. My Reaper Master Series metallic paints just didn't cover very well. I was getting brush strokes, pigment separation, and not enough paint in various areas. I muddled through, but decided MSP silver metallics weren't going to work for large areas anymore. It had been suggested that I try out the GW/Citadel line of metallics, so I grabbed a pot of Leadbelcher and a pot of Ironbreaker a couple months ago.
I broke open the pot of Leadbelcher and started working on the dozer blade. I held my breath and started applying paint. SWEET MOSES! It was like a revelation. The paint went on in a single coat, and perfectly covered the primer. I didn't need more than a single pass on any of the primed areas. I did need a quick second touch on areas that I'd gotten blue paint into, but it wasn't the struggle I normally encounter with my MSP metallics.
I've always been a bit of a Reaper paint snob, but I have to say I'm sold on these Citadel metallics. I don't think I'll go back to Reaper metallics on anything larger than infantry weapons. My only concern with the Citadel paint is that pot design. I had to paint with the pot open on my desk, which made me think it would dry out over time since it's constantly exposed to open air. Has anyone noticed drying in the modern Citadel paints? 

I've been listening to some 40K music in an attempt to get myself re-motivated to paint. It's not that I don't want to paint, it's just that when I have free time at 8pm at night after a day of work and a few hours playing with my son, it's hard to park myself in the heat of my office (it's been an Indian summer here lately) and put brush to model. It's even tougher when I spend an hour or two a night working on home improvement stuff, like redoing windows in our living room.However, 40K related music seems to really help with getting the mental juices going. I've been spending a lot of time listening to the soundtrack to Space Marine. You can listen to the whole thing on YouTube if you don't want to buy it (https://www.youtube.com/watch?v=2v4kaE_XbR8). I recommend Titus' Theme, Battlements, Titan, and A Hero's Legacy, though there's no bad track in the whole thing. The tracks have a little ore meaning if you've played the hell out of the game like I have, as you can picture the scenes from which they are pulled. Also good is the Dawn of War 2 soundtrack (also available on YouTube), and the first track from the Ultramarines: The Movie soundtrack, "Steel and Doom." Yes, that one's also on YouTube. I can fire these up on my Kindle Fire and listen to them while I paint, or while I'm trapped in my cubicle at work.