Showing posts with label Basing. Show all posts

1.03.2017

Let the 2017 Projects Begin!

Now that the holidays are over, I'm back to my regular winter day schedule. That means I'll get my half hour of hobby time in each weekday morning. The long holiday break prevented me from getting very much done, as it's hard to hobby with a kid running around with new XMas toys.

The first thing I've done is assemble and begin basing for some of my Blood Bowl Orc models. I selected three random models from the box: a thrower and a couple linemen or blockers. I glued them into their slotted bases, and started playing with basing. Here's the first shot of them:
blood bowl orcs
You can just see the small amount of texture I applied to the bases. It's the clearish, goopy stuff. Here's a close up: 
blood bowl orcs
It's a product called "resin sand" that is made by various art supply companies. I used Liquitex brand, as that's what I had. From what I understand, painters and artists add this stuff to their paints to infuse texture into paintings and projects. I used it a long time ago when making rusty terrain for a Mars board at the FLGS. It dries quite hard and is pretty durable. 
resin sand for basing
After the resin sand was applied, I glued down some basic craft sand on the bases. The result is unimpressive so far, as can be seen below, but I think once it's painted and I've glued on some static grass, it'll look better. 
blood bowl orcs
 
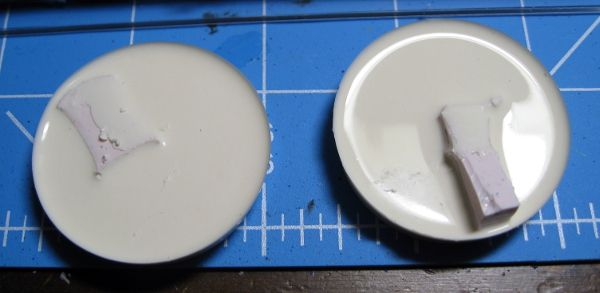
Since I had the basing materials out, I decided to jump in and start working on bases for my Harlequins as well. These guys are a little weird with the integrated wraithbone chunks, and I wasn't sure exactly which direction I wanted to go in. I decided to use straight glue on the bases, sprinkle some medium and large pebbles on, and then coat the remainder in fine sand. These are the same materials I'm using for my Raven Guard, but applied over the whole base instead of just small spots as on the Marines.

These models will be primed white, and the bases will end up a light tan for a desert feel. Once they're painted, I'll be adding some dead grass and scrubby vegetation to them.
 
On the Marine front, I finished my Deathstorm Drop Pod, but am working on taking pictures. My photo area is only so large, and I'm tinkering with ways to take pics of such a tall model.
 
I wasn't sure what the next Marine unit I wanted to paint was, so I took a few spare hours the other day and did a full inventory of all my kits and bits. I came to a surprising realization. Between my bits bins and a huge Rubbermaid tote of sprues and kits, I can only build the following:
  • 10 Terminators
  • 8 Scout Bikes (half of which are old, metal models)
  • 1 Rhino (with an optional Whirlwind turret or a range of Razorback turrets)
  • 1 Land Raider (with weapons for all three variants)
  • 6 Servitors
  • 1 Third Edition Techmarine
  • and SIX power armored models of any type.
I was really shocked by the fact I can only build a half-dozen PA models. I have a significant number of PA sprues and bits, but the thing holding me back are torso backs. I have completely run out, outside of the six I have, and even those are preassembled to fronts from an auction lot I got years ago. I had plans for a lot of PA models for a Demi Company in the near future, but now I need to go bits shopping!
 
In fact, I can build a bunch more models with a minimum of bits purchasing. Five Terminator torso fronts can net me five more full Terminators, while a single Rhino rear door would get me another full Rhino chassis. Three basic bike chassis (without riders) would add another three Scout Bikes to my options. But the big one is torsos. I can build another 19 models just by buying torso backs (though no one sells just backs). Oh, and I can build three full Landspeeders if I get some more of the magnetized flying stands I use from Back to Base-ix.
 
I've got a few things listed on eBay right now in order to raise some funds for said bits, but in the meantime I'm starting assembly of a Rhino. I think my lone Sternguard Squad or my small tactical Squad would benefit from a transport or two.
 
I've got a lot of irons in the fire now with Blood Bowl, Harlies, and Raven Guard. We've got a Blood Bowl league starting up soon that I'm going to really have to work to participate in, and the FLGS monthly 40K tourney coming up in a couple weeks. Lots to do!


10.20.2016

Dreadtober Progress Reports #2 and 3: Basic Colors and The Base

This week I have two Dreadtober updates to share in one post. I was out of town last week, so I missed the update on blocking in colors on the model.

Here's the current painting progress on the Raven Guard Venerable Dreadnought:
Raven Guard Venerable Dreadnought

He's nearly done. You can see that I left his shins off for painting. You can also spot a small dot of silver on his left thigh area that needs cleaned up. I used Runelord Brass on small details like bolt heads and ribbed cables, washed it with Devlan Mud, and then touched it again with Ironbreaker because it looked too flat. It breaks up the monotony of silver nicely.

I'm supposed to use this model in a is weekend, so I'll probably concentrate on decals and final details like lenses and targeters next week.

In order to get him table-ready, I also started work on his base. I use a flagstone style base scheme for my Raven Guard, and I covered the process I used to make the first bases HERE.

The first step for the Dreadnought base was to slather the whole thing in plastic glue and start slapping down carved squares and scraps.
40K Flagstone Basing

The scraps are left over from building my original 32mm bases and the base for my Leviathan Siege Dreadnought. All the overhangs are very intentional in order to get a more random placement of the center flagstone on the base. The overhangs go away when I turn the base over a couple days later and use an Xacto knife to trace around the top edge. This scores the plastic and allows me to snap the overhanging parts off. Those scraps go in a bag for later use. The result is here:
 40K Flagstone Basing
After snapping the overhangs off, you angle your knife and carve the flagstone texture into the edges. You can see some of the little curls of plastic produced by this process in the picture above.
 40K Flagstone Basing
The final step is to add bits, rocks, and sand. I have a bin full of random offcuts from which I pulled that skull-arch thing (I believe it came from a 40K scenery scrap), and obscured by the glare in the upper left are two resin skulls from Secret Weapon's "Sack 'O Skulls". Those are top-notch quality, and I highly recommend them.
 
The bits get stuck on with superglue, and then I use PVA glue top make little puddles where I want rocks and sand. I randomly drop small rocks into the puddles, and then cover the remainder in sand. Both materials came from the springtime washdown at the end of my driveway. That's the little piles of sand and dirt left in the drive by the melting snow.
 
I try to focus on wonky areas of the base for rocks and sand, like the corners of the center flagstone. I got lazy and didn't carve it up enough, and so it looked too sharp and geometric. The rubble obscures that and solves the problem.
 
The base is now sitting in my garage, waiting for the primer to dry. I'll paint it tonight during the Bruins game.


4.26.2015

More Raven Guard Scout Progress...So Close!

Here's a series of images that show my progress on the Raven Guard Scouts.

This image is washed out and terrible, but you can see the glossiness of the varnish I added to the shoulder pads. I'm told it's a key step in laying a foundation for decals, so I applied it to the shoulders of every model.

Once that was dry, I started applying decals. I used Micro Sol and Micro Set to get them nicely adhered. The first I applied didn't go very well, as I mixed up the order of the solutions. You want Set, then Sol. Set makes the area tacky so the decal "sets" in place, and then you use Sol to soften the decal to conform to the shape of the piece. It's a SOL-vent. After I figured that out, the remaining decals went quick and easy.

I used the Forgeworld decal sheet for Raven Guard, which is absolutely fantastic. I'd say you could probably do an entire army with a single sheet.

I then set the models aside after giving them a quick blast of Dullcote to lock down the decals, and proceeded to work on making a mold for my custom paver/flagstone bases. I dug out a very old canister of mold silicone. I'd had the kit for something like two or three years, and the canister was half full. When I went to use it, I realized it was probably no good because the silicone was very thick and goopy. Proper silicone is thick but flows easily. Being the cheapskate I am, I figured I would give it a shot anyways and mixed up a batch.
Turns out I was right, the stuff was too far gone. It refused to cure after three full days. Uncured mold silicone is just about impossible to remove from anything, so I had to throw the mold box, the acrylic sheet I'd glued it to, as well as four master bases in the trash. Here's a pic of the whole disaster before it went in the trash. The bases sticking out of the top were actually pulled free from the hot glue I'd used to fix them to the acrylic sheet because of the air bubbles underneath!

I thought about giving up on making a mold, as I wasn't sure I wanted to spend more money on more silicone. But, I gave in and bought more. This time I bought Alumilite Quick Set, where in the past I'd used High Strength 2. The Quick Set cures more rigid and less squishy. HS2 is more for one-piece molds with big undercuts, while Quick Set is for two-piece molds and one-piece molds with no undercuts.

I got my shipment in less than a week, and poured a mold over four of my masters. The result? Success!

One thing I'm a big fan of when I make molds is recycling. In the past, I'd saved small spills and sections of cured silicone and added them to my new molds. Silicone cures solidly to old silicone, which is why you need mold release agent when making two-piece molds. But I wasn't sure if Quick Set would bond to HS2, so I didn't include any recycled chunks in the master mold. Instead, I sliced off a couple pieces of an old HS2 mold and put them in the bottom of some plastic cups. I poured the leftover Quick Set into the cups to see what would happen. Turns out they bond nicely! I can now use chunks of old molds to save volume when pouring new molds. I even added these two little experiments to my pile of old silicone for chopping up and inclusion in new molds down the road.

My first pour into the new mold wasn't great, but it wasn't a total failure. Below you'll see four bases. The top right contains a lot of unmixed resin, while the top left contains a little less. I didn't spend long enough stirring the bottom of the cup. The two casts on the bottom came out perfectly, as they were the first ones poured from the cup.

 After another mix and pour, I had six usable bases and two failures. Here are the five for the Scouts:

Because pure, flat bases are boring, I got out my tubs of sand and small rock and added some to each base to make them look like small rubble piles.

These will then be primed white and painted a stone grey color. You'll notice the bottom left base has a small notch out of the largest tile section, at the bottom. That was an air bubble from the casting that I carved the edges of to make it look like wear or damage. You don't have to worry too much about bubbles on bases of this style, since you can just cover them up with sand and rock, or expand them into cracks or damage.


4.06.2015

Raven Guard Scout WIP Post #4

More solid progress on my Raven Guard Scout squad. In fact, all of the painting on them is now done! Here is a final WIP shot of painting on one of the models:

This was the addition of Caliban Green on the gun casings. I really like this color here, as it breaks up the sea of black. It'll be even more apparent on power armored Marines, since those guys will have no grey pants to break things up. I'll need to rely on pouches, grenades, and gun casings to break up the black and silver.

An example of a couple final shots:


I really like the Caliban Green on the shotgun. I forget what the green I used for the edge highlights was, but it was a Reaper MSP paint.

I also made some serious progress on my base masters for casting. I took all of the 1" squares of plasticard I'd cut out, and carved a rough bevel into each edge. When I had four squares, I'd slather the base in plastic glue and randomly stick the first square on the base. Then it was a matter of sticking the other three on as well, pressing very firmly, and then  letting them dry.

Once the glue was fully cured (wait at least 24 hours), I flipped the base over, and used my X-Acto knife to score the plasticard around the top of the base. You have to be careful not to slice off pieces of the base itself while you trace around, and also be careful that you don't press so hard that you break the knife blade. One or two passes around are plenty, and it doesn't need to be perfect. It all gets cleaned up at the next step. Once the pieces are scored around the base top, you can just snap the plastic off of the base. Don't throw out the pieces you snapped off!

It's not really visible in this picture, but the next step is to go around the newly-snapped card and carve bevels into it in the same way you did when making the squares in the first place. Again, be careful not to slice the black plastic of the base and take the opportunity to cut away any glue drips that got onto the black plastic. It'll reduce the amount of filing you'll do on the final casts.

Now, for the second base, take those pieces you snapped off and use them to make another pattern. I like to randomly select one, glue it down, and then arrange the other scraps based on its position. It keeps things reasonably random. I don't want all of my bases to be perfectly lined up with the center of the stone seam in the center. That'd be pretty boring.

I repeated this process until I'd made five base masters, and since then I've made three more. I stopped at a total of eight because I only had ten bases to work with, and wanted to save a couple for backups, plus I wanted to save some of my card squares to make some 40mm bases for Terminators someday (Raven Guard actually do use Terminators, not just Assault Marines and Scouts!).

The next step is to check for any fine seams under the stone squares that the silicone for the mold might get into, seal them up with glue, and then get to casting.

In other projects, I've finished painting my Ultramarine Librarian. However, he's still in pieces as I haven't glued all the subassemblies together. Once he's done, I'll set up the lightbox and get pictures taken. After that, I'll mount my lascannon Marines for painting and get started on them. I'm hoping to paint them in a batch, but if they won't hold still in the mounting corks I'll have to paint them one-by-one.

1.03.2014

Picture time!

As I promised, here are some pics I took over the course of a couple projects, but that never panned out into anything resembling the tutorials I wanted them to.

First up is a series of WIP shots of my Hive Tyrant's base.

This one is the base with the materials glued down. It's gravel and washdown material from the end of my driveway, resin tree stumps and a doric column chunk from Secret Weapon, and some Greenstuff mushrooms.

Then the same base primed white (very exciting). It took quite a few spritzes from the can at various angles to get all the rocks covered and gaps primed.

After that it was a few coats of Reaper MSP Stained Ivory on the dirt and exposed wood. When that was dry, it got a thinned wash of Gryphonne Sepia on the ground and Thraka Green on the wood. I wanted the wood to look soggy and decayed, and it was the one thing i feel I didn't pull off well. I was generally unhappy with the end result of the stumps, which you'll see in a future post.

I wanted some shadows and a moist soil look around the stumps, so I went with Devlan Mud wash around them. I then added a few more areas of Devlan, Ogryn Flesh, Leviathan Purple, and even a few dots of Thraka Green. I mostly concentrated on the areas where grass and reeds would be, figuring they'd retain and grow in the moist areas.

This final shot shows where I started basecoating the stone grey, and added some purple and brown washes to the stump bark.

And that's where I stopped taking pictures because I was short on time.

I grabbed these two shots of my WIP Devastator Sergeant in order to start a tutorial on how to shade red. Here's the sergeant with a basecoat of red on his helmet:
 
And then again after washing the red with Thraka Green, which is the proper color for shading red. I abandoned this tutorial because I was painting my ass off for the Standish Standoff.
 

Then I have this shot of my drop pod being assembled, using slide clamps to hold the fins in place while glue cures. I was going to do a whole article on these and other clamps, but I assemble models far too slowly for that.

 And finally, a shot of one of my Genestealers after I had put a Sepia wash on the basecoated talons. The green skin is complete in this shot.

So, that is make-up picture day. I'll have some more shots of the finished Tyrant and Genestealers next time.


10.14.2013

The List, The Paint Desk

I figured it would probably be a good idea to share the army list that inspired my last entry. It's 1500 points, and designed for a composition-friendly event I'm attending down in MA this coming Saturday. It's hosted by the DorkaMorka gaming club. I've attended two or three of their past events, but had not been down there for more recent tournaments, wither due to family stuff or the bitter taste of being worked over by comp-bender lists the last time out.

Anyhow, here's the list:

Chaplain Cassius
6 Sternguard, Sergeant w/combimelta
5 Terminators, 2 chainfists, 1 assault cannon
10-man Tactical Squad in Rhino (non-veteran sergeant with chainsword, pistol, and meltabombs, missile/flamer)
10-man Tactical Squad in Rhino (non-veteran sergeant with chainsword, pistol, and meltabombs, plasmagun/multimelta)
7 Scouts, 6 snipers, camo cloaks, missile launcher
10 Assault Marines, veteran sergeant with pistol and powerfist, 2 flamers
Land Raider Crusader with extra stormbolter

Pretty tame list. It's got lots and lots and lots of bolter shots (seriously, I added a stormbolter to an LRC). It should be a challenge to play against Tau, Eldar, TauDar, etc. I'd originally wanted to use a full 10-man Dev squad in place of the Terminators, but won't have the required bolter Marines painted in time.

Speaking of which, that is what is currently on my painting desk. I just finished my sixth Sternguard member (fifth if you don't count the one with combimelta I painted ages ago). I'm planning to take some shots using the proper lighting tonight. I am now working on bolter Marines to get to the point where I can run a true half-company of 3 Tacticals, 1 Assault, and 1 Devastator squad. I'd always been three bolters short of that goal.
I'm also still working on the base for my Hive Tyrant. I bought a bunch of Secret Weapon kits to spruce up the base (tree stumps, broken Doric columns, grass, turf, etc). I'm waiting for some small mushrooms I made out of Green Stuff to cure, and then it's on to applying sand. I filled an empty GW static grass tub with some of the wash down material from my driveway. Sand, pebbles, and rocks. I think I need to sift it a little though, as the larger rocks are a little large for my tastes. I'm still struggling with exactly how I'm going to glue the Tyrant to the base, as he's got that stupid little sculpted rock section under his tail. I can't glue him down and then sand, as I won't be able to prime the base with him on there. I think I'm going to have to trace around the connection point, apply sand/gravel, then fix up the edges of the hole before spray priming. Any major gaps can be lightly covered with grass or turf. It's the best option I can think of. With Marines, I just put a little section of plasticard where their feet go and sand around those. But doing so with the Tyrant would mean the little rock he's attached to would "hover" over the sand. I should have removed it when I started. Lesson learned.

I also primed and put a first coat of base color on five Genestealers. I'm pretty excited about getting on with these guys. They've been sitting on top of my paint rack for a couple months now.


9.06.2013

Tyranid Test Bases

Here are the two test bases I did up relatively quickly. The first is Liquitex Resin Sand mixed with an equal amount of craft paint. I then dry brushed it up through different shade of a brownish-grey, and added a bit of GW static grass:

The second is just craft sand painted in the same colors, again with static grass (but under different light):
 
For fairness' sake, here they are side by side under the same light:

I like them both, in their own ways.

The resin sand version comes out lighter due to having less small texture. It also provides a more three-dimensional look, depending on how much of the material you use, and how you pile it up. Little clumps of resin sand in one area make those little peaks and valleys you can see in the pictures. The valleys are where I intend to put static grass and small plants. It seems to be a pretty durable finish as well. I believe I can glue small plants right to the painted base in those low areas and make them look convincing.
However, the resin sand method is imprecise. I had no idea what the base texture would look like when I applied it. The binder in the material evaporates and shrinks as it dries overnight. I'm not sure how this would translate to a 40mm or 60mm base. I can try it out on a 40mm spare, but I don't have any 60mm junk bases to play with.
I'm also not sure how I could sink rocks and other items on these bases. The resin sand medium is sloppy and goopy. If I placed a cork rock in the middle, would I be able to make it look convincing?

The craft sand version is darker because I essentially soak the sand in the darkest color, and then dry brush those tiny grains up to light grey. However, plenty of the dark color still shows through. I can dry brush more of the lighter colors to reduce or eliminate that, but I've found that it tends to look smeared and shitty when you do so.
There is much more control with the craft sand, as I'm painting on white glue, and then covering it with the sand before painting. I can glue rocks and other items right to the base before glue and sand and it looks nice enough. I'm positive that I cannot glue small plants to the sand. I'd have to attach them to the base before applying glue and sand, which would require precision to avoid sanding the leaves of the plants. No one likes sandy leaves. The alternative is drilling holes in the base after sanding, poking the plants through to the underside, and then gluing them in place.

Affixing the models to either base is about the same. Add a small piece of plasticard to the base where the feet go, apply basing, then scrape away the paint and sand from the piece of card. Glue as needed.

What do you folks think? Resin sand or craft sand?
Does the grey color stand out enough from my green/brown Tyranid scheme, or should I consider another color set?
Obviously, these are quick mockups that I threw together. A finished base will have static grass and various scattered small plants to break up the grey. I'm not 100% sure how I'm going to make the plants, but my first though is to grab some cheap silk plants from the craft store, and then cut my leaves and stems from those, using the appropriate scale. Then I'd bind it all together with floral wire (I already have a reel of it from past projects) and glue to the base using that coiled wire. I think I could also break out the airbrush to quickly spray the leading edges of the leaves another color like a light green, teal, or crimson.


In slightly related news, there was a list of interesting rumors online regarding a new hive fleet "Karkinos." That's my fleet name, dammit! The rumors talked about how Karkinos focused on poison and gas. However, the rumor set was debunked this AM as fake, but it did get me thinking.
What if I wanted my entire Hive Fleet to be poisonous? Every Nid kit is packed full of toxin sac bits, and you can buy them by the hundreds from bit sellers for a song. Adding a toxin sac to every melee claw/talon/blade arm would be some work, but it would also give me a chance to break up the monotony of green with more little purple sections as I would paint the sac-looking pieces of those bitz to match the ribbed flesh I already use.
On the table, I'd simply require every model to pay for toxin sac biomorphs, even if it makes little game sense. Toxin on a Carnifex with crushing claws? Go for it!

Speaking of painting, I have gotten all of the base blue colors down on my fourth Sternguard model. I just need to line highlight his armor and I'll be ready to move forward to the details. I'll try to get a WIP shot up early next week. The new book is out tomorrow morning as well. Huzzah!


8.28.2013

At Long Last!


The painting of my Hive Tyrant is complete! Well, except for his base, that is.

Here are some assembled shots under terrible light:


Overall, I think he looks nice. He's not as stunning as I wanted him to be, as I skimped on reposing, resculpting, and conversion. As others have said, I should have started small with troops bugs instead of a showcase model. That would have allowed me to get my paint schemes down before applying them to a centerpiece model. I'd wanted to hack apart his limbs and repose them into a more fluid and dynamic pose, but was simply too logjammed to do so. It was a "if you don't start now, you'll never start at all" situation.

Despite that disappointment, I'm pretty impressed with what I've done, as he's my first fully painted non-Marine model since 2007. I had this crazy idea to start a WHFB Orc and Goblin army a few years ago, and finished the skin tones on ONE Orc before abandoning the idea, hence the "fully painted" qualifier.

The only obstacle left for this guy is a base. Last night I mixed together equal parts craft paint and Liquitex Resin Sand medium and slathered it on a spare 25mm base to see what it would do. This morning, it was dry but very glossy. I didn't get a chance for a picture, but it basically looks like shiny mud. I'm sure Dullcote would bring the shine down, but I'm not sure the effect would carry to a 60mm base, or even a 40mm base. Originally, I'd wanted a loamy, fertile earth base with tufts of grass (easily done with static grass) and some random stumps and plants. I don't want to use resin bases because I don't want to sink the money into them for a Nid force that may end up containing a lot of small models. Plus, I've not found anything so far that I felt really hit the nail on the head for a convincing jungle earth look.

Some Google searching shows some poorly done jungle bases where gamers have simply glued tufts of tall grass, aquarium plants, and vines all over the base with the model planted squarely in the middle. I'm thinking that less is far more in this situation. I'm not sure I can get plants and grass to look right on these muddy bases, but will have to give it a try. If that fails, I will probably have to go back to the basic sand bases I use for my Marines, but with a different color and more liberal use of rocks, grass, and plants.

I put half a second coat on my Sternguard Marine last night as well. The rumors regarding bikes as troops in the new Marine codex are contradictory. Some say you only get one unit, some say you get as many as you like. I'll wait the two weeks to see, and then decide how to proceed. Regardless, I'd like to finish this 5-man Sternguard squad as soon as I can.
The rumors are that Kor'sarro Khan and the White Scars chapter tactics will be spectacular for running a Marine Bike force. On one hand, I'm thrilled that Marine bikers will be getting a small shot in the arm, but I'm also dismayed that it's a chapter tactic. When I first saw the chapter tactic rumors, I swore I'd only every use the Ultramarines tactic while fielding my Ultras, regardless of build. The idea that I can run better bikes by simply selecting a different tactic makes that vow very hard to stick to. I've railed against people cherry-picking chapter tactics in the past, though my beef is/was more with Blood Angel and Space Wolf armies being run under the new Marine book rules. But, the opposite happened when those two books were released (Marines run as BA/SW), so I guess it wouldn't be totally hypocritical of me to use the White Scars tactics when wearing blue paint.
It's a decision I'll make in a couple weeks.

6.17.2013

Advice Taken

In response to my last post, I've taken the advice of some of the FLGS folks (Thor, who commented on the post, is one of those).

I've boxed up all of the sprues I have for Nids, and put them away temporarily. I cleared my desk of all Nid projects except the Tyrant, five Genestealers I already built, and one Hormagaunt. Now, I'm working on a way to batch paint five Troop models at once.

In the past, I've pondered how to properly mount the thin-legged/thin-ankled Nid gribblies. Genestealers have a single, small foot print that I can drill into very carefully and insert a thin pin for mounting. But, with a thin pin I'm concerned that it will spin in whatever holder I'm using. I don't have enough old Dremel chucks to hold five models securely! I'm thinking that I'll use wine corks instead. I've used them in the past for Marine parts, but found that the natural corks tend to not hold pins securely for very long. The soft natural fibers tend to expand as the pin shifts, slowly allowing it to spin.
I've got one synthetic cork I'm going to try out, and see how that goes. But, I'm also going to try mounting the pin at an angle, instead of straight down. Here's a quick MS Paint illustration:


I figure this should be enough to keep the pin from spinning around in the cork. I should be able to simply remove and reuse the pins from the models without removing them from the corks for each succession of five models.

Due to the wobbly nature of corks, I also need a place to hold them. I've got scrap wood in the garage, and the wife just bought me a new table saw for Father's Day. I figure I can rip a 2x4 down to about a foot long, and use a 1" boring bit to punch some holes in it. Set the corks in the holes, and it should be good to go. Much better than the hanging rig I made from a paint stirrer and some eyelets.

Some progress was made on the Tyrant this weekend. I got his shading wash applied, so I can move on to layer painting now. I'll have to get out my Paint Book, as I can't remember the succession of blends I used for the rest of his body. The Paint Book is just a big, blank book I got ages ago on sale at Borders. I've only used three pages of the 100+ it has, but it has helped immensely in my painting work. I jot down the recipes I use for certain things, like Scout Camo Cloaks or Tyranid skin. I also use it for standard measurements like Rhino top hatches, side doors, etc.

The Genestealers need to have the slotta tabs removed from their feet in order to have pins put in, and also some small gaps filled where their heads meet their necks. Stealers are a weird model. Tons of posability in arms, absolutely none in body, legs, and head.

The Hormagaunt also needs to have the slotta tab removed, as I simply can't think of a way to base an already-painted model. I'm extremely paranoid about getting basing paint or material on the already-painted Nid. I'm thinking that I can cut the slotta off, and then put a pin in between the Gaunt's legs. That way I can complete the base, and then just use the pin to attach him to it. Less ankle and leg breakage down the road as well. If I paint the pin black and hide it a little with some foliage or grass, it should be ok. It would also allow me to recenter the model on the base. Hormas are notoriously front heavy models that tip like crazy. I'll probably also cast up some of my base weights to keep them from falling over.

I think the small batch plan will help me stay motivated with Nids. The Tyrant really has gummed up the works, being such a major project. I'll still be picking away at him, but also attempting to churn out Troops models at the same time.

How do you Nid players store your models, though? Marines are easy, as they have very limited pose ranges and everything fits nicely in standard square tray slots. Genestealers and Hormagaunts, or any other spiky, taloned Nid is going to be a bitch to store. If the storage slot is too small, claws and talons snag on foam and ruin paint or break edges. Too large of a space, and they bounce around and get damaged. What are you folks doing for your Nid models? How about big baddies like Tervigons and Mawlocs?

2.28.2013

Tyranids are so much fun to build!

I've finally started piecing together some of my Tyranid models. My main focus is on my Hive Tyrant, but I'm also working on a Genestealer and a scratchbuilt spore mine.

The Hive Tyrant is a very cool kit. I have the upper body together, and it required a minimum of Liquid Greenstuff to look good. I really only used it in the little seams between the back vents. That upper shell is FIVE parts! Two vent outers, two outer arm sections, and the center core section. The mold lines are nicely placed so they don't interfere with assembly and are easily reached with a file and blade to clean them up.
The tail section is ELEVEN parts. The waist ball joint, two tail halves, the tail end, tail stinger plate, two legs, and two toes per leg. The two tail sections went together nicely, with a minimum of seams and mold lines. Since I used the long, curved, "flying" tail, I needed a clamp to hold the midtail section to the elongated tail section. Thankfully, whoever designed the kit had the forethought to place a couple of the spines on the seam line between the two sections, which helped immensely in lining up the sections for gluing. The assembled tail is now sitting on my desk with a bunch of Liquid Greenstuff along the joint lines. I'll file it smooth this evening, I hope.

I have to interject for a moment that my pot of Liquid Greenstuff is starting to dry out. I bought it the first weekend it was released, and haven't used it a ton. But, the center of the pot is becoming granular and semi-cured. I used to be able to use a nylon brush to pull a bit out and use it on a model, but now I have to get a flat toothpick or coffee stirrer and scoop the stuff out of the pot and put it on a piece of plastic. Then add water and it thins back out. Not sure I'll buy another pot when this one is gone. I've heard Privater Press or Vallejo makes an equivalent product in a dropper bottle. Might try that next. I've also heard that a slurry of Milliput also serves the same purpose and is easier to press into the seams. I used to use superglue or plastic glue drawn over the area, but those are messy and leave behind scars if you don't do it right.

As I waited for the tail to cure and set, I cleaned up the legs. The kit only allows you to use the standing legs with the standing tail, and the flying legs with the flying tail. You could do some joint pinning and sculpting to make the legs swappable, but the legs don't really look quite right on the wrong tail anyways. Because I chose the flying tail, I cleaned up the flying legs. Again, mold lines are minimal and the joint has a nice little nub in it to make it perfectly align on the tail. The tail section even has little sculpted in overlays for the joint that make the fit seamless and hide any lines.
Before I put the legs on though, I need some feedback. The flying legs are intended for use on a winged Tyrant. They have scything talons added to the end of the standard hoof-shaped foot. This makes it so a winged Tyrant is always WYSIWYG. The wings take up an arm socket, so no matter what secondary arm set you use, you always have at least one set of scything talons on the model. Because my model is not winged, and instead "leaping," I'm torn over the feet. I can either leave the feet as they are, or cut the talons off and go back to the hoof look.
This won't be a magnetized, optimized game model. It's intended as a fun, artsy project that I can enter into a painting competition (and maybe win). As a result, I'm arming him with two sets of scything talons, and posing him as if he's pouncing forward onto his prey. Picture a velociraptor, or any Wolverine attack pose, or the world's biggest Hormagaunt. Because he's ground-based, I'm thinking the foot talons need to go. He'd never be able to walk around with them, so I should remove them, right? Should I remove them, I'll likely sculpt something on the underside of the hooves. Maybe cut a little bit of thin plasticard and mimic the galaxy's weirdest horse hoof?

The Genestealer I'm working on hasn't made much in the way of progress since I pulled him off the sprue. I'm agonizing over two things: what to do with his slotta base, and if I should leap into the sculpted conversion arena right off the bat.
I have never used a slotta base in my life. On all my Marines, I've snipped off the slotta tab, flied the feet flat, and treated them like non-slotta models. I even did that to my metal models. I do this because I create my bases separately from the model. Gluing a model to a base feels like a major pain when attempting to add sand, paint, flock, etc. Marines have big, fat, chunky feet and legs. Tyranids have thin, whippy feet and legs. I think I can drill a small hole into the Genestealer's foot and lower leg to insert a pin by which to hold him during painting, but am not sure.
I have grand plans for my Genestealers as well, as I intend to hive them all tentacle faces. I've seen a bunch of examples of this done online, and really like the idea. My plan is to cut the lower jaw off of the head, sculpt the tentacles, and attach them to the upper jaw, using more GS to blend the transition so it looks natural. Essentially, they'll all look like Ymgarls from the codex art.
The question is whether I'm biting off more than I can chew. Should I start with a basic set of Stealers to start, just to get the hang of painting, or skip that and go straight to end product? My gut says start with the tentacles, as I have plenty of marine models to build and paint while waiting for tentacles to cure and glue to set.
How do you start off an unfamiliar project? Go for the desired result, or start with small test subjects first?

My spore mine is pretty rough at the moment. All I've done so far is cut a length of sprue, and chop the front off of three Gaunt spinefists. I then glued the spinefist parts to the sprue in a two-horizontal, one-vertical setup. I need to measure how tall I want the mine to be, and then insert a length of wire in the underside of the mine "head" area. I'll use GS to fill in the areas between the spinefists, making the gas sac part of the mine. Add some tentacles and a base, and done. Not at all time efficient, but it allows me to use up some junk bits and make nonstandard models.

I'll get some photos of all this work taken tonight, I hope. I've also got my first Sternguard model about 95% done as well, so you'll see him as well.

10.22.2012

How I Base Models

Every model in my army is based nearly identically. They all stand on a display board that is also based in the same manner. Here's how I base my models, as well as a brief review of the resin base I used.

The base was purchased from Iron Halo. It is their Generic Round Pill 65x90mm. They're reasonably priced, and fit attack bikes perfectly. I've found that other companies attack bike bases are either too large or too small. These fit beautifully and leave some room for basing decoration.
Iron Halo is a small family operation in New Zealand.

The bases come pretty standard from the shop.

Very smooth, and a minimum of air bubbles. The air bubbles that were present were pinprick small, and can be safely painted or glued over.
As always with resin, be sure to wash the bases in cool, soapy water before attempting to use them. I didn't notice any mold release agent on the bases, but better to clean them up just in case.
After the bases are clean and dry, I set an attack bike on the blank base and sketch carefully around the tires with a colored pencil. You can use a regular pencil, marker, or whatever you prefer. You're just getting the general location of the tires down.
I then cut small squares of plasticard and glue them to the center of each tire area on the base. This makes sure the bike doesn't look like it's sinking into the sand. A valuable tip from From the Warp (in the blogroll, to the right).
I also draw around the perimeter of the open spaces available for basing. This ensures i don't glue rocks or bitz under the body of the bike, which is both pointless and can prevent the bike from being glued to the base.

The next step is to grab a bottle of white glue, a cheap brush, and your base.

Pour out a good amount of white glue onto a smooth, disposable surface. I like to use the inside of a blister pack. Load the brush with a bit of water, and thin the glue ever so slightly. Then start slathering it onto the base, being sure not to drown nay of your detail bitz.


You then want sand. I have a pound of craft sand that I got for a dollar at the craft store several years ago. It's a lifetime supply. One pound will last forever. I then filled a plastic squeeze bottle with sand. It's a cheap bottle from the candy making section.


Pour the sand liberally over the base, making sure to cover every bit of glue.


Let this sit overnight. Doing so ensures the glue is completely dried before you start working with paint. After your overnight wait, you can pick the base up and knock off all the loose sand. Tap the underside with your fingers for a while to get any loose grains off the base. Pour the sand back into your bottle.


You'll invariably have some grains of sand glued to detail pieces and the lip of the base. Gently pick them away using the tip of a hobby knife, a toothpick, or other pointed object. For the base lip, just use your thumbnail to peel away any bonded sand. Be careful not to get too close to the base top, or you'll have small gaps at the edge. If you have good eyes, you can spot such a spot at the leftmost edge of the base above.
Now to start painting.
I first apply a very liberal coat of Reaper Master Series Muddy Brown.


I do mean liberal. You need to cover every grain of sand to make sure it tints to the correct color and hides the base from showing through. While you're at it, go ahead and cover the detail bits as well. it makes them easier to paint in the following steps.
Let this dry for a few hours. Do not attempt any further steps until this coat is 100% dry, otherwise the glue will not have reset (the thinned paint softens it temporarily) and it will pull off when you drybrush.
Once the paint is dry and the glue recured, I apply a heavy drybrushing of RMS Leather Brown.

Follow that up with a lighter drybrush of RMS Amber Gold. (Autolevels altered the following photo a tad too much).

Paint your detail bits. I used RMS Shadowed Stone, Stone Grey, Weathered Stone, and Leather White for my rocks; Stained Ivory, Yellowed Bone, and Creamy Ivory for the skull. The chainsword was done with black and silver and GW washes.
Paint the base rim your desired color (I always use black craft paint), and seal the base. After sealing, apply any static grass.
The result:

A nice, neat base.