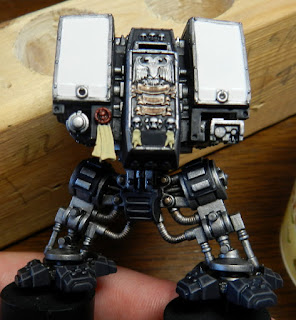
Here's the current painting progress on the Raven Guard Venerable Dreadnought:
He's nearly done. You can see that I left his shins off for painting. You can also spot a small dot of silver on his left thigh area that needs cleaned up. I used Runelord Brass on small details like bolt heads and ribbed cables, washed it with Devlan Mud, and then touched it again with Ironbreaker because it looked too flat. It breaks up the monotony of silver nicely.
I'm supposed to use this model in a is weekend, so I'll probably concentrate on decals and final details like lenses and targeters next week.
In order to get him table-ready, I also started work on his base. I use a flagstone style base scheme for my Raven Guard, and I covered the process I used to make the first bases HERE.
The first step for the Dreadnought base was to slather the whole thing in plastic glue and start slapping down carved squares and scraps.
The scraps are left over from building my original 32mm bases and the base for my Leviathan Siege Dreadnought. All the overhangs are very intentional in order to get a more random placement of the center flagstone on the base. The overhangs go away when I turn the base over a couple days later and use an Xacto knife to trace around the top edge. This scores the plastic and allows me to snap the overhanging parts off. Those scraps go in a bag for later use. The result is here:
After snapping the overhangs off, you angle your knife and carve the flagstone texture into the edges. You can see some of the little curls of plastic produced by this process in the picture above.
The final step is to add bits, rocks, and sand. I have a bin full of random offcuts from which I pulled that skull-arch thing (I believe it came from a 40K scenery scrap), and obscured by the glare in the upper left are two resin skulls from Secret Weapon's "Sack 'O Skulls". Those are top-notch quality, and I highly recommend them.
The bits get stuck on with superglue, and then I use PVA glue top make little puddles where I want rocks and sand. I randomly drop small rocks into the puddles, and then cover the remainder in sand. Both materials came from the springtime washdown at the end of my driveway. That's the little piles of sand and dirt left in the drive by the melting snow.
I try to focus on wonky areas of the base for rocks and sand, like the corners of the center flagstone. I got lazy and didn't carve it up enough, and so it looked too sharp and geometric. The rubble obscures that and solves the problem.
The base is now sitting in my garage, waiting for the primer to dry. I'll paint it tonight during the Bruins game.


Man, I love Dreadnoughts, and yours is looking great.
ReplyDeleteYou're going to decal the blank shoulder fronts I take it?
Thanks. They're some of my favorite models in the Marine range as well.
DeleteYep, I put decals on those big, white spaces.