Another small update. I've primed the Scout models, considering the modeling done. I was debating holding off until I decided upon a base theme, because normally I attach models to bases after they're painted using small strips of plasticard to mark foot position and then gluing sand and objects around those strips. That typically involves tracing around feet with a colored pencil, etc. But for my Raven Guard, I decided to try a different basing method. I'll be doing a ruined city base style, with very large, slab-style pavers and tumbled debris. I don't need to deal with strips of card and pregluing for that.
Anyhow, I have started on the skin for these guys. As many of you may know, Raven Guard have pale, paper-white skin. They don't go full-on alabaster until some time after geneseed implantation. It's perfectly normal for Scouts to have pinkish skin. So, I decided all of mine would be "rookie" Scouts with pinkish skin. This not only provides me the chance to work different skin techniques into the army, but also delays the need to figure out how to paint the more mature Marines' skin.
To start, I applied a bunch of thin layers of Reaper Master Series Fair Shadow. This is the darkest color in the Fair Skin triad (Reaper sells their Master Series paints in three-color sets, for those not in-the-know). It took anywhere from 3-5 coats per model. You can see here what only a few coats looks like, leaving a bit of grey tone on the flatter areas of the face.
Once that was dry, I applied a very thin wash of Ogryn Flesh to the whole face. I put a bunch of Ogryn Flesh on my palette, and then thinned it out with Winsor and Newton Acrylic Flow Improver. This gives a pinkish hue in the recesses. If you don't dilute the wash, it just stains the light skin color a reddish color. You can do that, and just come back up to the Fair Shadow color, but it's a bit of a waste of time and effort, and you can end up with very stark pink lines around the edges and in the facial creases.
At this point I stopped for the night to let the washes dry thoroughly. If you keep poking at them you end up softening and removing the paint underneath, and repairing the holes can be a pain depending on how many layers you damaged. The next step will be to touch up any overly pink areas with more Fair Shadow, and then move on to the next color, MSP Fair Skin, and then highlights of Fair Highlight, which is nearly white.
I have no idea how I'm going to paint these guys' eyes. The eyeballs are so poorly defined on the models once you've primed and painted them, that it's really tough to paint them so they don't look wide-eyed and fearful, or cross eyed. I know HOW to paint eyes, just not on Marine faces.
I have also been poking away at other projects and models. Here are a couple WIP shots of my Ultramarine Librarian. I tried using darker blue for his armor, to make him stand out from the other Ultramarines. The shoulder pad shot is intended to show the tone difference. I did miss the brown basecoat on the shoulder pad rim, and yes, that is a magnet sunk into his back. I'm taking the backpack magnet plunge so I can use him with a jump pack or on foot!
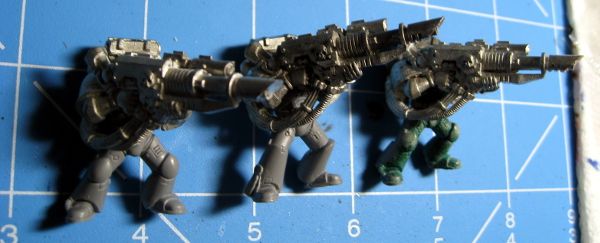
I also got bored and assembled some lascannon Marines usable as part of a Devastator or Tactical Squad. Missile launchers just don't cut it in the modern "AV13 and 2+ armor everywhere" world of 40K. I'm using old, metal lascannons and salvage-quality bodies/legs/heads. The metal cannons aren't all that hard to assemble if you do so in the correct order and with the correct glue. I use Loctite Ultra Gel Control super glue. Assemble the backpack to the body, then the gun to the torso by applying glue to both the stump of the power feed on the pack and the arm joint. Press the power cables of the cannon against the stump on the backpack, and then the shoulder to the torso joint. Hold it in place for several minutes, and then attach the support arm by applying glue in the wrist socket and the left shoulder joint. Press the wrist into the socket on the cannon, and then the shoulder to the torso. Hold, and you're done! I also recommend leaving the head off the model until after the lascannon is fully assembled, to make sure it's not at an angle or pose that would prevent the cannon from seating properly against the shoulder joint. The models are wobbly and tippy, but putting them as far back on a base as you can helps mitigate it a little. 32mm bases would help a LOT.


I'll have to do the thinned out flesh wash. For some reason thinning out a wash never occurred to me. Anyway, good start so far.
ReplyDeleteI've been making a return to lascannons also. It's one of my favorite weapons but I rarely use it with Chaos, beyond Obliterators. So I'm doing the same and working on getting some lascannon units ready for the table as well. I just like having a weapon that could pop a vehicle in a single shot.
You have to be sure to use flow improver, acrylic medium, or the Lahmian Medium stuff from GW. If you use plain water, it ruins the wash and just produces tide lines.
DeleteGotcha. Good to know. I do have the GW medium and it's proven super useful.
Delete